PayCart is a new Joomla 3 e-commerce extension from the team at ReadyBytes.
Good shopping carts are always hard to find. In Joomla, we currently recommend HikaShop, but that comes with hundreds of different options.
So, we were excited to test PayCart which presents itself as a very simple, easy-to-use shipping cart. Here's our review of PayCart.
Download and install
Go to the PayCart website and sign up for one of the available plans in order to download the extension.
Once you download the installer:
- Go to Extensions > Extension manager > Upload package file
- Browse for the PayCart zip file and select it
- Press the Upload and Install button
Then access PayCart from Components > PayCart
Apps
To add payment gateways such as PayPal, Stripe and other features, you need to install "apps", which is a slightly different approach to Joomla plugins.

- Go to the App Store menu on the left
- Login with your Ready Bytes account
- Install the apps you need
- Click the back button when you're done
Payment gateways
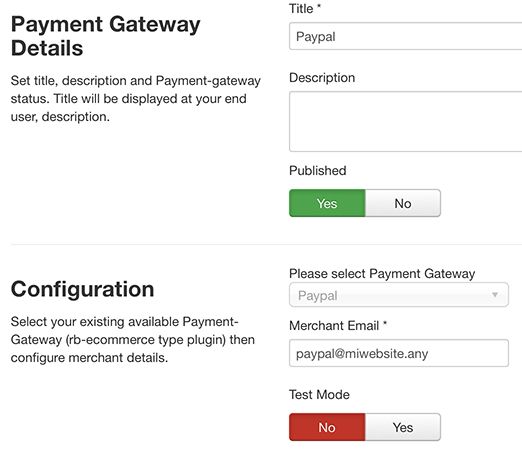
Go to Settings > Payment gateways > New
- Payment gateway
- "Merchant Email" is the PayPal account where you'd like to receive the payments
- Test mode. Enable or disable depending on your needs
- Save when you're done
You can do other configurations inside the Settings menu to define company details, shipping rules, discounts, tax, countries and more.
Categories
Adding products and categories is really easy. PayCart avoids overcomplicated settings and has a clean UI; you only need to worry about the basic details.
- Go to Catalogue > Categories > Add
- Type the name
- Save and close
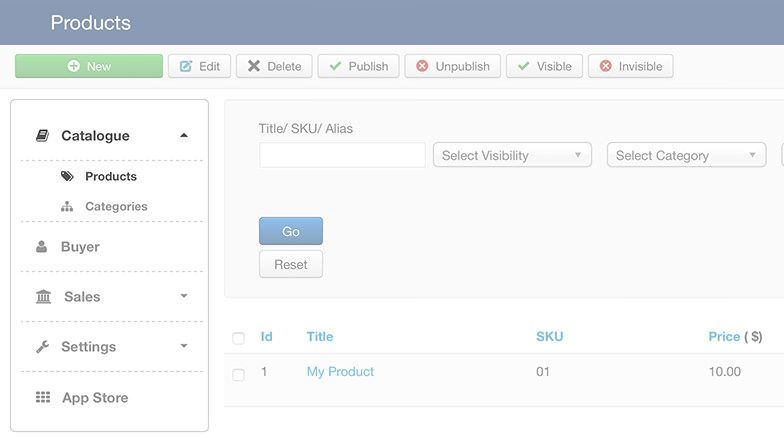
Products
- Go to Catalogue > Products > Add
- Type the title and category
- Scroll down to set Pricing & Inventory
You can also set meta data and weight & product dimensions. Both are optional but worth considering.
In the Custom Attributes tab, you can add more details. Click the Create attributes button to add color, header, radio or select.
When you’re done, save and close.
Finally, drag and drop the new attribute to the left side.
Menu items
By default, PayCart creates a new menu located in Menus > Cart Menu that includes sample pages.

You can create or edit those pages:
- Go to Menus > Your menu > Add new menu item
- Menu item type: PayCart > choose one of the available options
Strengths
- Clean design. This is the best backend for an e-commerce extension. In addition, the frontend uses bootstrap, which adds responsive support for any screen size.
- User friendly. The installation and configuration is easy. Get the features you need without complicated processes.
- App store. Manage extended features from the component with a couple of clicks. Forget about worrying about checking plugins like you do with other regular Joomla extensions.
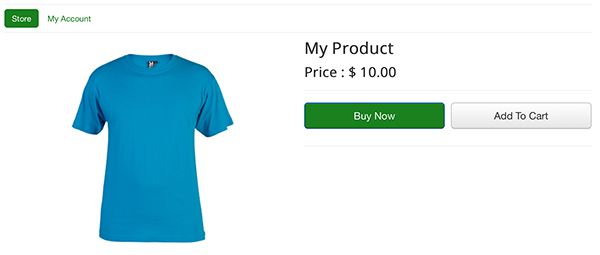
- Multiple images. Add more than one image to your products easily. The images will rotate automatically inside a slideshow in the public area.
Weaknesses
- Bugs on a a local server. I noticed a couple of small bugs by using PayCart in a local environment, however once I moved the project to a live server, those issues were solved.
- Store size. The component is ideal for a small catalogue, and possibly it could work for a medium sized one, however big stores would likely need more flexibility.
- There is no free version. We used to think every great extension should have a free version with the basic features, sadly this is not the case. You will need to but a membership.
Final Thoughts
During the whole process of writing this article, I didn't have to read the documentation. PayCart is that easy to use!
The menu in the backend is limited to a small list of sections to configure and maintain an e-commerce site. For inexperienced users, this will help reduce the feeling of being overwhelmed by tons of links and options. For more experienced users, PayCart will very easy to use.