The Flash Image Rotator is one of the most popular tools around. It enables you to set a number of images to rotate, at a speed you specify, through a module position on your site. It is a fantastic way to display multiple images without having to use up a lot of space on your page.
The Image Rotator is an extension that gets published in module positions. Once you have installed it, all you need to do is upload the images you want displayed, customise your Rotator, and publish it in a module position. This guide will teach you how to customise and publish your Rotator, after you have uploaded the images you wish to display into a folder in your Media Manager.
Setting up the Image Rotator
1. Login to the backend of your Joomla site.
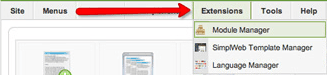
2. Go to the Module Manager under the 'Extensions' tab, as shown below.
3. You will have the Image Rotator available if you have already installed the Rotator. Find the Image Rotator, select it, and click 'Edit' in the top right corner, as in the screenshot below.

4. You will now see the familiar editing screen for modules. The editing screen for the Image Rotator is slightly different though, and it is extremely important to get all of the settings right. Important fields to note are: enabling the module, the module position, the menu assignment, and most things in the module parameters. The Image Rotator screen is pictured below, with the important fields highlighted by arrows.
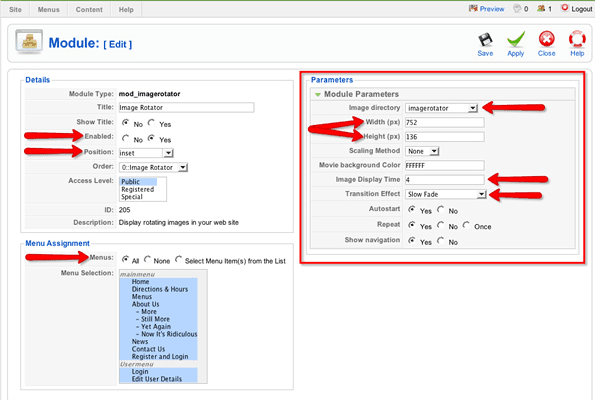
5. Set your Rotator module to be enabled, and place select the module position where you would like it to be displayed. We also recommend setting your title to be hidden.
6. Select the menu items under which you would like your Rotator to be displayed.
7. Now switch your focus to the Module Parameters box. First you will see a field for the image directory. This field determines the directory within your Media Manager from which the images will be displayed. The Image Rotator will cycle through all of the photos in the selected directory, so make sure you set this directory to be the one in which you will store your Image Rotator images.
8. Next you will see a field for height and a field for width. These fields determine the dimensions of the Image Rotator, and so they determine what dimensions the images you display should be. Putting a 900x400 pixel image into a rotator set to display at 700x200 pixels will break the rotator display. Make sure you resize your images to match the dimensions you specify in this field.
Another thing to be careful of is breaking the module position into which you place your rotator. If you set the rotator to display at 1000x800 pixels, you will break most modules because the dimensions will be greater than the dimensions of the module positions themselves. The rotator dimensions are the trickiest thing to get right, and it will likely take some trial and error to set these fields up properly.
9. The Image Display Time field determines for how long an image displays before rotating to the next image in the directory, and the Transition Effect determines the style used when it rotates. Set these fields to your preference.
10. Finally, you will see options for how your rotator triggers, whether it repeats its cycle, and whether shows navigation. We recommend leaving these to their default settings. When you are finished with the Module Parameters, click 'Save'
11. Your Image Rotator will now be up and running, but until you upload images to the directory from which it is pulling them, it will not display anything. The final step is to upload all of the images that you want your rotator to cycle through. Put them all into the directory you selected in the Module Parameters, and your Image Rotator will now be rotating through all of these images!