Gantry is a very popular design framework that is available for both Joomla and WordPress. It is built on a 12 column, 960 Grid System layout (you can find out more about grid systems here).
All Rockettheme templates and themes are now based on Gantry because it offers a wide-range of features that don't have to be re-written for each design. Because of this, not only Rockettheme, but also quite a few independent designers use Gantry to speed up their work.
Overview of this Gantry Tutorial
We're going to keep it simple to start. In this tutorial we are going to show you:
- Exactly what you should be downloading then uploading to your site
- How to set the number of modules per row
- How to turn off the logo position
- How to place a header graphic into the site
You can get the framework at https://gantry-framework.org/
As of this writing Gantry works with both Joomla and WordPress and they are soon to release a Drupal version. In this tutorial we'll use Joomla as our example.
A big advantage to using this framework for Joomla users is in migrating from 1.5 to 1.7. If you have a 1.5 site and you've used Gantry, You will be able to migrate it to any other Gantry based theme without modifying module positions or CSS - unless you want to. RocketTheme uses Gantry on all their newest themes, and changing from one of their designs to another is a one-click operation.
Since all the positions and position names are the same in both WordPress and Joomla, this will also simplify both matching a design if your use platforms and also cross-platform migrations.
Step 1. Downloads
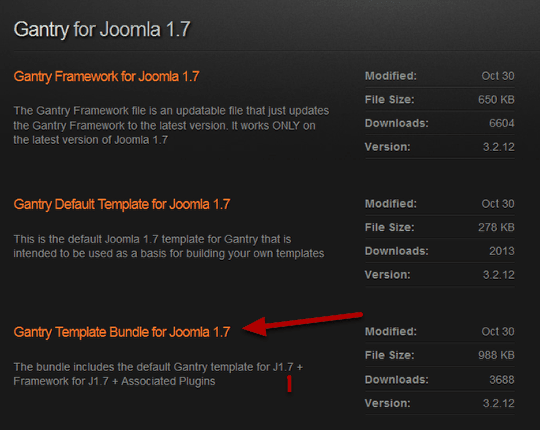
When you get to the Gantry download page you will be faced with different options for each version.
Recommended for:
Custom Developer - The Framework - Gantry is a framework. It exists independently of the theme. If you want to design your own theme from scratch, or you have purchased a Gantry compatible theme, you only need to add the Gantry Framework. You will need a separate template and possibly some add-ons for menus.
Custom Developer - The Template - Gantry isn't a template, but you have to have template or you won't be able to see anything. The Gantry template doesn't work without the Framework. Just be sure to get the Framework first, then you can use the basic template as a guide and modify it to your liking.
Most people - The Bundle - The bundle includes the Gantry framework, the Gantry template, plus some additional plugins. You can't hurt anything by installing the bundle, so it's the best choice.
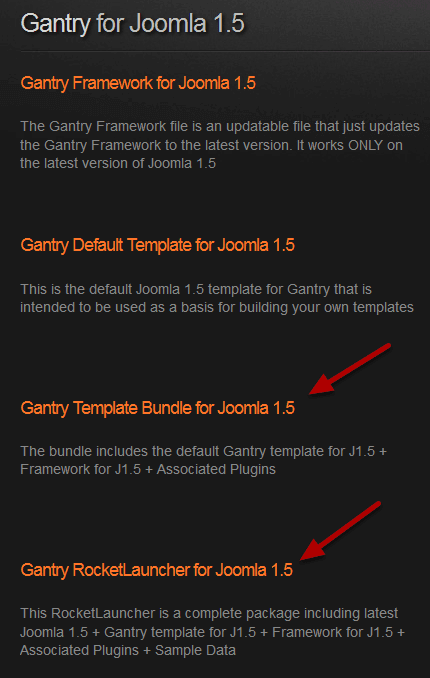
The options here are similar.
You can download the template and the framework separately, but the bundle is the most logical download.
The Gantry Rocket Launcher is a complete installation of Joomla 1.5, the framework and the template plus some additional plugins you'll need like Rok Menus. Sample data is also completely installed. So if you're experimenting, this is a good choice, but not necessary.
Option 1: Installing the framework on an existing site
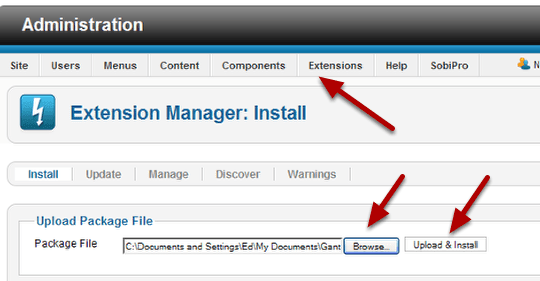
Go to Extensions > Extension Manager > Browse > Upload and install as you normally would.
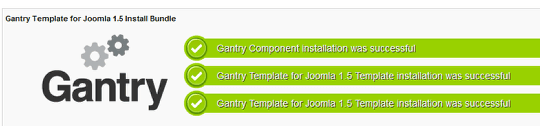
You will get confirmation messages. If you get an warnings, deal with them at this point. You can get support from the Gantry site. I have done about 10 installations and upgrades and have not encountered any warnings so far, it seems very reliable.
Option 2: Installing with the RocketLauncher
For this you want to start with a clean directory. If you install in a directory with an existing installation it will overwrite it. To do the installation
- Create a directory or account for your site.
- Upload the entire zip file to your root directory.
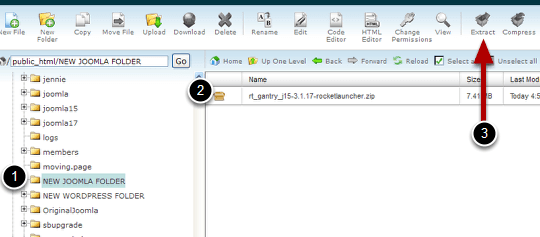
- Use the your hosting control panel file manager (or the command line if you know how) and extract the compressed files.
Here's what you would do in cPanel. Yours may look different.
If you don't have access to a control panel, you might try extPlorer, which installs in Joomla, and gives you file management capabilities.
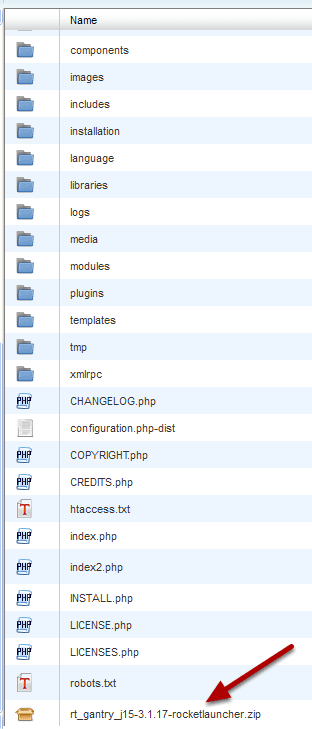
After extraction you will see the Joomla folders installed. You can delete the original zip file if you want.
Go to your cPanel and create a data base. Review our basic Joomla Class Video if you need to brush up on manual installation.
Now go to your url (in this case it would be https://mydomain.com/NEW JOOMLA FOLDER) and go through a typical Joomla installation.
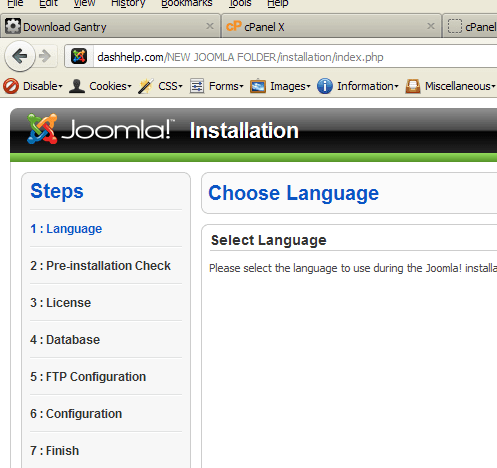
Follow the steps for a normal installation.
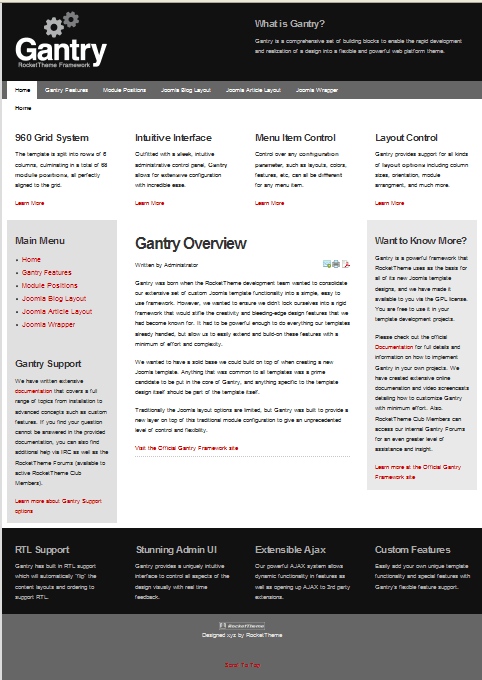
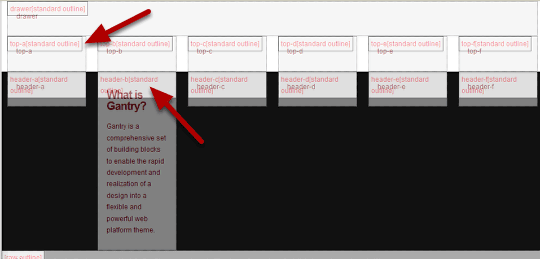
The template only shows 6 rows out of 16 (or 14 depending on how you count the mainbody and sidebar sections.) and 4 columns out of a possible 6. We have marked those positions on the image below. The full range of module options with Gantry is far greater, as you can see.
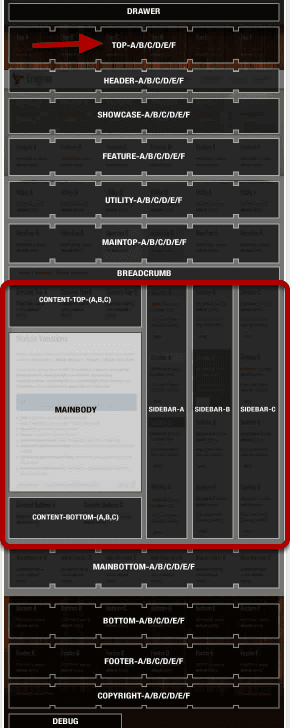
The rows each have names, and the columns each have letters. The exception is the mainbody section. If this were a table in html, you would say that Content Top, Mainbody and Content Bottom span 3 columns while Sidebars A, B, and C span three rows.
Using Top as an example. In the top row there are 6 possible module positions that take up the 960 pixels allowed for the site width.
- Top A
- Top B
- Top C
- Top D
- Top E
- Top F
Each row has the same columns. So Bottom, for example, would have Bottom A, Bottom B, Bottom C and so on. There are a couple of special rows that don't have six positions: Drawer, Breadcrumbs, and Debug. Advanced users can add rows or delete rows from the grid, but we're going to learn to use the template manager to get what we want.
Adjusting the column widths and number of columns
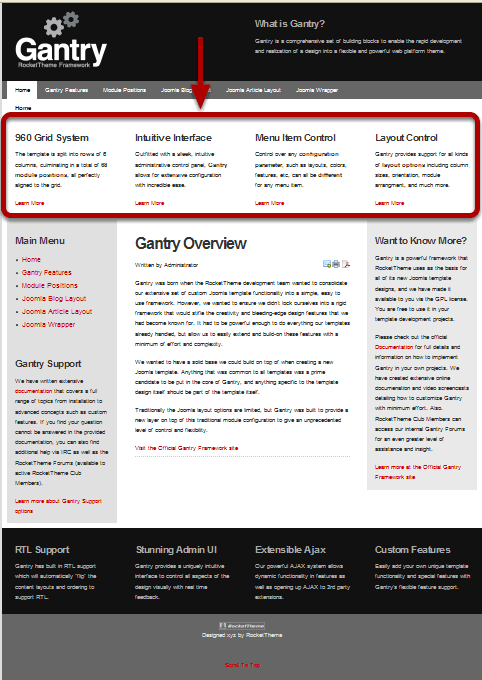
The red square highlights the "showcase row." You might be wondering why only 4 columns show, when there are 6 .... A,B,C,D,E,F?
There is a control in the Template Manager that allows you to choose how many positions you want to publish. In this case 4 were published, and the control also gives you the ability to space them evenly. A simple slider lets you make the choice as in the image below:

In the template administrator there is a Layouts section, part of which you can see above. Notice that It says I have 4 positions published, indicated by the boldfaced 4, and the letters a, b, c, d showing in th boxes. It also shows it in the note on the right. You just can't see it because I've moused over the control, and 3|3|3|3 pops up. The 3|3|3|3 shows you the proportion of the space allotted to each published position. In this case all of them are equal.
Let's move the slider and see what happens.

I've moved the slider all the way to the right. You can see a representation of the columns in the boxes. Position a now has the lion's share of the row. I don't really need to know the exact proportions because I can visually see the allocation of width.
Here's what it looks like after you apply the change.
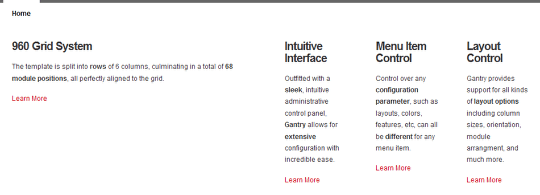
Now you can see what position "a" lookslike on the site. Position A, has the biggest share of the page, and B, C, and D share the rest equally. Play with the slider a bit and observe changes and you will soon have a good idea of how this control works.
Try changing the 4 to six or two, see what happens.
Adjusting the Main Body Positions

This row is a little different because the sidebars span three rows. You could consider this one row or three.
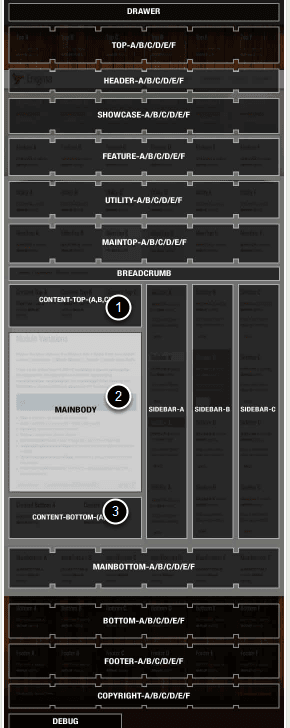
There is a way to turn of this section so it doesn't appear and you have no sidebars or Mainbody content. It's not hard. We'll mention it in Step 8 below.
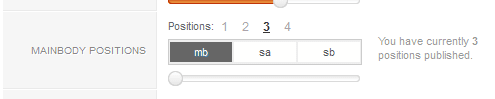
Here I have 3 positions published out of a possible 4. If I chose 4, there would be mb (the main body content) and three side bars instead of two.
Notice that moving the sidebar all the way to the left, moved the body content to the side and put both sidebars on the right. You control the position of the sidebars with the slider. You also control the width of the main body content. Now the mb and the sidebars are all equal. Playing with the slider you can com up with different width combinations.
Here's how this looks on the sample site.
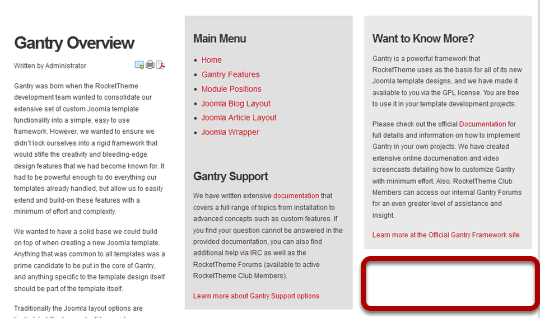
Main body content is now on the left with two sidebars on the right, all of equal width. If you check the original picture in Step 5, you'll see the difference.
The length of the content in a column is determined by the amount of content. You would control it by carefully choosing image sizes, and placing the "read more" link in a place where the content breaks at about the same length if you want them to all appear even. Or you could enable another module, for instance, under "Want to Know More" to use as a filler if you don't like white space. The possibility also exist for custom CSS.
Putting more than one module in a single column, stacks them up, so you could make a filler for the white space, to even out the columns.
Turning Features On and Off
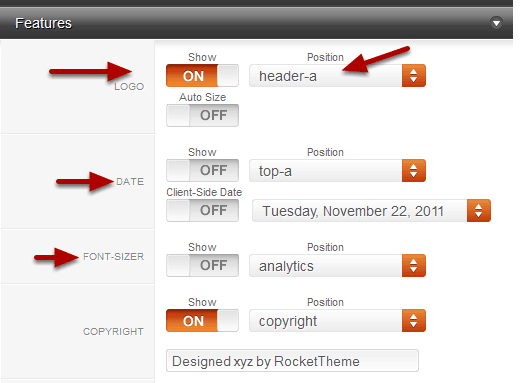
There are some built in features like the date, the logo position, font-sizer and a few more you'll see in the Features panel in the template administration.
The default is to have the Logo "ON". by clicking it you can turn the logo off and leave the "header-a" position open for your own content or logo.
Alternately you could leave it on and replace the Gantry image with your own the way you do for other templates.
You can even move the logo feature to a new position if you don't want it at the top.
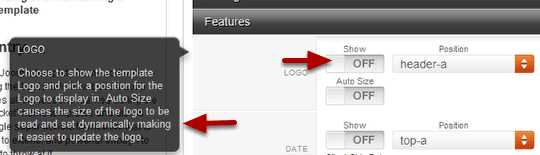
Here' I've turned off the logo feature. You might be wondering why you have it at all. The pop-up tool tip explains it. The logo feature automatically resizes the logo for you so you have one less thing to deal with. Kind of handy.
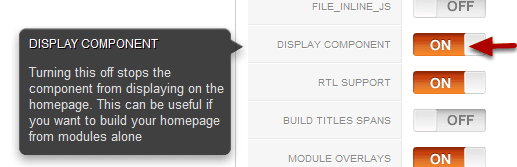
Further down the menu, there is an Advanced panel, and the control for turning off the Mainbody Display is there.

With the logo section turned off, the logo disappears. However, the other module positions that have content are still visible. There was text in Position B, and it has expanded to the full width of the page. I could delete it, or disable the module that appears there to get rid of it. I'm going to leave it there But that means I'll have to find another position to place the banner I made.
Upload a banner to the top of the page.
Type in https://yourdomain.com/NEW JOOMLA FOLDER/?tp=1 and the /?tp-1 shows you the module positions that are available. You can see that the "Top" row is empty. It's the one above the "Header" row. I have a choice, I could put it in Top or I could put it in Header A, but there is a potential conflict in the Header row, Header B is not empty. Instead of deleting the module placed there, and since my banner has a white background, I'm going to put it in Top A.
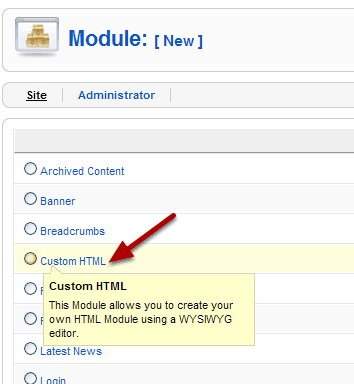
Go to Extensions > Module Manager and add a custom HTML module as you would in any other template.
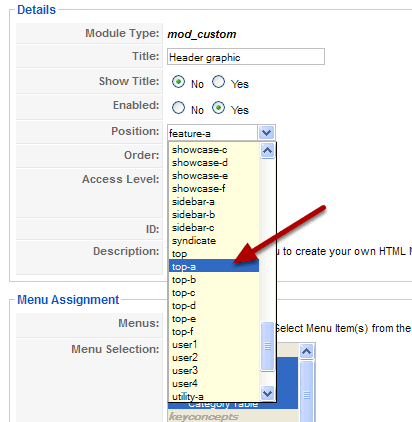
Select top-a as the position.
Now you have a graphic at the top of the page, header B still has the text, and you've adjusted the column widths on the Showcase row back in Step 6 . Since you didn't put anything in Top B,C,D,E or F, position A expands to take up the entire width. If you put content in another column on the Top row, you'll have to create a new picture to be the correct size or the modules will overlap or not show correctly.
No matter which Gantry enabled theme template you switch it to, everything will stay in the same place. Just the design will change.
There's lots more you can do even with the basic Gantry template. You can change colors and typography, including assigning a different layout to individual pages, and much much more. At a more advanced level you could actually code the positions and create new rows that don't come with the basic template. You'll find documentation on the https://gantry-framework.org website.
But with the basics you have just learned, you should be able to find positions for everything on the home page. From there you'll soon be doing your own layouts.