JForm is one of the most exciting new features to be introduced as part of Joomla! 1.6. The intention is to provide XML configurable forms complete with custom field types and form validation. I cannot stress enough just how much easier this is going to make life as a Joomla! developer. In this article we take a look at how to define JForms and how to display them.
The JForm concepts
There are three important concepts to understand in JForm: groups, fieldsets, and fields. Groups are the highest level concept, they enable us to group fields and fieldsets into, you've guessed it, groups. Fieldsets bring together common fields, and should be thought of in the same way as HTML fieldsets. Fields describe individual form fields. When defining fields it is important we only define one field with a given name per group (not fieldset). The example below illustrates these concepts.
<?xml version="1.0" encoding="UTF-8"?>
<form>
    <fields name="myGroupOfFields">
        <fieldset name="myFieldSet">
            <!-- Fields go here -->
        </fieldset>
        <fieldset name="myOtherFieldSet">
            <!-- Fields go here -->
        </fieldset>
    </fields>
</form>
The way in which I have found best to use these concepts is easily described when considering a standard edit page in Joomla!. In the page mock below it is easy to identify fields based on fieldsets and groups.
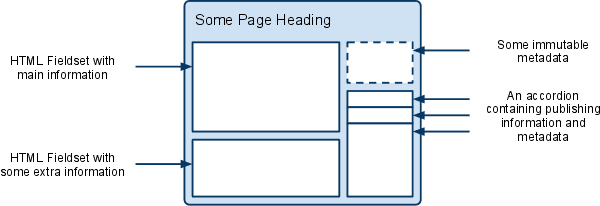
The first group is to the left hand side and contains two fieldsets, this area in Joomla! often consists of a single fieldset but there are no reasons why we cannot have more. The second group is to the top right and consists of a single fieldset, we often come across these on edit pages in which some useful immutable metadata is displayed, such as who created the item we are editing. The third group is the accordion to the lower right in which each pane is a fieldset. Using this definition our XML structure would be similar to this:
<?xml version="1.0" encoding="UTF-8"?>
<form>
    <fields name="main">
        <fieldset name="primaryfieldset">
            <!-- Fields go here -->
        </fieldset>
        <fieldset name="secondaryfieldset">
            <!-- Fields go here -->
        </fieldset>
    </fields>
    <fields name="immutable">
        <fieldset name="metadata">
            <!-- Fields go here -->
        </fieldset>
    </fields>
    <fields name="extra">
        <fieldset name="publishing">
            <!-- Fields go here -->
        </fieldset>
        <fieldset name="metadata">
            <!-- Fields go here -->
        </fieldset>
    </fields>
</form>
Notice the groups are not named relative to their position on the page or the way in which they are displayed. For example, rather than naming the group which appears in the accordion as accordion, they are named extra. This is purposeful given that templates can override layouts and present things in different ways.
Defining JForm fields
Defining fields in JForm XML files is very similar to defining params for JParameter XML files. In fact in Joomla! 1.6 JParameter is still alive an kicking, and a great deal of effort has gone into ensuring consistency between defining fields for JForm and params for JParameter. We will take a look at three of the more common types, starting with a text field. The example below describes a text field called myTextField.
<field
        type="text"
        name="myTextField"
        id="myTextField"
        label="MY TEXT FIELD LABEL"
        description="MY TEXT FIELD DESCRIPTION"
        size="80"
        maxLength="255" />
The type attribute is required, and is used to determine what type of field we are describing. The name attribute is also required, this is the name used to pass the input data to the server. A little surprisingly, the id attribute is not required. If we do not specify an id the name will be used.
The label attribute is the user friendly label displayed HTML label, and the description is used in the title attribute for HTML label. The values in these two attributes are translated by JText, hence the reason the values in the example are in uppercase.
The size and maxLength attributes are specific to the text field type. They define the display size of the field, and the maximum length of any value entered into the field.
Now let's define an editor field. This is a surprisingly easy field to define.
<field
        type="editor"
        name="myEditorField"
        id="myEditorField"
        label="MY EDITOR FIELD LABEL"
        description="MY EDITOR FIELD DESCRIPTION"
        rows="5"
        cols="200"/>
In the example we see much the same format as for the text field. We have a type, name, id, label and description. In addition to these we could also have specified, rows, cols, height, width, buttons (true/false or specific button names as a list) and hide (list of specific buttons to hide).
Now for a slightly more complex field type, radio. When using this field type we must also define the radiobutton options. This is achieved using elements, much as you would when using JParameter or plain old HTML.
<field
        type="radio"
        name="myRadioField"
        id="myRadioField"
        label="MY RADIO FIELD LABEL"
        description="MY RADIO FIELD DESCRIPTION">
    <option value="0">YES</option>
    <option value="1">NO</option>
</field>
At the time of writing there are already a great many field types. For a complete list take a look at libraries/joomla/form/fields. If you cannot find a suitable field type, similar to JParameter/JElelement classes, it is possible to define our own JForm fields by extending the JFormField class. Back to our example, we now get to bring everything together.
<?xml version="1.0" encoding="UTF-8"?>
<form>
    <fields name="myGroupOfFields">
        <fieldset name="myFieldSet">
            <field
                    type="text"
                    name="myTextField"
                    id="myTextField"
                    label="MY TEXT FIELD LABEL"
                    description="MY TEXT FIELD DESCRIPTION"
                    size="80"
                    maxLength="255" />
            <field
                    type="editor"
                    name="myEditorField"
                    id="myEditorField"
                    label="MY EDITOR FIELD LABEL"
                    description="MY EDITOR FIELD DESCRIPTION"
                    rows="5"
                    cols="200"/>
            <field
                    type="radio"
                    name="myRadioField"
                    id="myRadioField"
                    label="MY RADIO FIELD LABEL"
                    description="MY RADIO FIELD DESCRIPTION">
                <option value="0">YES</option>
                <option value="1">NO</option>
            </field>
        </fieldset>
    </fields>
</form>
Displaying a JForm
Now we have a JForm XML file we can load this into a new JForm object, ready to display. Like many Joomla! classes rather than instantiating JForm ourselves, we use a static getInstance() method.
// get the JForm object
$form = &JForm::getInstance('myform', $pathToMyXMLFile);
When calling this method we pass a unique name to the method. Instances of JForm are cached based on this name. If we were to call this method a second time with the same name, we would retrieve the already instantiated JForm object.
The next step is to display all of our fields. In a typical Joomla! MVC component, we would do this inside a layout.
<div id="myGroupOfFields">
    <fieldset class="adminform">
        <legend></legend>

        <ul class="adminformlist">
        <li>
<div class="clr"></div>
<?php echo $form->getInput('myEditorField', 'myGroupOfFields'); ?>
</fieldset>
</div>
Notice when we retrieve field labels and inputs we do so based on the group and name, but do not specify the fieldset. This brings us back to an earlier note; field names need to be unique within a given group. If we do not not do this, JForm will simply pick the first field in the group with the specified name.
This will produce something like this:
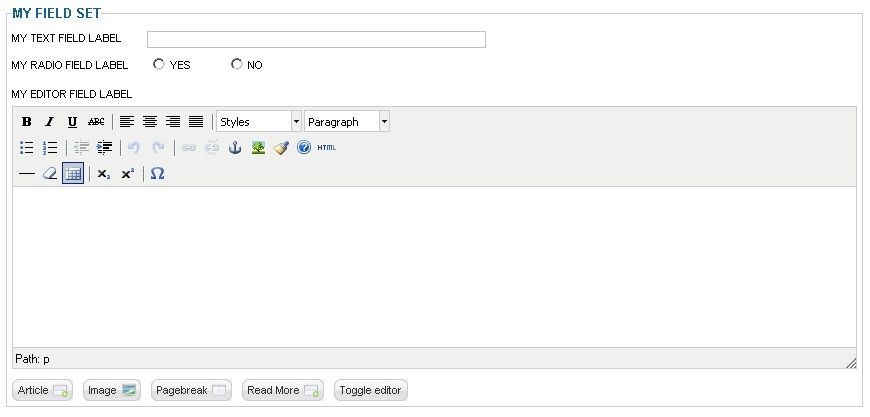
There is a problem with this approach, we have tightly coupled our layout with our JForm XML file. This means we need specialised layouts for every form. To really reap the benefits of JForm, we need to loosen this relationship.
In this final example, we loosen the relationship by implementing a generic JForm layout that iterates over the various groups, fieldsets and fields. This example uses the suggested way of using groups and fieldsets outlined at the start of this article. For the sake of simplicity we will not bother with immutable fieldsets. The following XML describes a JForm with three groups, main, immutable and extra. Don't worry too much about the actual fields defined in the example, these are simply here to illustrate the example.
<?xml version="1.0" encoding="UTF-8"?>
<form>
    <fields name="main">
        <fieldset name="primaryfieldset">
            <field
                    type="text"
                    name="my_text_field"
                    id="myTextField"
                    label="MY TEXT FIELD LABEL"
                    description="MY TEXT FIELD DESCRIPTION"
                    size="80"
                    maxLength="255" />
            <field
                    type="text"
                    name="my_other_text_field"
                    id="myOtherTextField"
                    label="MY OTHER TEXT FIELD LABEL"
                    description="MY OTHER TEXT FIELD DESCRIPTION"
                    size="80"
                    maxLength="255" />
            <field
                    type="editor"
                    name="my_editor_field"
                    id="myEditorField"
                    label="MY EDITOR FIELD LABEL"
                    description="MY EDITOR FIELD DESCRIPTION"
                    rows="5"
                    cols="200"/>
        </fieldset>
        <fieldset name="secondaryfieldset">
            <field
                    type="radio"
                    name="my_radio_field"
                    id="myRadioField"
                    label="MY RADIO FIELD LABEL"
                    description="MY RADIO FIELD DESCRIPTION">
                <option value="0">YES</option>
                <option value="1">NO</option>
            </field>
        </fieldset>
    </fields>
    <fields name="immutable">
        <!-- Fieldsets go here -->
    </fields>
    <fields name="extra">
        <fieldset name="publishing">
            <field
                    name="created"
                    type="calendar"
                    label="CREATED"
                    description="MY CREATED DESCRIPTION"
                    class="inputbox" size="20"
                    format="%Y-%m-%d %H:%M:%S"
                    filter="user_utc" />
            <field
                    name="created_by"
                    type="user"
                    label="CREATED BY"
                    description="CREATED BY DESCRIPTION" />
            <field
                    name="created_by_alias"
                    type="text"
                    label="CREATED BY ALIAS"
                    description="CREATED BY ALIAS DESCRIPTION"
                    class="inputbox"
                    size="20" />
        </fieldset>
        <fieldset name="metadata">
            <field
                    name="metakey"
                    type="textarea"
                    label="KEYWORDS"
                    description="KEYWORDS DESCRIPTION"
                    class="inputbox"
                    rows="3"
                    cols="30" />
            <field
                    name="metadesc"
                    type="textarea"
                    label="DESCRIPTION"
                    description="DESCRIPTION DESCRIPTION"
                    class="inputbox"
                    rows="3"
                    cols="30" />
        </fieldset>
    </fields>
</form>
Now comes the fun part... we want to create the generic layout (or equivalent if not using the Joomla! 1.6 MVC approach) to display all our JForms. The example assumes the variable $form is the JForm we want to display.
We start by iterating over the fieldsets defined in the group main. As with a typical Joomla! 1.6 administrator layout, we will make these float to the left, and use a width of 60%.
<!-- normal fieldsets -->
<div class="width-60 fltlft">
    <?php
    // Iterate through the normal form fieldsets and display each one.
    foreach ($form->getFieldsets('main') as $fieldsets => $fieldset):
    ?>
    <fieldset class="adminform">
        <legend>
            <?php echo JText::_($fieldset->name.'_jform_fieldset_label'); ?>
        </legend>
        <!-- Fields go here -->
    </fieldset>
    <?php
    endforeach;
    ?>
</div>
Now we have done this, we need to add our fields by inserting the following in the location marked Fields go here. This is little more than an iteration over the fields in the fieldset. The code takes into account hidden fields and some additional styling for editor and textarea fields. Editor and textarea fields require additional attention because they require 100% width.
<dl>
<?php
// Iterate through the fields and display them.
foreach($form->getFieldset($fieldset->name) as $field):
    // If the field is hidden, only use the input.
    if ($field->hidden):
        echo $field->input;
    else:
    ?>
    <dt>
        <?php echo $field->label; ?>
    </dt>
    <dd<?php echo ($field->type == 'Editor' || $field->type == 'Textarea') ? ' style="clear: both; margin: 0;"' : ''?>>
        <?php echo $field->input ?>
    </dd>
    <?php
    endif;
endforeach;
?>
</dl>
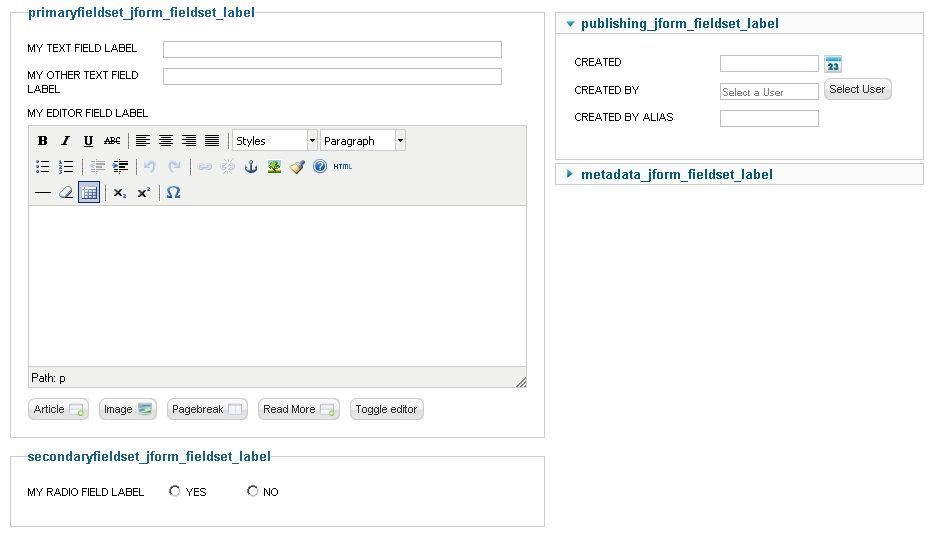
Apart from the jiggery pokery when considering the hidden, editor and textarea field types, this is little more than a simple iteration over the fields. Put these two examples together and we get the following:

The iteration over the fieldsets in the group main has provided us with two HTML fieldsets. In each we can see the fields as defined in the XML, and still in order.
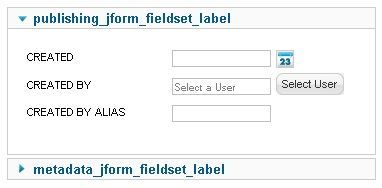
The next bit of code iterates over the fieldsets in the group extra which we want to display in an accordion in which we want to place one fieldset per pane. The example assumes $pane is an instance of JPaneSliders (the JPane implementation commonly used to create accordions). This time we will float the wrapping div to the right and make it 40% wide.
<!-- extra fieldsets -->
<div class="width-40 fltrt">
    <?php echo $pane->startPane("extra"); ?>
        <?php
        // Iterate through the extra form fieldsets and display each one.
        foreach ($form->getFieldsets("extra") as $fieldsets => $fieldset):
        ?>
        <?php echo $pane->startPanel(JText::_($fieldset->name.'_jform_fieldset_label'), $fieldsets); ?>
        <fieldset class="panelform">
            <dl>
            <?php
            // Iterate through the fields and display them.
            foreach($form->getFieldset($fieldset->name) as $field):
                // If the field is hidden, just display the input.
                if ($field->hidden):
                    echo $field->input;
                else:
                ?>
                <dt>
                    <?php echo $field->label; ?>
                </dt>
                <dd>
                    <?php echo $field->input; ?>
                </dd>
                <?php
                endif;
            endforeach;
            ?>
            </dl>
        </fieldset>
        <?php echo $pane->endPanel(); ?>
        <?php
        endforeach;
        ?>
    <?php echo $pane->endPane(); ?>
</div>
This time the code is a little easier to read because we do not account for editor or textarea field types. Below is a screen shot (no fields are being displayed for the metadata fieldset because of the fact we are using an accordion). Notice that we have also used some different field types. The calendar field type allows us to manipulate dates. The user field type allows us to select a user.
All that is left for us to do is combine the fields produced from the group main and the group extra.
We can now create XML files for JForm, instantiate new JForm objects and display our assorted fields and fieldsets. Even better, we can use our loosely coupled layout to display all our JForms and we can modify our JForm XML without the need to mess around with our layouts. JForm is unquestionably a very valuable new tool for Joomla! 1.6, and by making sure we use it in a suitable way, we can significantly reduce required code and improve maintainability.