One of our online students requested a tutorial on this extension. Event Registration is an important function for many sites.
Event Booking is an extension which allows you to create events and allows users register for these events (both Free and Paid events). There are payment gateway plugins for several different payment gateways.
Step 1. Install
This is a commercial plugin, so you will need to buy a license before you can download. You can get everything you need by clicking here.
Everything you need will be in the file called event_booking_unzip_first.zip.:
- Component - The Event Booking Component itself.
- Upcoming events Module
- Event Categories Module
- Event Search Plugin
- Event Cart Module
- Cart Update Plugin
- Event Detail Plugin
- Event Register Plugin
There are also some plugins for JomSocial, CB, ACYmailing and ACAJOOM mailing which you may want, but don't need to install unless you use them.
When you first download the zip file you need to unzip it and you will see there are separate folders for 1.5 and 1.6/1.7. Upload from the correct folder for your version.
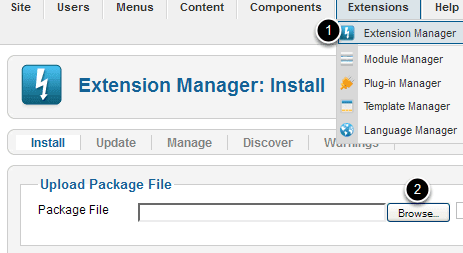
After downloading and extracting go to Extensions > Extension Manager and Browse your computer and upload the component, modules and plugins.
Step 2. Enable plug-ins
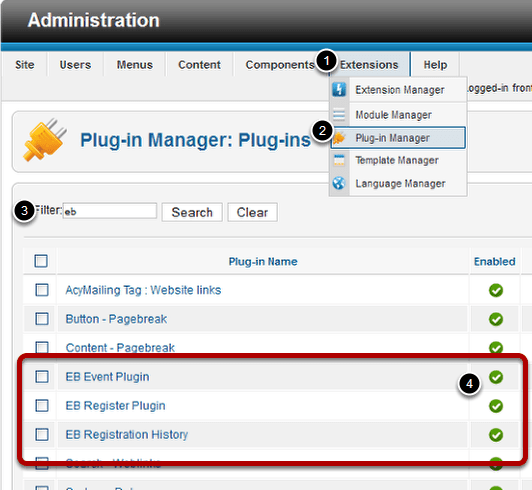
Go to Extensions > Plug-in Manager and use the filter to find all the EB plugins and make sure they are enabled.
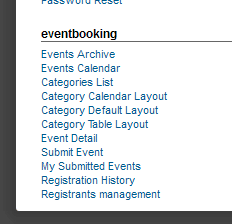
Step 3. Go to Components > Event Booking
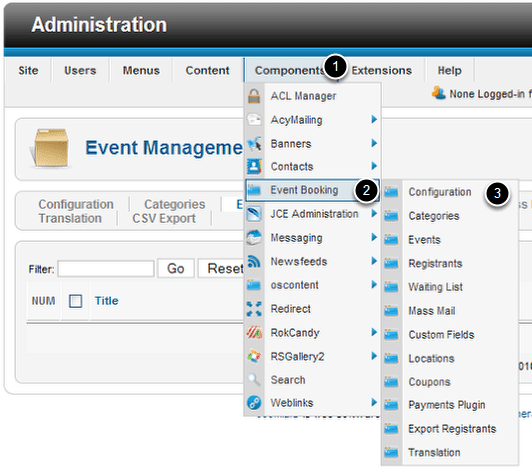
You will want to go to the Event Booking dashboard and start with Configuration to start the process.

You will see several tabs in the Configuration section and you need to click on each of them and make sure the settings are correct. Here are the most important features to check.
Integration (General tab) : If you are using Community Builder on your site, set it to Community Builder. If you are using JomSocial on your site, set it to JomSocial. Otherwise, set it to None. The purpose of the integration is that if customers logged in and access to registration form, the basic data (first name, last name,....) in the form will be auto filled by the data stored in customer's profile so that he doesn't have to type it again.
Event Date Format(General tab): That's the format of the date of event which will be displayed in front-end. To see list of parameters which can be used for this format, please visit https://php.net/manual/en/function.strftime.php.
Notifications email: That's the emails which will received notification when someone register for events on your site. If you leave that email empty, administrator of the site will receive notification about new registration. Multiple emails are possible, just use comma character to separate these emails, for example This email address is being protected from spambots. You need JavaScript enabled to view it., This email address is being protected from spambots. You need JavaScript enabled to view it..
Billings tab : Allows you to choose to Show / Hide , Require / Not require any fields (First name, last name, address,...) on the billing page (both individual and group registration).
Group Members Fields tab : Allows you to choose to the fields which you want to collect from members for group registration.
Multiple booking feature : If you want your users to register for several events within one checkout, set Multiple Booking configuration option to Yes. Also, please install and publish the cart update plugin.
Enable Captcha: If you want to use captcha to protect registration form from being spammed, you need to enable captcha feature in configuration of the extension. Captcha can be enabled on Free, Paid or both Free and Paid events.
Step 4. Categorize
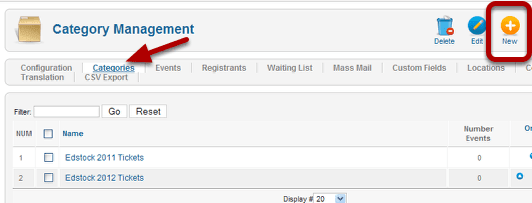
In our Joomla classes we emphasize a standard work flow that makes Joomla a little easier to organize, Categorize, Add, Show. The first thing you are going to want to do is establish your categories.
Access Levels allow you to show events to some groups and not others.
Click the New button and adjust your settings.

A great feature of Event Booking is the ability to create endless nested categories, as well as to use multiple layouts for categories.
Event Booking supports multiple layouts for displaying events in a category. They are:
Default Layout - each document in one row Click For Sample.
Calendar layout - display events in a calendar. Click for Sample.
Table layout - Display events in table format. Click for Sample.
Access Level - Choose the group which you want to be able to to access to this category (default is Public).
Step 5. Add Events
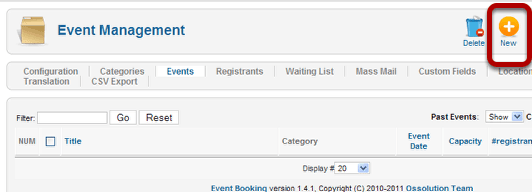
From the Events Management section click New and add events.
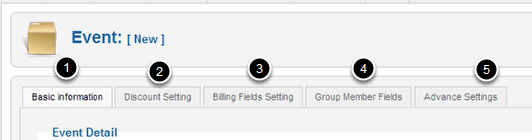
There are multiple tabs for Basic Information, Discount Settings, Billing Fields, Group Member Fields and Advanced Settings.
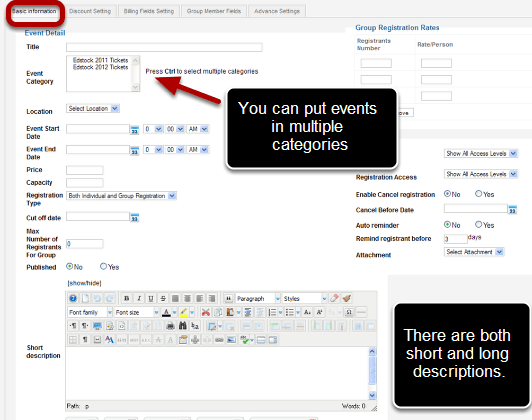
There are some important parameters when creating new event:
Event Date: That date of the event. After this date, users will no longer be able to register for this event.
Price : Individual Price/Price for each registrant.
Event Capacity : Set the capacity of the event (leave empty for unlimited). When number of registrants reached this capacity, users will no longer can register for this event .
Registration Type : Both individual and Group registration (default), Only Individual registration (Only individual registration is enabled), Only Group registration (only Group registration is enabled), Disable registration(the events are displayed but users won't be able to register for it).
Access Level : Choose the group you want to be able to view the event from front-end .
Registration Access : Choose the group you want to be able to register for this event.
Cut off date: After this date, users will not be able to register for the event anymore.
Short description: This description will be showed in events list (when you view a list of events in a category) .
Description : This description will be showed in event detail page.
Group Registration Rates : This feature allows you to give discount for registrants for group registration. For example, if individual price is 10$/person, you can set up so that if one user register for 2 other registrants (number registrants is 3), the price for each person only 9$/registrant.
Billing Fields Setting: Choose the fields which you want to be showed on billing page of the registration process (the setting from Configuration will be used to generate the default setting here)
Group Members Fields: Choose the fields which you want to collect from group members on group registration (the setting from Configuration will be used to generate the default setting here).
Step 6. Show - Create Menu links to your events
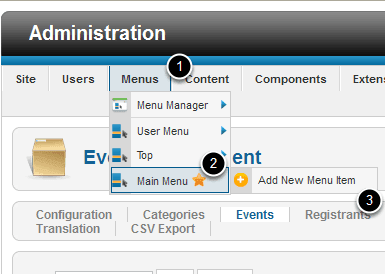
Now all you have to do is create the links to the calendar events or categories. Go to Menus > Main Main > Add New Menu Item and add links. You could also create a new menu for the calendar if you know how. You can get instructions on creating menus in our online classes.
If you have more than one category, choose Categories view . When users access to this menu item, they will see list of categories in the system. They can click on a category to browse for events in this category .
If you only have one category, choose Category View. If you choose this view, please remember to choose the category you want to display in the menu parameter. When users access this menu item, they will see list of events in this category .
If you only have one event, choose Event View. If you choose this view, please remember to choose the Event you want to display in the menu parameter. When users click on this menu item, the system will display detail page of the event and they can click on the Registration Button.
If you want users to browse for events in a calendar, choose Calendar View. When users click on this menu item, the system will display list of events in a calendar. Users can then click on the event title to go to the event detail page.
There are several views and other options as well. Tip: on your development site, create an Event Booking menu with all the views linked to it, so you can see what they do. Hide the Event Booking menu when you go live, restrict it to Administrators Only, or delete it before you publish.
Step 7. Activate modules
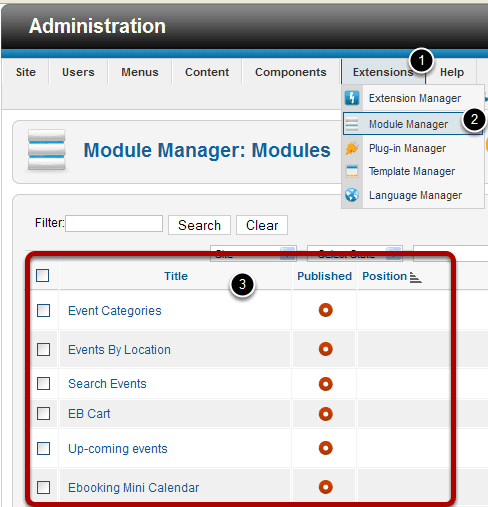
Go to Extensions > Module Manager and the modules will be in your module list. Enable the modules you want and position them on your site. These will give you additional ways to display and promote your events.