One of the best ways to make money on the web is to charge for the exclusive content you provide by selling memberships to your site. PayPlans is an easy-to-install solution for anyone wanting to create a paid membership site.
The Joomlashack Blog
PayPlans, a Joomla Subscription Extension
- Written by Ed Andrea Ed Andrea
- Published: 17 February 2012 17 February 2012
Seems the developers have thought of just about everything you might need, and most of it is included in a single package. Here's a summary of the features, some install tips, and our overall rating.
This is a commercial extension and you can purchase it and download it here https://www.jPayPlans.com. One-year plans cost $99, $149 or $299 depending on the support level and extras you might want.
Features
They've covered all the areas that are important for running a subscription site.
- Member Management: At a glance you can see your members, their registration status, membership level and much more. It’s also a snap to upgrade members, move them to different levels, “pause” their membership or delete them entirely.
- Invoicing: PayPlans is bundled with a professional-looking invoice display. The copy I tried doesn't let customers print invoices, but they promise that is an upcoming feature.
- Payment Gateways: PayPlans provides multiple online payment gateways to handle your payments.
- Flexible Plans: Create various set of plans (Free / Trial / Unlimited) with any combination of membership level (Free / Trial / Paid / Recurring ) without any restrictions.
- Expiration and Renewal: You can automatically expire memberships.
- Discounts: Set up as many discount coupons as you want. Usage limitation can be applied by number of uses and by date. Discounts can be applied in either percentage or amount to be deducted.
- Taxes: Direct Taxation and Indirect Taxation(EU-VAT) which take care of all the necessary calculations.
- Marketing and Communication: Integrates with mail programs and has built-in mail capabilities. Automatic notifications are included. With Text Rewriter, you can customize your emails with dynamic information like user's name, subscribed plan, expiration dates, your site link, and other strings.
- Design: PayPlans comes with multiple themes and layout. Decorate and describe your membership plans with interactive corner badges and use teaser text to promote and highlight content.
In addition they have numerous apps (plugins) you can get from the AppVille, a section of their site that has all the modules and add-ons. I started going through the entire list because I was going to add everything and check it all out. Turns out I didn't have too much to download. About 90% of the apps are already built in. I really like this.
It's frustrating to me to download something that needs modules or plugins to just get up to a basic level of operation, and every single one of them is an individual download. This one is almost fully loaded from the start, and that cuts out the tedious download-install-repeat process.
Step 1. Installing PayPlans
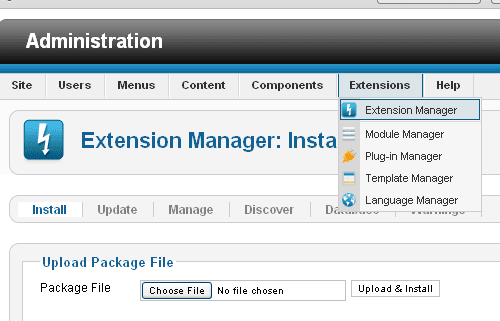
There is nothing special about the installation method. Use the standard Joomla Extension Manager. Go to Extensions, then Extension Manager, Choose File, Upload and install.
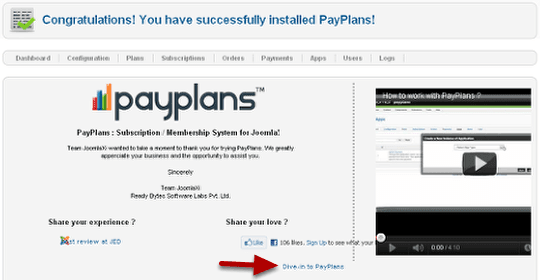
After installation, you will see the confirmation screen, plus a help video and a link to get started, "Dive-in to PayPlans"
Step 2. Complete the Setup Checklist
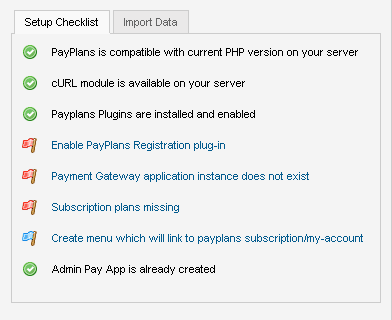
A nice feature is this Setup Checklist. Just click the links and it takes you to the right place to fix or add whatever you need to do. This was a huge time saver for me. I did have some trouble figuring out what do on a couple of steps, but was able to solve the problems with trial and error.
Step 3. Enable the plugins
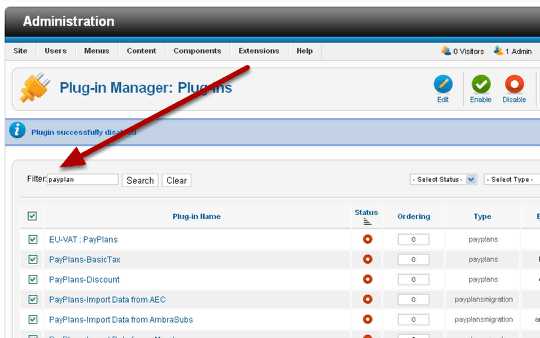
Go to Extensions, then Plugin Manager, and use the Filter to search for payplan.
Click the Checkbox next to the ones you want to enable.
Click the Enable icon at the top or the red circle in the Status column.
Note: When I did this I needed to enable at least one Tax plugin for things to work. There are two tax plugins. I disabled it later and everything still works.
Step 4. Return to the dashboard and continue configuration
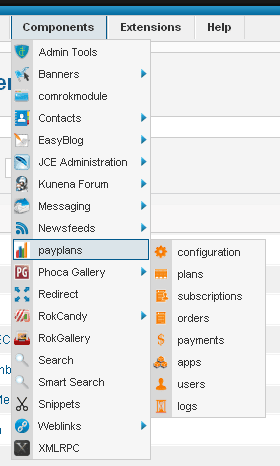
Go to Components, then PayPlans.
Go to the Dashboard and continue until you have all green check marks in the Setup list.
Step 5. Install sample data
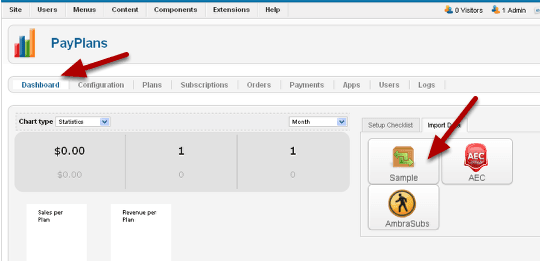
I found the sample data extremely useful in getting familiar with all the settings. I highly recommend installing, but a note of caution: Installing Sample will completely destroy any data you entered. Until you're sure you know how to use this, don't add your real data.
The sample data was a great guide, but I would like to see a few more variations of membership plans installed as samples. Some with setup fees and time limits and other variations would be a nice addition.
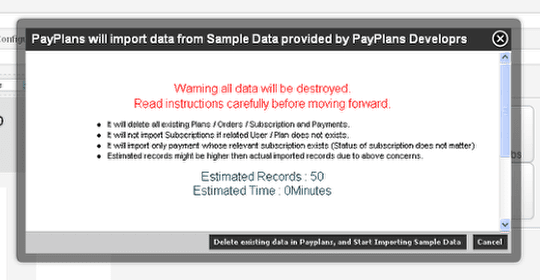
They give you really obvious warning. This is good. It's much better than a little line of type at the top in red letters. If you're going to do something as drastic as delete everything - you want fair warning. More than fair actually.
Step 6. Install Apps
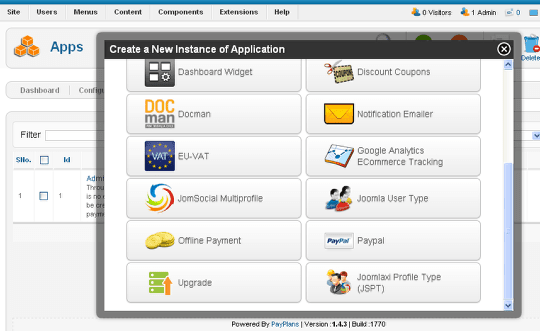
Installing all the apps is a snap from the Apps page. Just click the New icon like normal. A popup window has clear and easy to read buttons and icons.
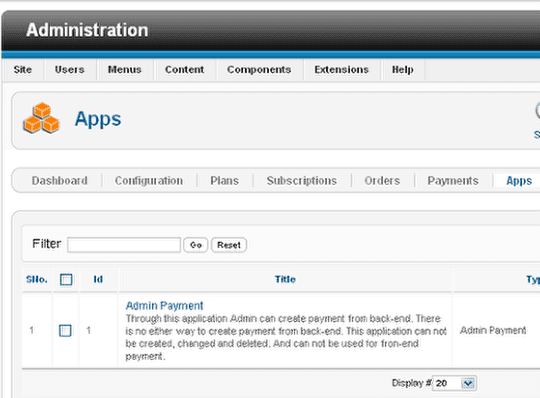
Note: When you go to the Apps you'll already see Admin Payment installed. This is a backend payment method. You will need to install at least one other payment method to get everything working right so you can test it out.
Step 7. Create or modify plans
If you installed the sample data the samples will be here and you can modify them. If not you have to create them from scratch. I tried it first without the samples, and the settings were a bit cryptic and the pop-up tool tips didn't help that much. Using the samples really clarified it for me. They have a video but it really didn't explain it either.
Step 8. The result
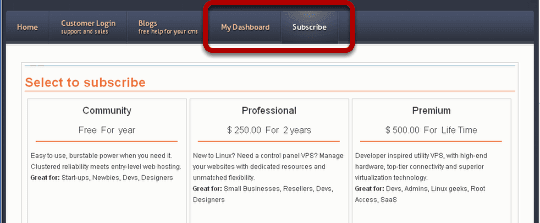
During the setup you automatically created the menu items "My Dashboard" and "Subscribe". Clicking Subscribe will bring a visitor to your list of plans. My Dashboard takes them to their account if they are logged in.
This is fully integrated with the Joomla Login, so any one who registers on your site is included in the membership. You can have members assigned to categories. Different content can be assigned to different member groups. The flexibility is extremely well worked out.
Once you install it and go through the configuration, you're ready to experiment in about half an hour. Don't believe the "five minutes" claim. There are things you have to set and payment gateway information and all your descriptions to enter, it's not that simple, but it is easy. I think you could be done in less than an hour if you had advanced beginner to intermediate Joomla skills.
Conclusions
This is one of the easier membership payment plugins I've seen. I like it because it comes packed with most all of what you need to operate, without needing to search for additional components.
They've also used some good judgment by including integration, with JomSocial, CB, Sobi2 and Sobi Pro, ACY Mailing, Phoca Download, K2, JINC, Mosets Tree, Virtuemart and many others. Visit AppVille to see if your favorite is included.
Migrating from AEC and Ambrasubs to PayPlans is easy with the addition of one-click importers. As it sits, this is almost everything you need to start a membership site. I'm hoping they'll keep coming up with more. They've covered all the bases in a short time, and they're still developing.