 Simple Image Gallery does exactly what it says on the tin.
Simple Image Gallery (SIG Plus) makes it simple to create a photo gallery on your Joomla site in just minutes.
It also has more advanced features that allow you to create more sophisticated galleries with just a little more effort. This makes Simple Image Gallery a good all-around image management and display tool for almost any Joomla website.
Step 1. Install Simple Image Gallery
- Download the package from JoomlaCode.
- There is only one download file for Joomla 2.5 which includes both a plugin and a module.
- There are two separate extensions for 1.5. If you're using 1.5 be sure to download both the plugin and the module. The sigplus module (mod_sigplus) is a supplement to the sigplus plug-in that allows you to have a sigplus gallery in a module position without using the activation tag. It requires plg_sigplus to be installed, or it will trigger an error message otherwise.
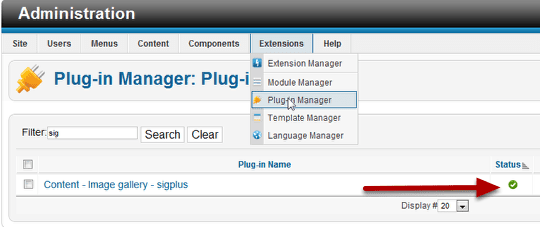
Step 2. Enable the plugin
- Go to Extensions > Extension Manager and uploading and installing the package.
- Go to Extension Manager > Plugin Manager and activate the Content - Image gallery - sigplus plugin.
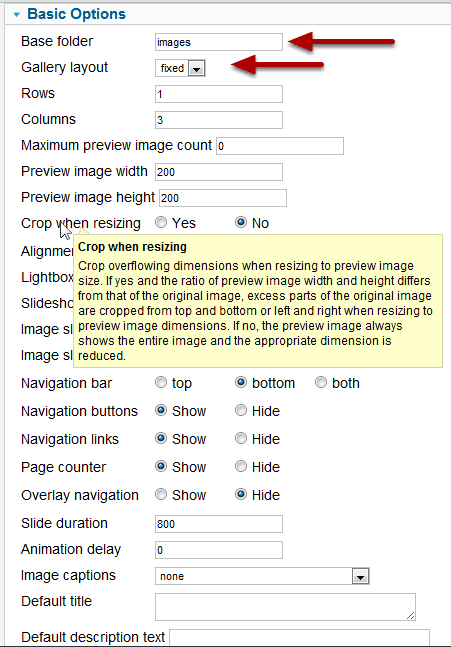
Step 3: Configuration
- Click the name of the plugin to open the configuration controls.
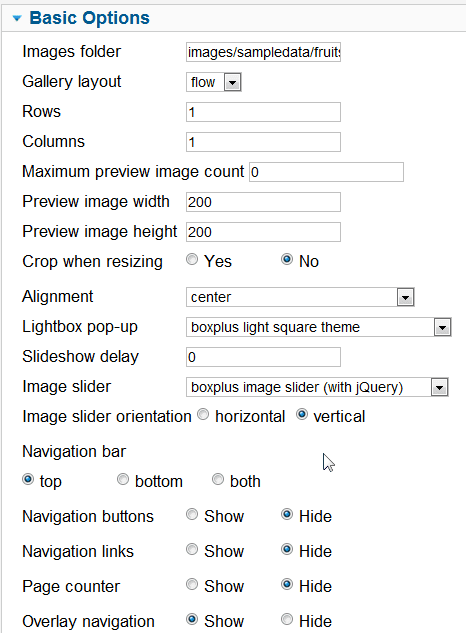
- The most important thing here is the Base folder. By default it will be set to /images/. It seems simple, but the biggest stumbling block for beginners is knowing the path to upload photos.
- The rest of the options comprise a fairly long list, all of which have to do with how your gallery will be displayed. You'll need to experiment with this to get it the way you want. Mousing over the field labels will give you extensive and detailed tooltips that should help you make a lot of these decisions.
- Be sure you try out both Gallery layouts while you experiment. Fixed and Flow are dramatically different.
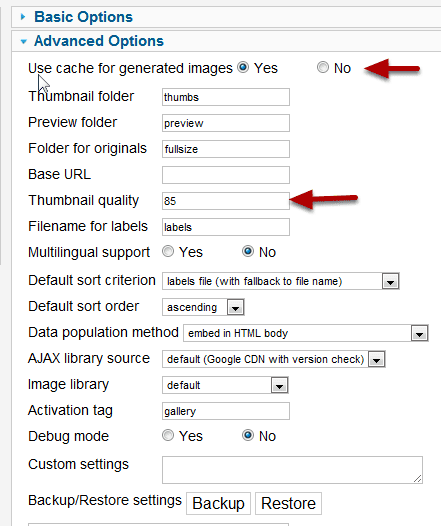
- There are quite few advanced options as well. These also have excellent tool tips.
- The option most photographers are likely to ask about is Thumbnail Quality. That can be set from 1-100. The higher the number the better the quality. However if the quality is too high, it will take a long time to load.
- The other thing that affects speed is caching. You probably want that turned off while testing but on for your production site.
- Activation tag is another one you might need. Other galleries use the same tag name. If there is a conflict with another plugin you have, you can return here to change the word that activates the gallery when you put it into an article.
Step 4. A Folder for Photos
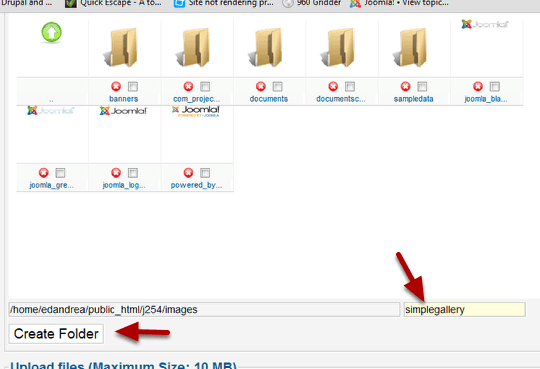
- Go to Content > Media Manager.
- At the bottom of the folder panel in Media Manager, when you are in Thumbnail view, is a field for creating a new folder. Type the name of the new folder in the box, and click create folder. We're calling ours simplegallery. The complete path to a picture will be /images/simplegallery/ourpicture.png.
- Now use the Media Manager to go to this new folder and upload some photos.
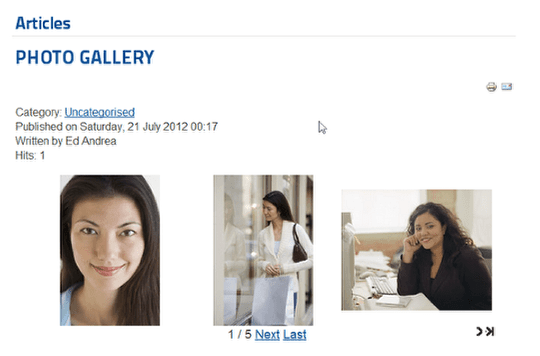
Step 5. Insert a Photo Gallery Into an Article
- We insert a gallery into an article by using curly brackets. Here is the syntax to use, with folder name in the middle:
{gallery}simplegallery{/gallery}

- Here is how your gallery will appear on the front of your site:
You can manage the look and performance easily by learning a few codes to extend the original tag. For example:
{gallery slider=boxplus.carousel}myfolder{/gallery}
Writing the tag like this will convert the static display into a slide show carousel. See this page for examples and more codes you can use.
Step 6: Use the Module
- Go to Extensions > Module Manager.
- Click the name of the sigplus module which will already be installed.
- You'll see the basic options that are almost the same as the ones that are in the plugin manager. These will take precedence over the plugin options.
- Choose a module position.
- Make the module menu associations.
- Save your changes.
- Here's what it looks like when published in a sidebar position in a single column.
- Note that this time I chose a different directory, and the pictures are automatically inserted.
- You can put multiple modules with different galleries all on the same page.