 Here at OSTraining.com we rely on several key extensions. Few are more important to us than Snippets.
We run over 100 classes per year. If a teacher updates their bio, we need to update in dozens of different places on our site. If we update our curriculum, we need to update it in hundreds of places. We use Snippets to make that process much easier.
Snippets allows you to enter content in one central location and then re-use it anywhere on your site.
Step 1: Download and install
- Download Snippets from the developers website at nonumber.nl.
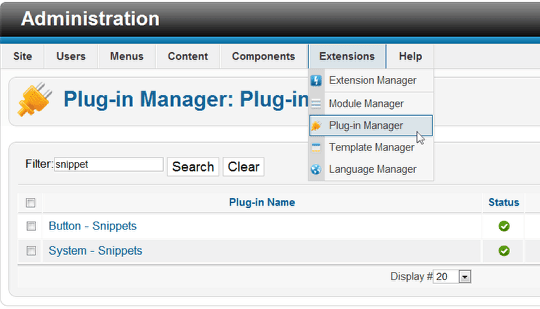
- Install by going to Extensions > Extension Manager.
- Go to Extensions > Plugin Manager and check to see if the accompanying plugins are installed:
- System - Snippets: must be enabled.
- Button - Snippets: adds a button to the bottom of the article editing screen that will allow you to click a button and choose the snippets from a list. This feature is only available in the Pro version of Snippets.
Step 2: Create a snippet
To demonstrate how Snippets works we're going to use the example of a meeting. Imagine that you write a new meeting agenda every month but always add the same meeting details to the end of it. We are going to put those meeting details into a snippet.
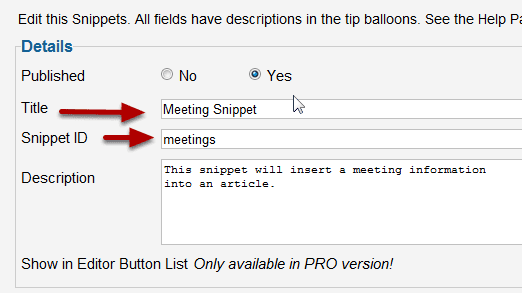
- Go to Components then Snippets and click New.
- Title: this is simply for your own administrative use.
- Snippet ID: this is what you'll enter into the content area to make this snippet live.
- Description: this is also only for your own administrative use.
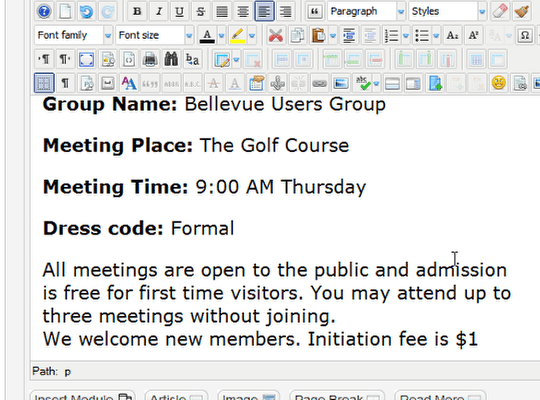
- Now we can enter the re-usable meeting details:
Step 3: Insert the snippet into an article
You can use Snippets anywhere there's a text area
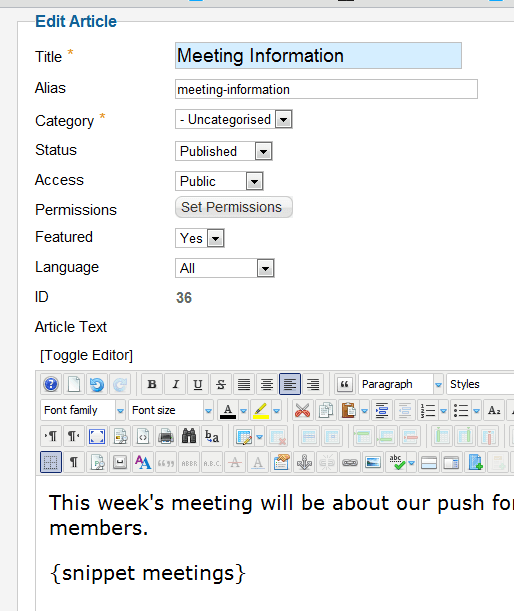
- Go to Content >Article Manager > New.
- Create an article for your meeting announcement.
- Insert the snippet tag using the syntax The id will be the Snippet ID you created in the first step.
Step 4: The snippet live on your site
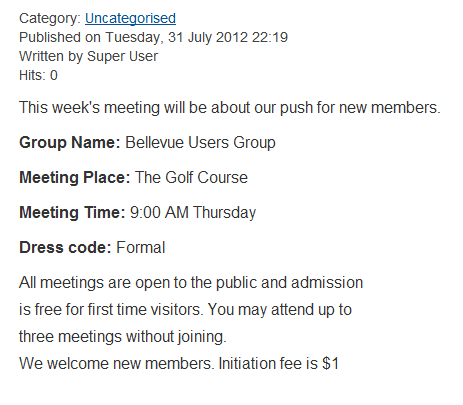
You can see the text and our inserted snippet. You can re-use the meeting data across your entire site and update everything automatically by going to back to Components, then Snippets and editing the snippet.
Advanced snippets with variables
We have seen one big advantage of using Snippets, but it allows you to do even more with the use of variables. Let's use the meeting example as before, but this time we'll show you how to use variables.
Step 1. Create a snippet with variables
- Go to Components > Snippets > New.
- Create a snippet called meeting-details.

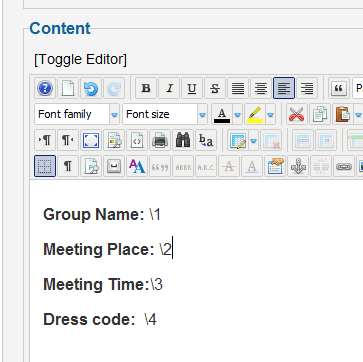
Now we're going to replace the meeting data with variables.
Instead of typing in the actual data, put \number. Always start with "\1" you can place the numbers anywhere inside the content window, but keeping them in order of appearance is going to prove very helpful. You need to put the backslash in front of the number. As far as I can tell there isn't a limit to the number you can use, but it's going to get very messy if you have a lot.
Step 2: Create a plain snippet
To make our example work clearly, we're also going to use a regular snippet.
- Create a snippet titled Admission with an ID of admission.
- Simple use regular content describing the admission policy for the meeting.
- Save the snippet.
Step 3: Use the snippets
- Go to Content > Article Manager and create a new article called "Schedule for all meetings". This article will contain the details for many meetings.
- We now have two snippets one with numbers acting as variables and one with text. We're going to combine those on a page and show you how convenient snippets can be.

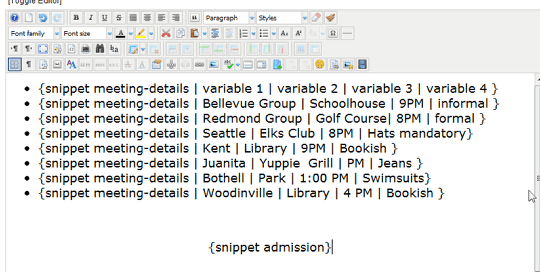
- Insert the meeting-details snippet using this syntax:
- Copy that line several times, and replace the variables with real values.
- At the end of the page add the admission snippet.
Step 4: The snippet live on your site
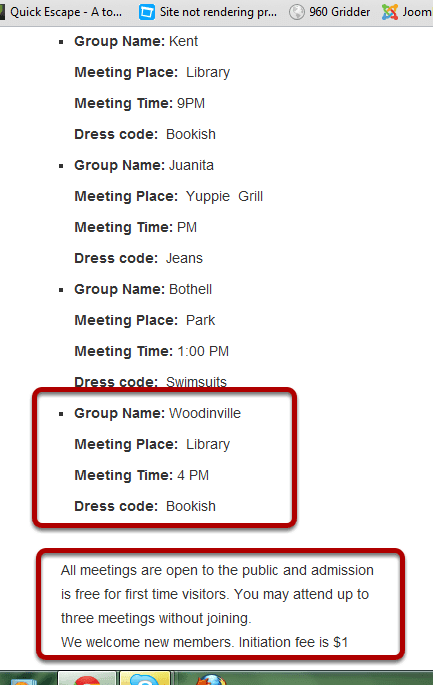
As you can see below, our list was generated and the variables in the snippet were replaced by the real values.
Both the meeting details and the admission policy can now be easily re-used anywhere on your site where there's a text area. That's the power of Snippets.