
With the "Shack Analytics Pro" Joomla extension you can easily analyze visitors' traffic to and engagement with your Joomla site using Google Tag Manager and Google Analytics. With "Shack Analytics Pro" you can set a button click tracking even if you are a Joomla beginner with limited technical knowledge.
For example, you may want to track clicks on a button on your Joomla site. It could be a button of a contact form. It also could be a button of a sign-up form, or a button of a shopping cart, or a button for a file download.
In this blog post, you will take a look at how to use the "Shack Analytics Pro" Joomla extension to connect your site to Google Tag Manager and Google Analytics and track and analyze clicks on a button of a contact form.
This is a five-step process:
- Connect your Joomla site to Google Analytics with Shack Analytics Pro
- Connect your Joomla site to Google Tag Manager with Shack Analytics
- Create a button click tracking tag in Google Tag Manager
- Track the button click events in Google Analytics
- Switch your Google Tag Manager mode from Preview to Live
Let's take a look at this process in more detail.
Step #1. Connect your Joomla site to Google Analytics with Shack Analytics Pro
The "Shack Analytics Pro" Joomla extension acts as a middle man between your Joomla site and your Google Analytics and Google Tag Manager accounts. A good first step would be to sign up for a free account with Google Analytics. Then you will use "Shack Analytics" to connect your Google Analytics account with your Joomla site.
For this to happen, you would firstly sign up for a free Gmail account with Google at mail.google.com. Then you would log into your Gmail account and visit the Google Analytics main page at analytics.google.com.
On that page, you need to sign up for your Google Analytics account. Once done, on the left-hand menu in your Google Analytics Home page, you would click "Admin":
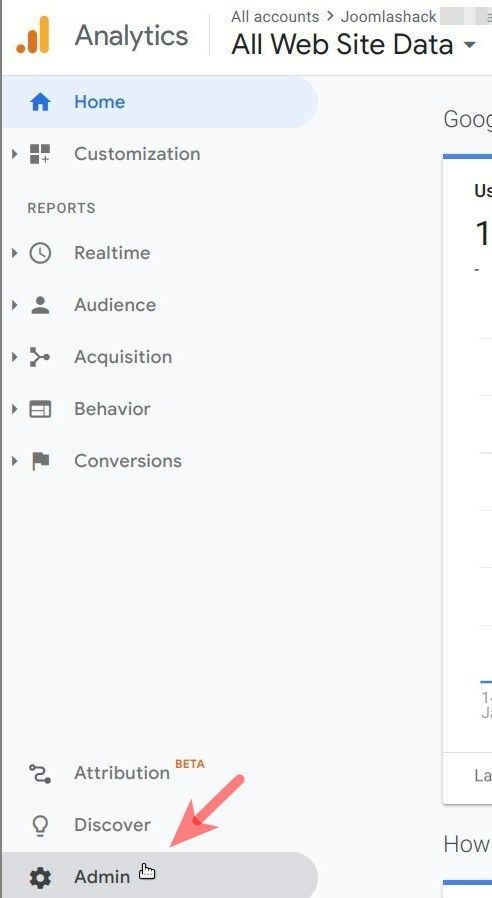
This will take you to the "Admin" screen. In the middle column on that screen, you want to click "Property Settings":

This will bring up for you the "Property" page. Now would be a good time to copy the "Tracking ID" of your Google Analytics account:
![]()
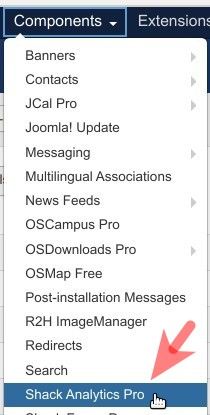
With your Google Analytics Tracking ID copied, now would be a perfect time to set this ID in your "Shack Analytics Pro" Joomla extension. For that, in your Joomla administrator panel, you want to go to "Components" > "Shack Analytics Pro":
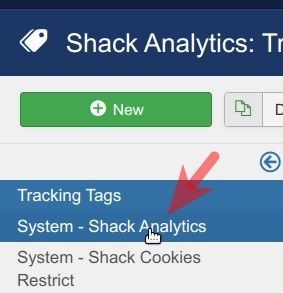
You will be presented with the "Shack Analytics: Tracking Tag" administrative screen. On the left-hand side of the screen, you want to click "System - Shack Analytics":
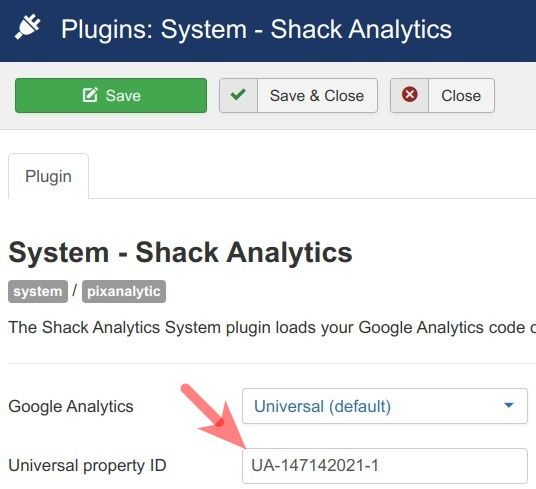
Excellent! Now you can enter the Tracking ID of your Google Analytics account into the "Universal property ID" field:
You are now ready to save your changes and click "Save" or "Save & Close".
When you check the HTML source code of your Joomla site, you will see the Google Analytics code sitting pretty in the <head> of the code:

Excellent! This confirms that your Joomla site is now connected to your Google Analytics account. Here you will be able to analyze all the clicks to your chosen button.
But sending this data to your Google Analytics account will be Google Tag Manager. In the next step, you will learn how to create your Google Tag Manager account and connect it to your Joomla site using "Shack Analytics Pro".
Step #2. Connect your Joomla site to Google Tag Manager with Shack Analytics
Firstly, you want to create your Google Tag Manager account. You start this step by logging into your Gmail account and visiting this page. This should open the Google Tag Manager administrative interface for you.
Here you want to click one of the two "Create Account" buttons:
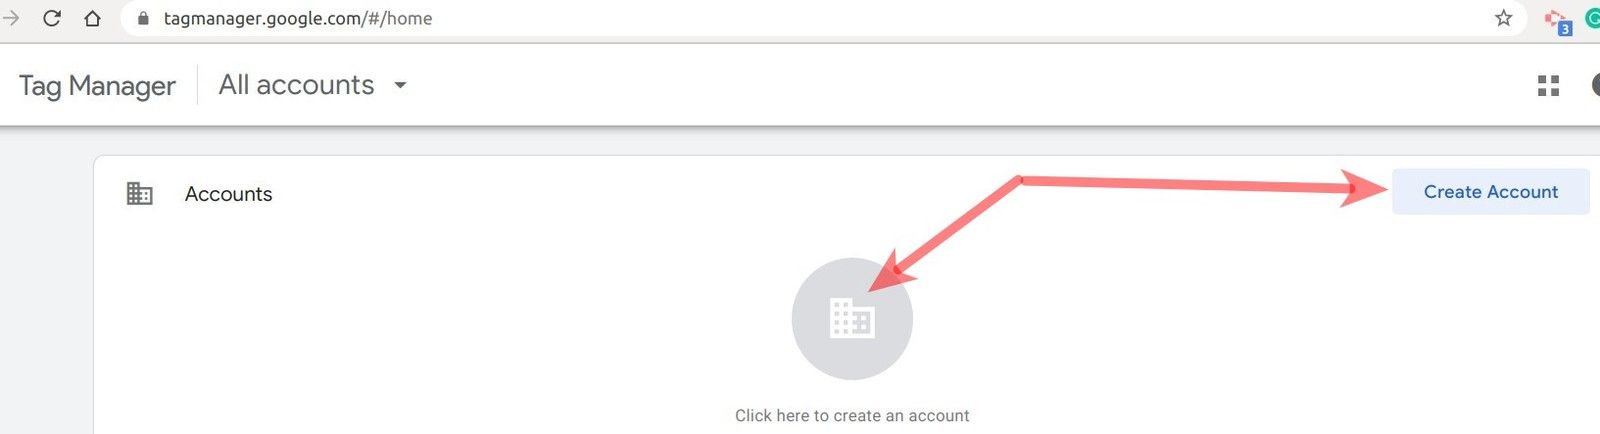
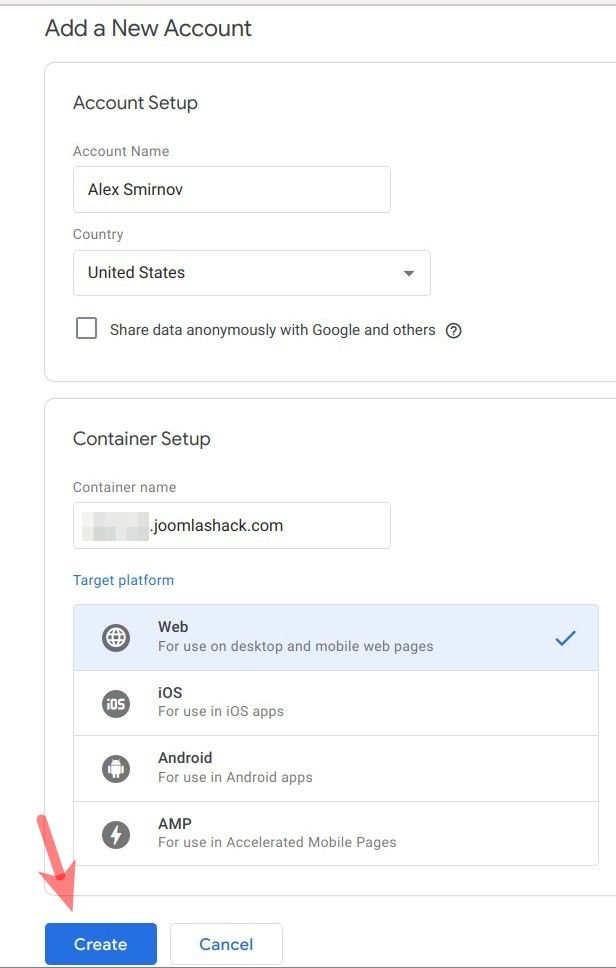
You will be taken to the "Add a New Account" page.
- Fill in the "Account Name" field
- Select your country
- Type in your site URL in the "Container name" field
- Click the "Web" button under the "Target platform" list
- Click the "Create" button:
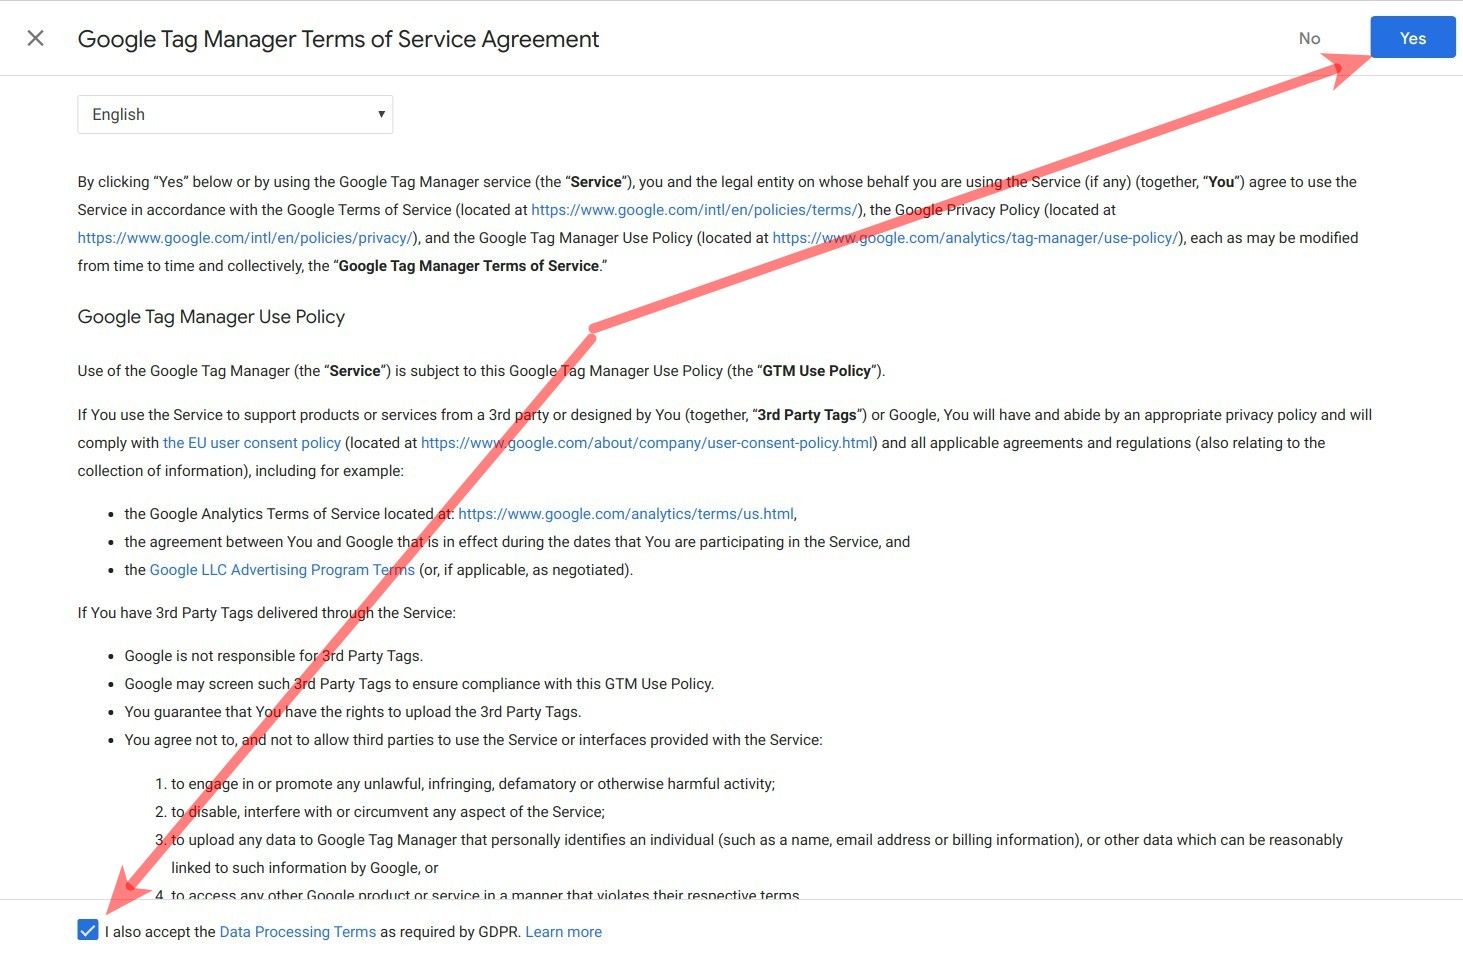
You will see the "Google Tag Manager Terms of Service Agreement" page. Here you would accept the Terms of Service in the bottom left corner and click the "Yes" button in the top right corner:
You will be taken to your Workspace in Google Tag Manager console with the "Install Google Tag Manager" modal box open:
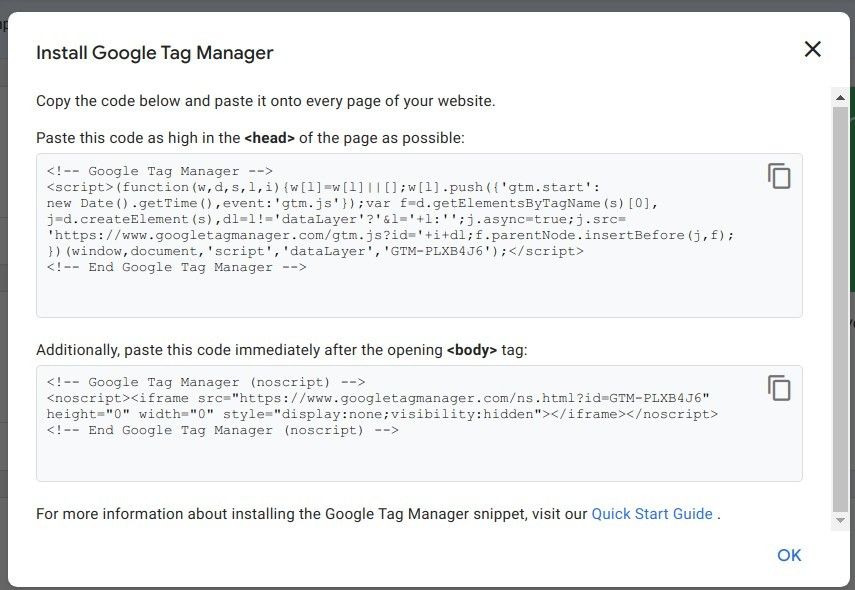
You need to copy and save the code snippets somewhere safely on your hard drive. You will need these two snippets in a few seconds to connect your Google Tag Manager account to your Joomla site using Shack Analytics.
Note: in case you accidentally closed the modal box with the snippets, open it up again by clicking the link resembling GTM-PLXB4J6 on the top bar:

So far so good. At this point, your Google Tag Manager account knows about your Joomla site. But you Joomla site yet knows nothing about your Google Tag Manager account. Now would be a good time to connect your Joomla site to your Google Tag Manager account using "Shack Analytics Pro" Joomla extension.
In your Joomla administrator panel, you want to go to "Components" > "Shack Analytics Pro". You will be taken to the "Shack Analytics: Tracking Tags" administrative screen.
In the top left corner of the screen, you would want to click "New":
This will bring you to the "Shack Analytics: New Tracking Tag" screen.
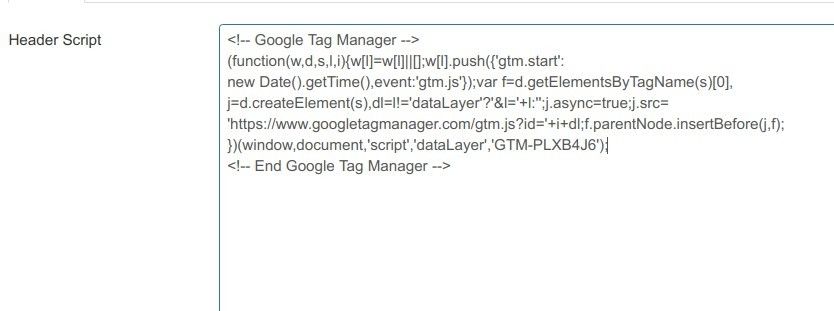
Here you want to enter your tracking tag title in the "Title" field. Then paste the Google Tag Manager snippet (without the <script> and </script> tags), intended to be placed inside the <head> section, into the "Header Script" box:
Next, you would want to paste the Google Tag Manager snippet intended to be placed inside the <body> section, into the "Footer Script" box:

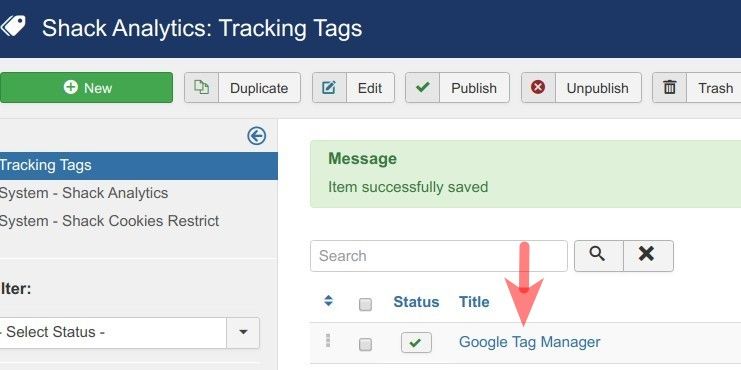
Now you can click "Save & Close". You will see the newly created tracking tag listed:
Then in the top right corner, you want to click the "Options" button:

This will open the "Shack Analytics: Configuration" screen. Here you would need to click inside the "Global Tracking Tag" field and then click on your tracking tag:
![]()
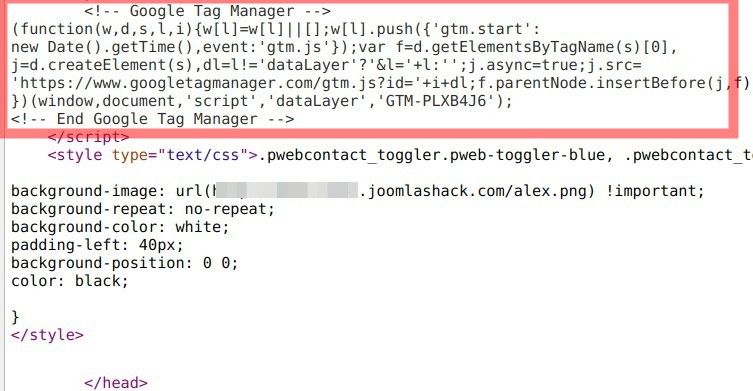
Click "Save & Close". Now would be a good time to open the HTML source code of your site. You should see both snippets displayed within the HTML code.
You will see one inside the <head> section:
You will see another snippet inside the <body> section:

Step #3. Create a button click tracking tag in Google Tag Manager
Now with all the preparation work out of the way, you are ready to create a tracking tag for a button in your Joomla site using your Google Tag Manager Account.
You want to log into your Google Tag Manager and your Google Analytics consols.
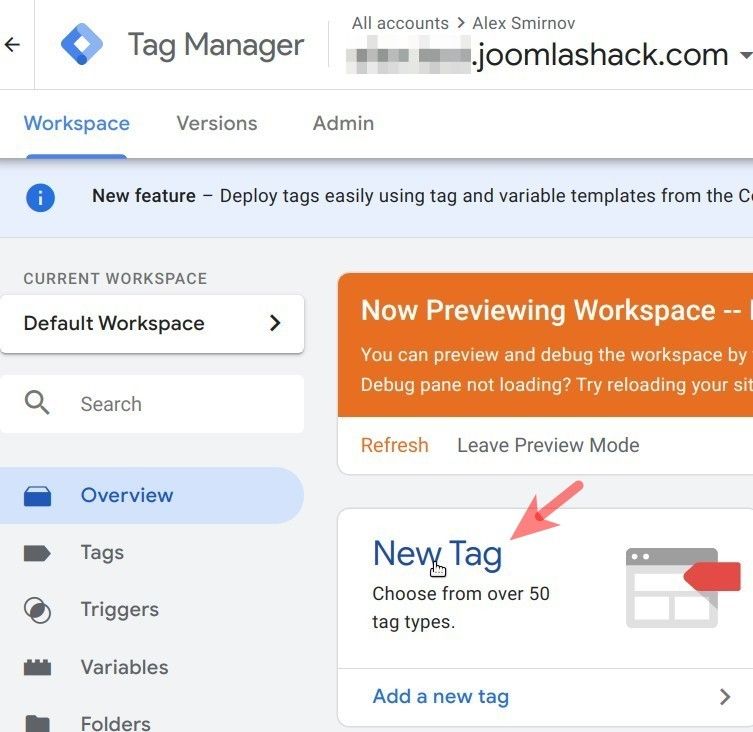
In your Google Tag Manager, you want to click "New Tag":
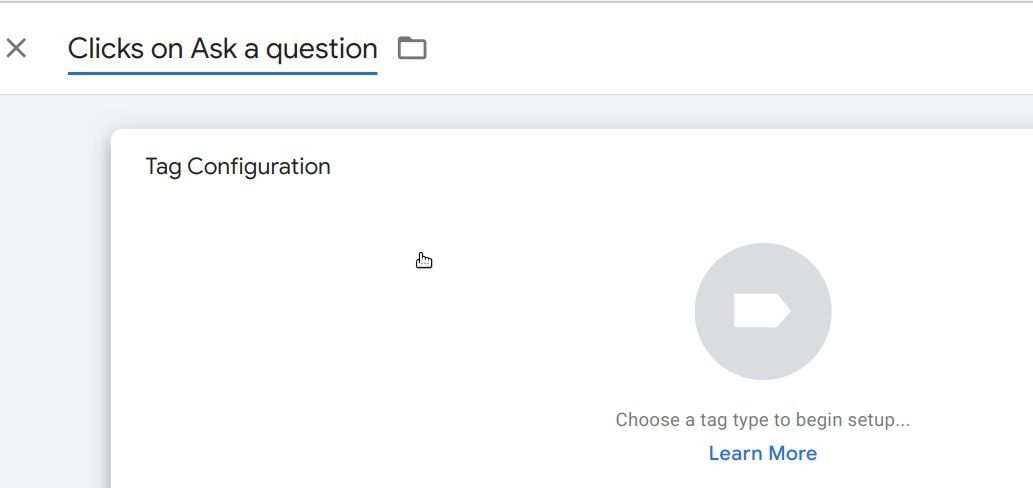
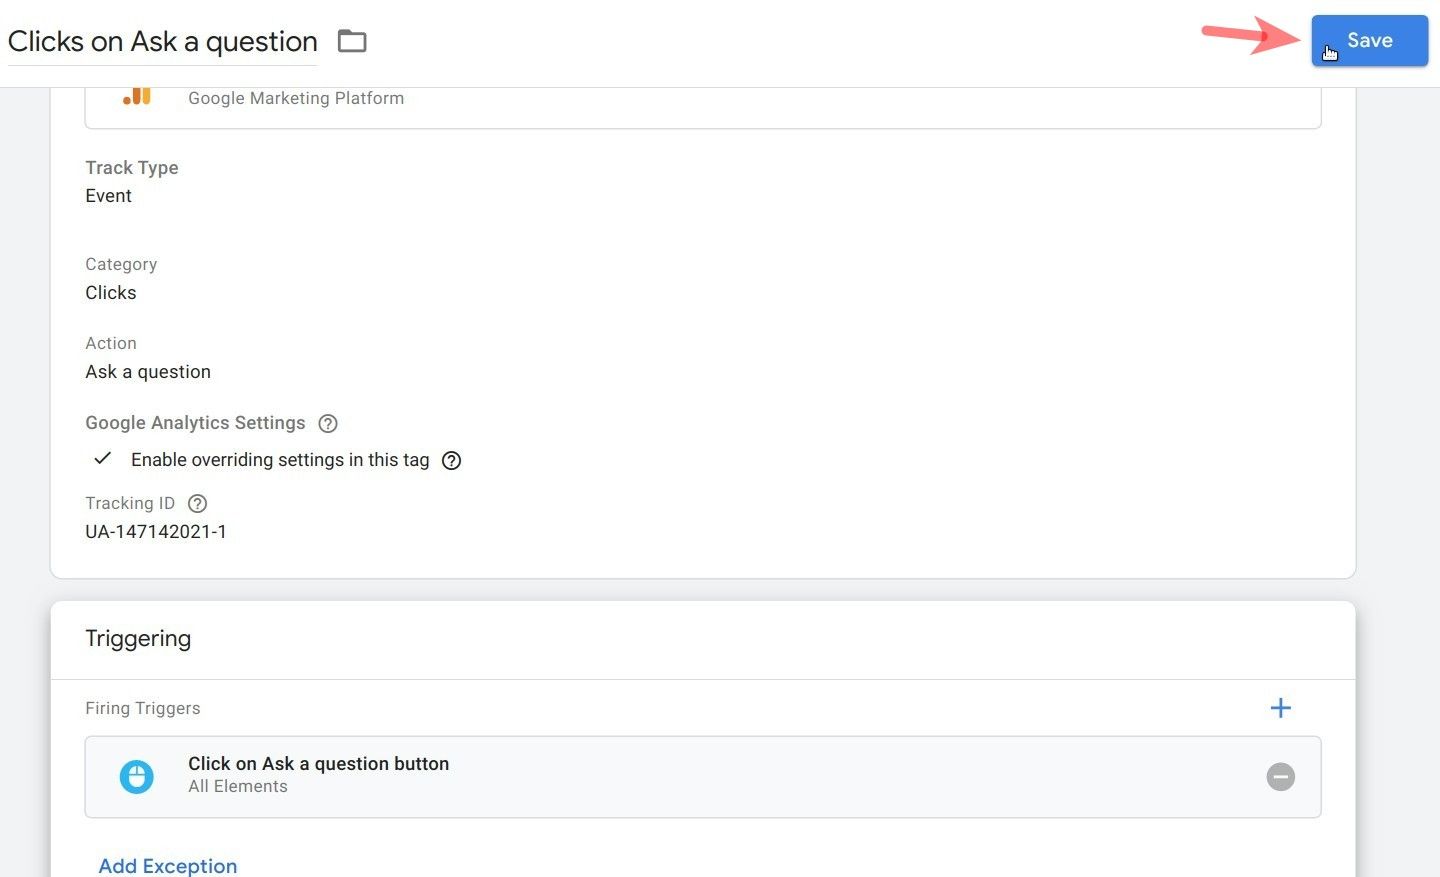
On the next screen, you want to enter a title for your tracking tag and click anywhere on the "Tag Configuration" panel. The text of my button is "Ask a question". That's why for my demonstration, I entered "Clicks on Ask a question":
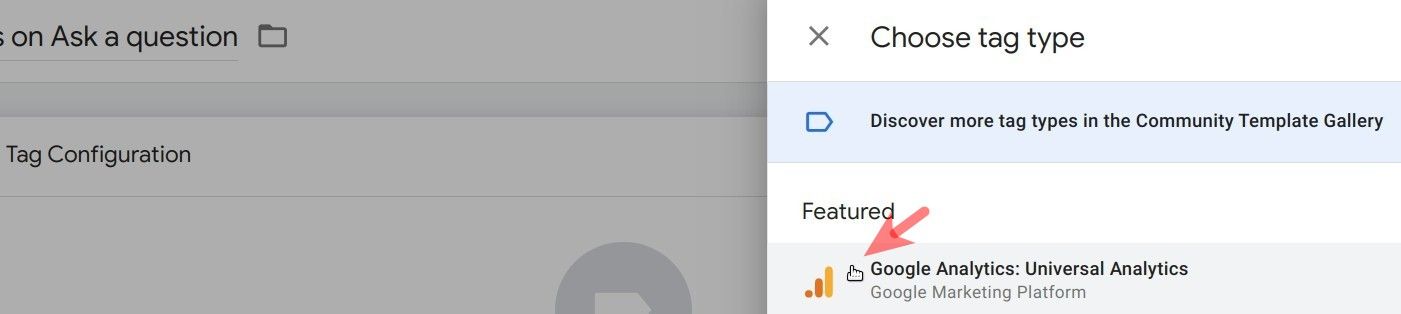
You will see the "Choose tag type" panel on the right side of the screen. Click "Google Analytics: Universal Analytics":
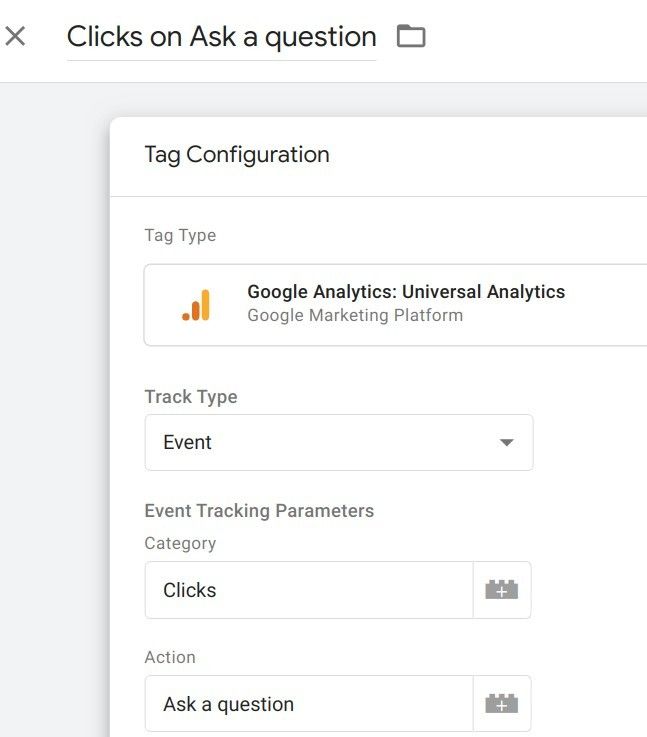
This will bring up the "Tag Configuration" and "Triggering" panels.
- In the "Track Type" field, select "Event".
- Enter something meaningful in the "Category" field. For this demonstration, I entered "Clicks".
- Enter something meaningful in the "Action" field. Form my demonstration, I entered "Ask a question":
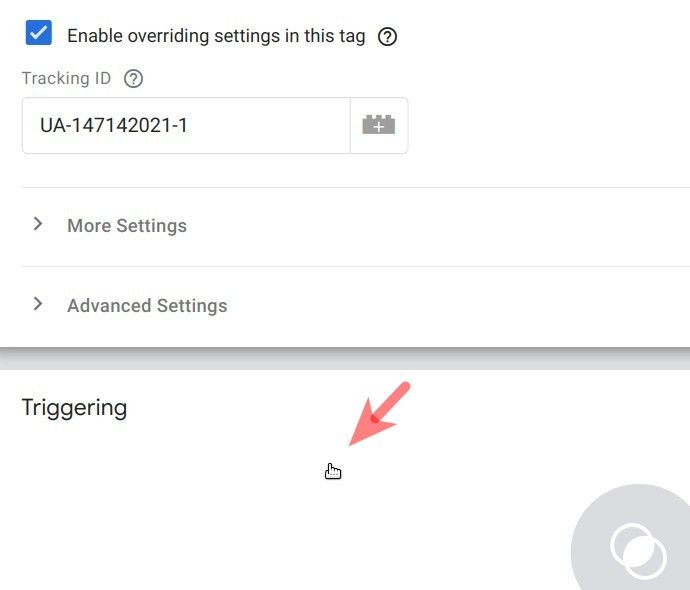
Nest, you want to scroll slightly down the panel and tick the "Enable overriding settings in this tag" checkbox. Enter your Google Analytics Tracking ID into the "Tracking ID" field:
![]()
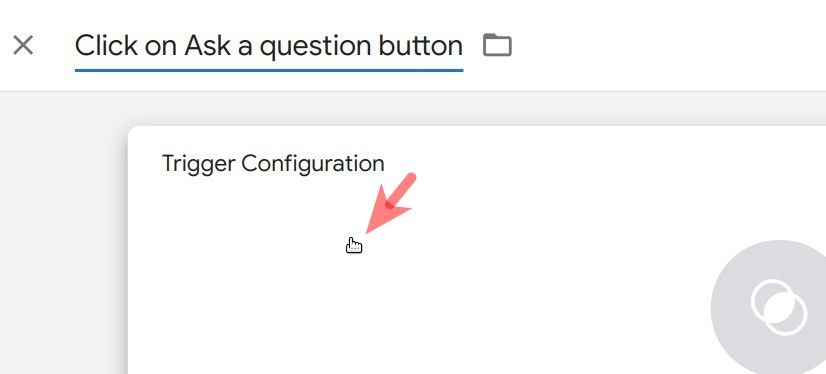
Now you need to click anywhere on the "Triggering" panel:
In the top right corner of the next screen, you want to click the the "+" icon:
![]()
On the next panel, you want to enter a title instead of the "Untitled Trigger" and click anywhere within the "Trigger Configuration" panel:
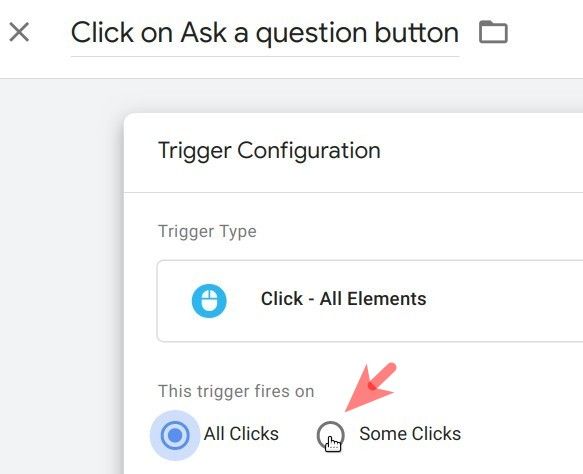
This will bring up the "Choose trigger type" sliding panel on the right side of the screen. You want to find the "Click" group of trigger types there and click "All Elements":

This will bring up the "Trigger Configuration" panel. Click "Some Clicks":
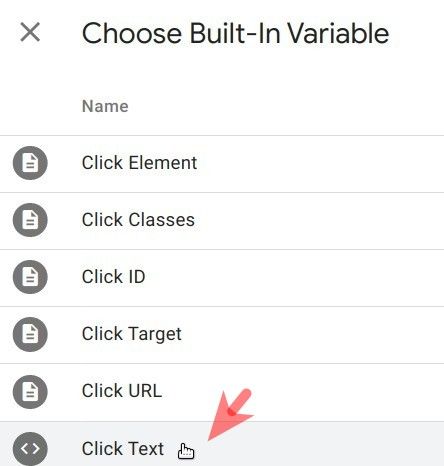
You will see three new boxes appeared underneath. You want to click "Click Target" and then click "Build-in Variable":
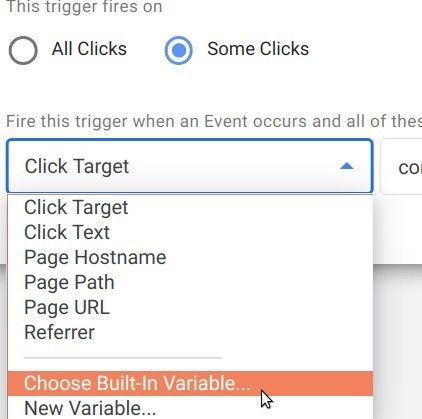
You will see the "Choose Built-In Variable" panel sliding out on the right side of the screen. Click "Click Text":
You once again will see the "Trigger Configuration" panel. Make sure the field in the middle is set to "contains" and enter the text of the button to be tracked into the right field. For my demonstration, I entered "Ask a question":
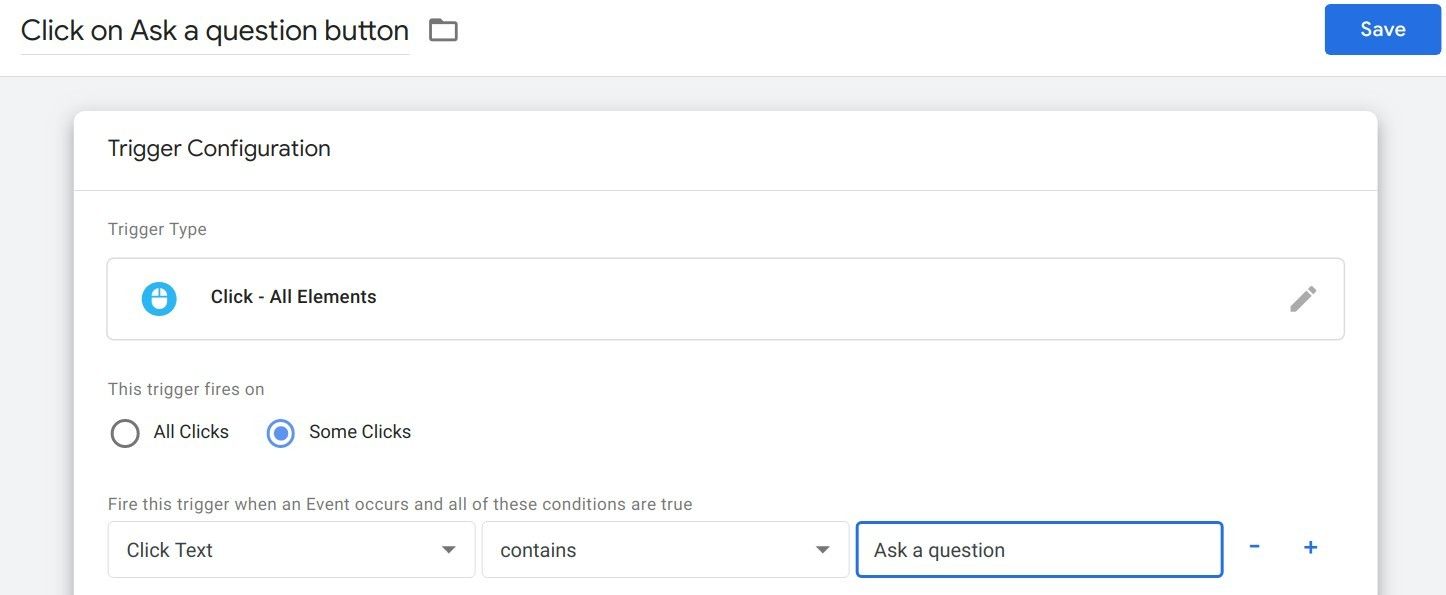
In the top right corner, you want to click the blue "Save" button and on the next screen, click the same "Save" button:
Excellent! You just created a tag to track clicks on a button on your Joomla site. Now would be a good time to test it.
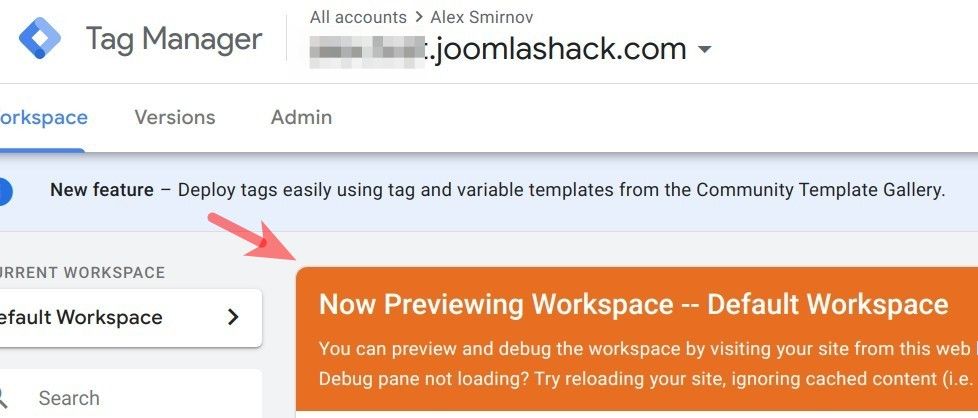
In the top right corner of your Google Tag Manager console, you want to click the "Preview" button:

You will see the orange panel with the "Now Previewing Workspace" title:
Visit your Joomla site frontend and refresh the page with the button clicks on which you would like to track. You should see the Google Tag Manager preview panel underneath it:
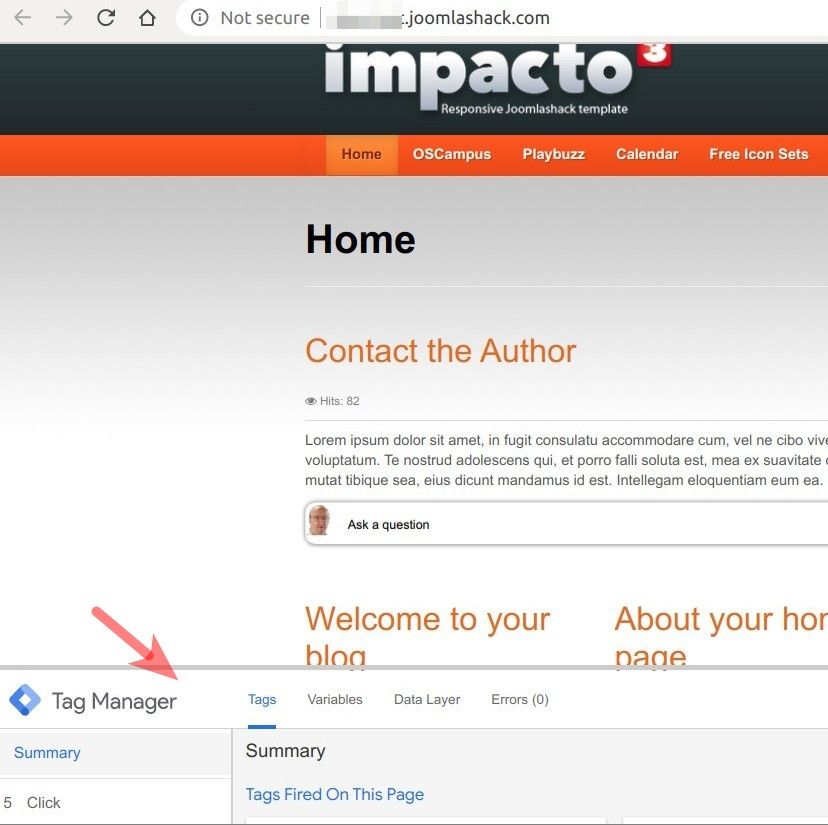
Click the button for which you created the tracking tag in your Google Tag Manager account. You should see that your click has been registered in the "Summary" > "Tags Fired On This Page":
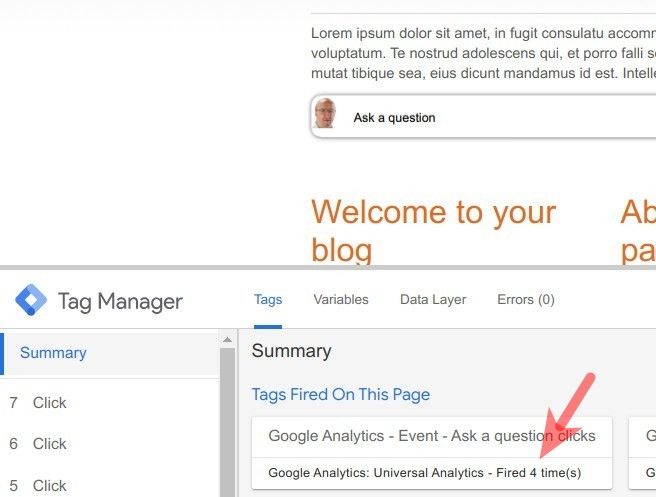
This proves that your tracking tag works. Good job! But what about tracking itself? This is where your Google Analytics account comes into play. Let's take a look at how to track the button click events in Google Analytics.
Step #4. Track the button click events in Google Analytics
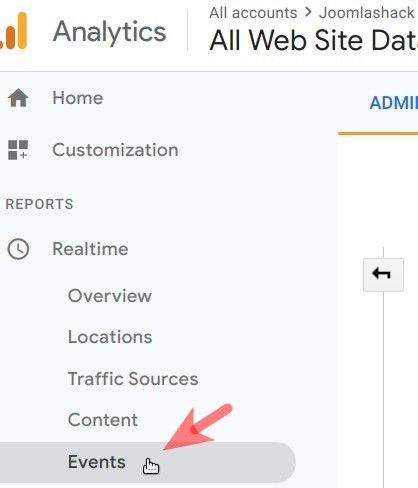
Now go to your Google Analytics console > "Realtime" > "Events":
You will see that Google Analytics also tracked the events of the click on the button you selected to track:
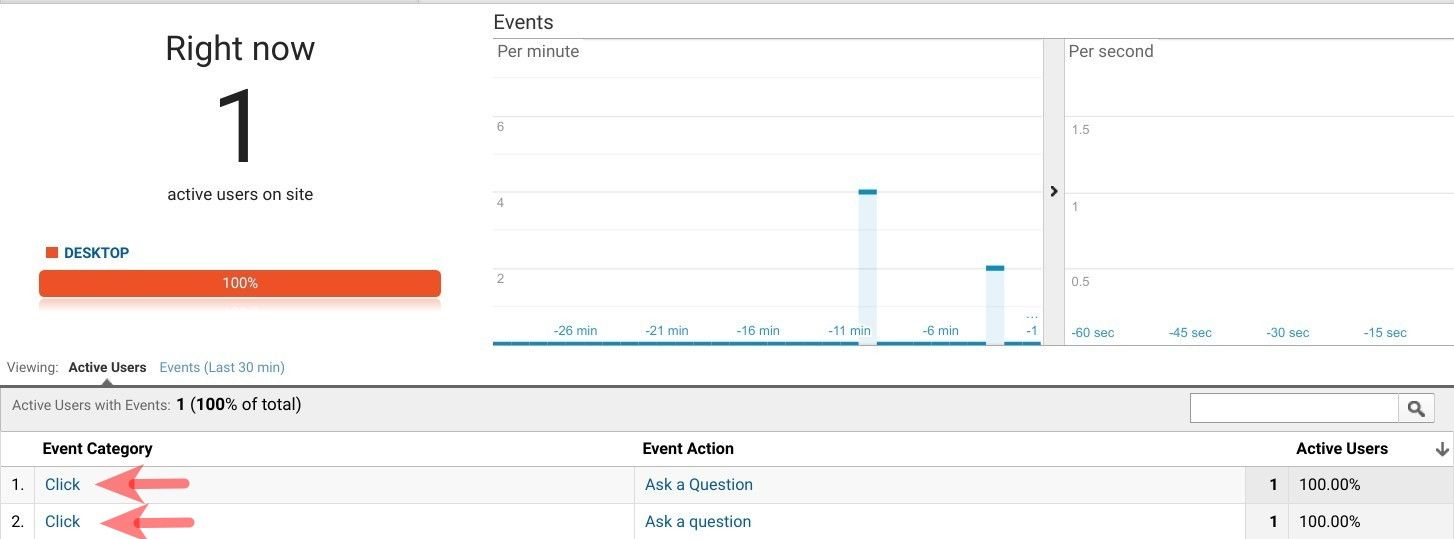
Great! At this point, you can see that the whole process works flawlessly. But there is one remaining issue: everything you've done so far in your Google Tag Manager account was in the "Preview", that is testing mode. You want your Google Tag Manager to run in live mode. Let's take care of that.
Step #5. Switch your Google Tag Manager mode from Preview to Live
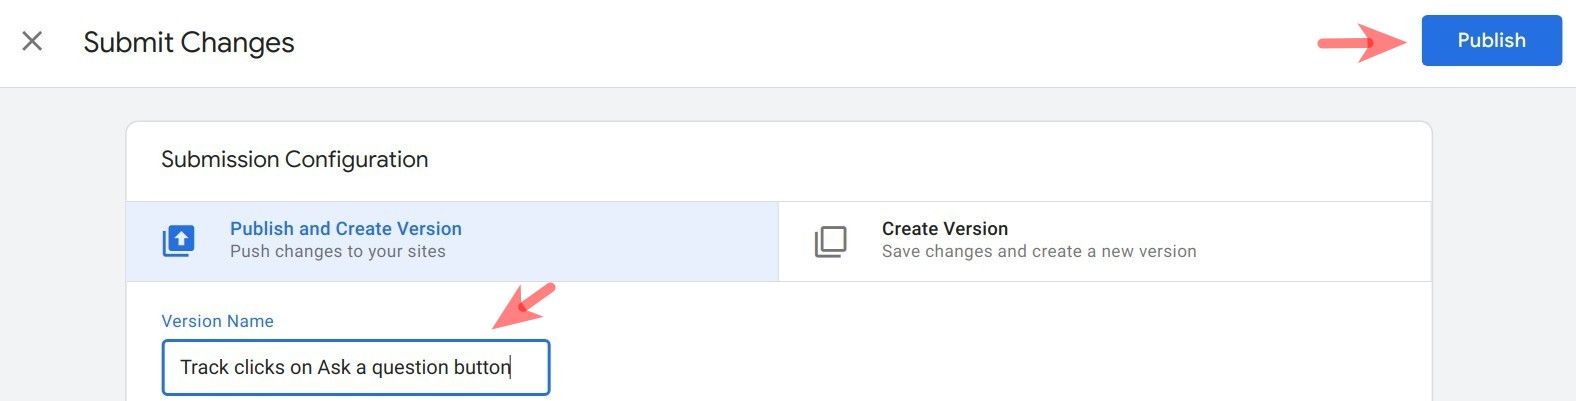
In your Google Tag Manager console, in the top right corner, you want to click "Submit":

You will see the "Submit Changes" box. Add a descriptive name into the "Version Name" box and click "Submit":
You will see your version under the "Version" tab of your Google Tag Manager:

There you have it.
What's Next?
What's Next?
Save $1,000's when you sign up for Joomlashack's Everything Club.
You will get your hands on our extensive range of over 20 extensions, plus legendary support!
Click here to join the Everything Club
About the author