This tutorial is aimed at those Joomla site administrators, who set their Shack Form to get opened up via a link in a Joomla article.
By the end of this tutorial, you will learn how to add a value of one of the fields of your form to the subject of the emails automatically sent by the form once it has been submitted.
In some use cases, you may want to achieve the following:
- Your visitor clicks on a link in one of your Joomla articles:
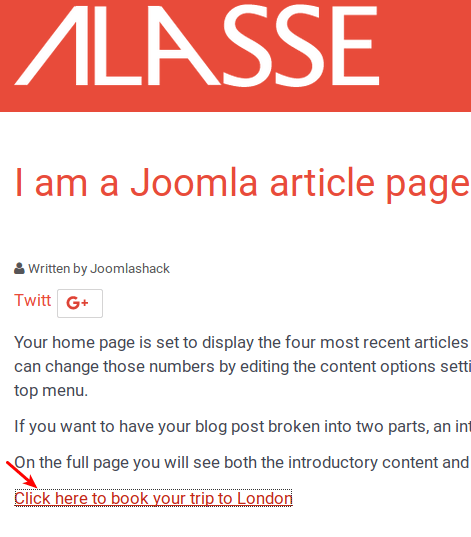
- Upon the click, they will see your Shack Form.
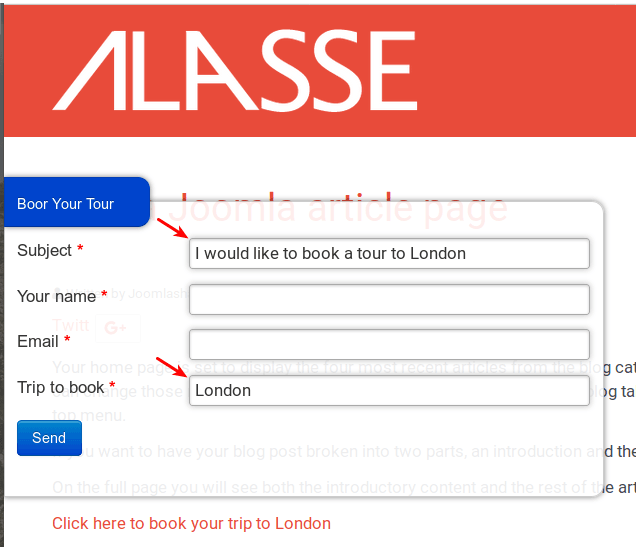
- The form will open up with one or more fields pre-loaded. For my demonstration, I pre-loaded two fields: the Trip to book
and the Subject:
- The pre-loaded fields will get their values set manually in the link HTM code:
- Once submitted, the form will automatically send two emails in text format:
- One - to the form sender.
- Another one - to the site administrator.
- The subject of both emails will consist of a custom text followed by the form subject.
Let's get started.
Step #1 - Create the field by the Subject type
This step is pretty straightforward. You just need to create a field of a certiain type.
- Under the Module tab, click Add new field:

- In the Field type setting, select Subject:
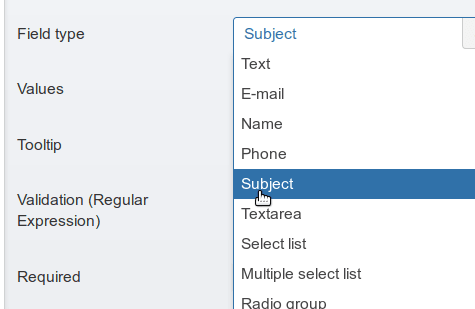
- For the Required parameter, click Yes:

- Click Save.
Excellent. Your form now has a field for its subject.
Your form subject will be included in the subject of the emails automatically sent by your form once it is submitted.
In one of the next steps, you will learn how to add a custom text before this form subject in the emails' subject.
Before that, let's first set those automatically sent emails.
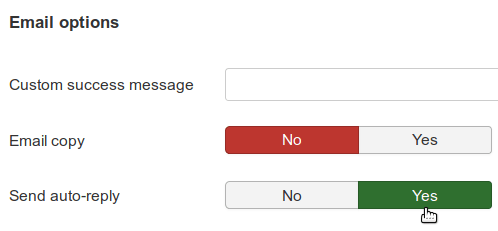
Step #2 - Enable and create automatically sent email replies
Shack Forms is enormously flexible. You can set it to automatically email two separate personalized replies once the form has been submitted:
- One - to the form submitter.
- Another - to the site administrator.
As we discussed just a minute ago, both emails will have the same subject. It will consist of a custom text you will set in the next step + the subject of the form.
Let's set these two emails.
- Go to the Email tab:

- Go to the Email options group of settings and set the Send auto-reply parameter to Yes:
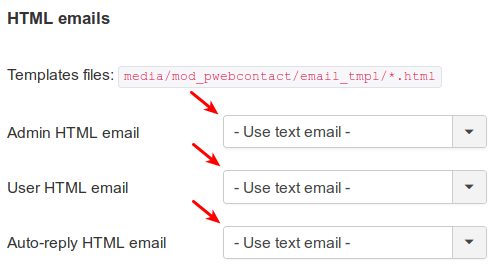
- Go to the Email template tab:

- In the HTML emails group of settings, set all three settings to Use text email:
- In the Admin text email box, enter a text of a message that you would like to be automatically sent to your site administrator once the form is submitted:

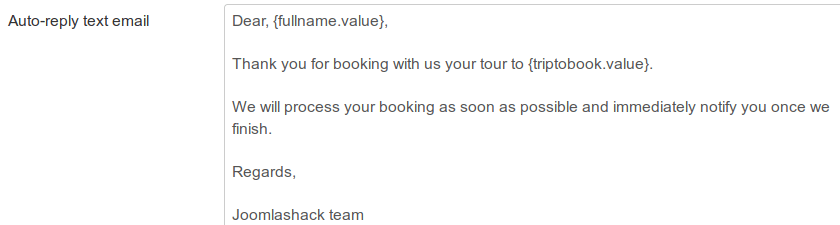
- In the Auto-reply text email box, enter a text of a message that you would like to be automatically sent to the form submitter once they submit the form:
- Click Save.
Good job! You now set the form's subject field and two auto-reply emails.
The emails will be instantly sent to the form submitter and site administrator once the form has been submitted.
In the next step, you will set some custom text to be added at the beginning of the subject of those two emails.
Step #3 - Set custom text part of the subject of the emails
- Go back to the Email tab.
- In the Email subject group of settings, enter your own text into the Email subject field.
- Set the Email subject suffix setting to Form field.
- Keep Enable tickets set to No:
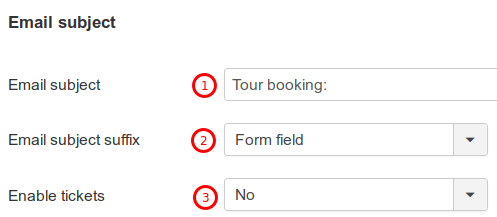
- Click Save.
Excellent. You now set the two-part email subject.
It will be used by the automatically sent by the form emails.
The custom text you entered into the Email subject field will be the first part of the email subject.
It is the email subject prefix.
The value of the form's Subject field will be the second part of the email subject.
It is the email subject suffix.
In the next step, you will specify what the suffix value will actually be.
You will manually set it within the HTML code of the link, clicking upon which your site visitors will get the form displayed to them.
Step #4 - Create the link to open the form with the pre-loaded subject
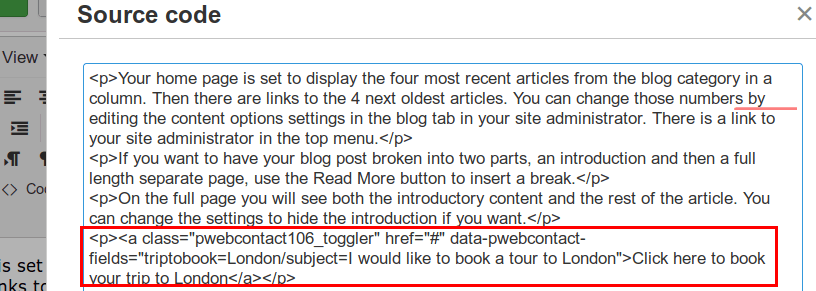
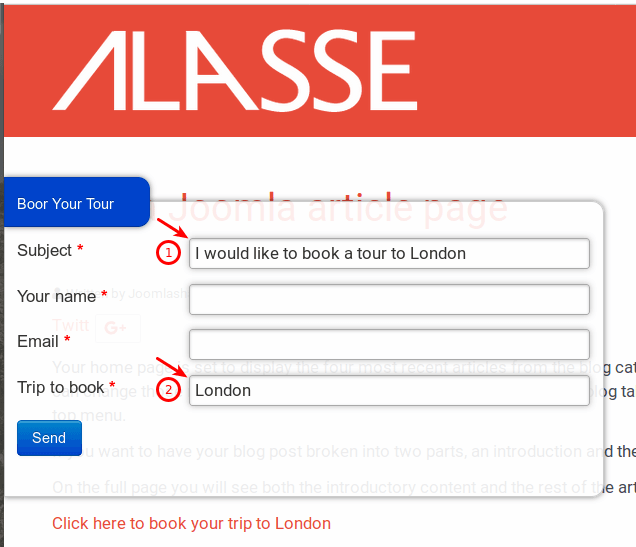
- In a Joomla article, create and save a link with the following format:
<a class="pwebcontact106_toggler" href="#" data-pwebcontact-fields="triptobook=London/subject=I would like to book a tour to London">Click here to book your trip to London</a>
Replace the 106 bit with the ID of your form. You can find what your form ID is under the Documentation tab after the pwebcontact strings:

Make sure you replace the triptobook=London/subject=I would like to book a tour to London bit between the double quotes with your own pairing field_alias=text_to_preload_it_with.
- In my example link above, I pre-loaded the Trip to book field. Its alias is
triptobook. I pre-loaded it with theLondonvalue. - As you see, I also pre-loaded the Subject field. Its alias is
subject. I pre-loaded it with theI would like to book a tour to Londonvalue:
Great! You are all set! You now have a form:
- That will open up upon a visitor clicking on a link in a Joomla article.
- That will open up with two of its fields pre-loaded with the values, set in the link.
- That, once it is submitted, will instantly send out two emails:
- One - to the form's submitter.
- Another one - to the site administrator.
- That will construct the subject of these two emails from the two parts:
- From the custom text that you entered into the Email subject parameter under the Email tab.
- From the form Subject field, that will be pre-loaded by a value you manually set in the link in a Joomla article.
Now is a good time to put your work to test.
Step #5 - Test emails sent to the form sender and administrator
- Click on the link you create in a Joomla article of your choice.
- Fill in the form and submit it. Make sure the email address you enter into the Email field is a valid email address to which you have an access.
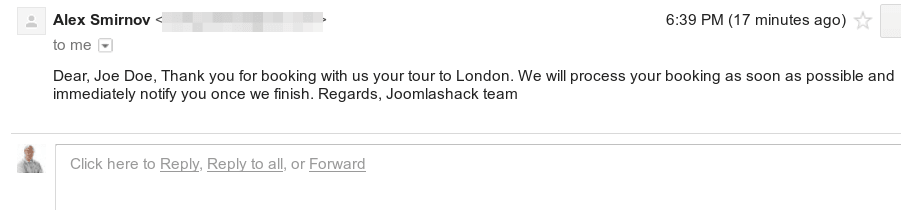
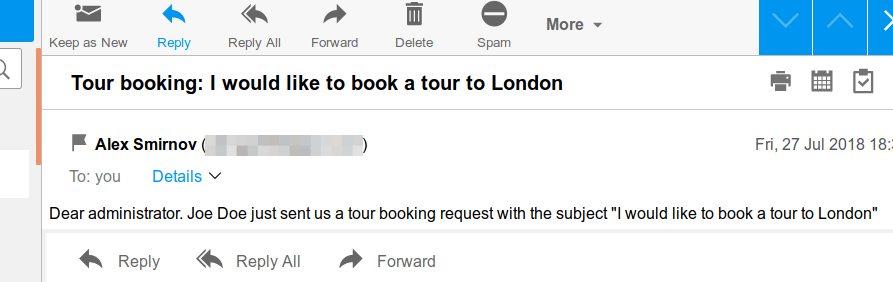
If you check your site administrator inbox, you will see the email with the subject and text just as you set:
Check the inbox of the form's submitter. You will see once again the email subject and text you set in this tutorial: