
In this tutorial, we show you how to install a brand new multilingual Joomla site. If you already have a unilingual Joomla site and want to add another language, skip this post.
In this blog post, you will learn:
- The best place to install Joomla
- The best way to install a multilingual Joomla site
Choosing the Best Place to Install Joomla
Joomla is not like many other software programs. It can’t just run on any computer. It requires a server in order to run successfully. That means you normally have the choice of installing Joomla in one of two places:
- A local server installed on your computer
- A web server
Choosing the best place to install Joomla is important, so here is an explanation of the difference between the two options.
Your Computer
There are several useful advantages to working on your computer:
- Working offline: You can work without an internet connection.
- Privacy: Your Joomla site will be safe and private, accessible only to people who can access that computer.
- Free: There are no fees to pay.
However, there are also several important disadvantages to using a computer:
- Extra installations needed: You need to download and configure special software for your computer.
- Difficult to get help: You can’t easily show it to other people and ask for help.
- Only one computer: You can only access it from the computer you used to install it.
- Need to move in order to launch: When you’re ready to make your site public, you’ll need to move everything to a web server and adjust for any differences between the two locations.
Because of these disadvantages, installing on your computer can present significant obstacles for a beginner. I’m going to recommend that you don't take this route until you have more experience.
A Web Server
Unlike your computer, a web server is specifically designed for hosting websites so they are easy to visit for anyone who’s online. If you work for a company, they may be able to provide a server.
However, for most of us we’ll need to rent space from a hosting company. There are two common types of web servers, Linux and Microsoft. Both require PHP, because that is the language Joomla is written in, and MySQL, because it is the type of database Joomla uses.
These are the minimum versions recommended:
- PHP: 5.6 or above.
- MySQL: 5.5.3 or above.
Linux servers also require Apache, a type of web server software. The minimum version for that is 2 and above. When it comes to choosing a server, Apache has long been the favorite choice for running Joomla.
Microsoft is working hard to make Joomla run as smoothly as possible on their servers, but for now, Apache is still my recommendation. Most hosting companies support Joomla, but it’s worth choosing carefully. Some hosting companies are much better than others. Here is some advice before picking your host:
- Search https://forum.joomla.org for other people’s experiences with that host.
- Contact their customer support and ask them what they know about Joomla. One of our training students actually called the phone numbers of several hosts and timed their responses. After all, in an emergency you don’t want to be on hold for an hour or talking to someone who knows nothing about Joomla.
- Check prices. Most good hosting companies will charge around $6 to $10 per month for approximately 1 GB of space (enough for a 2000 page site) and 50 GB of bandwidth (enough for about 100,000 visitors per month).
Choosing the Best Way to Install Joomla
For people who choose to install Joomla on a web server, there are two common ways to install Joomla:
- Use a “One-Click” installation.
- Upload the files and create the database manually.
The “One-Click” installation method is the fastest and easiest way to install Joomla. This method is done through a control panel such as those offered by Fantastico, Softaculous, cPanel and Plesk. We do recommend that you install Joomla multilingual sites manually.
This is because the "One-Click" installation methods don't support the creation of multilingual sites. This means that you’ll be moving Joomla files to the web server. For that, we’ll need FTP (File Transfer Protocol) software.
One good choice is Filezilla, which is free to download and can work on Windows, Mac or Linux computers. To download it, go to https://filezilla-project.org and click on “Download Filezilla Client”.
How to Install a Multilingual Joomla Site
An old-fashioned HTML website consists only of one part: files. It doesn’t need anything else to run. However, a Joomla website is a little different because it consists not only of files but also a database to store all the site’s information.
We’re going to have to set-up both the files and the database, then connect them together. So, the process of installing Joomla manually is this:
- Step #1: Create a database
- Step #2: Download the Joomla files and upload them to our web server
- Step #3: Complete the Joomla installation by connecting the database and files together
Our first step will be to create a database to store all the unique information about our site. A database is basically a group of tables with letters and numbers stored in its rows and columns. Think of it as several spreadsheets. There’s a spreadsheet with all of the articles you write.
There’s another for all of the users who register on your site. The database makes it easy for Joomla to easily handle large amounts of data. If a new article or user is added, Joomla just needs to add an extra row to the appropriate spreadsheet. Joomla uses a particular type of database known as MySQL.
Let’s go ahead and set up a database for our new Joomla site:
- Log in to your web hosting account. In this example, we’re using a web hosting control panel called CPanel, as provided by a hosting company called Siteground.com. Their version of CPanel looks like the image below. Your hosting company may offer a slightly different version of CPanel, or they may offer an alternative that looks a little different but works in a very similar way.
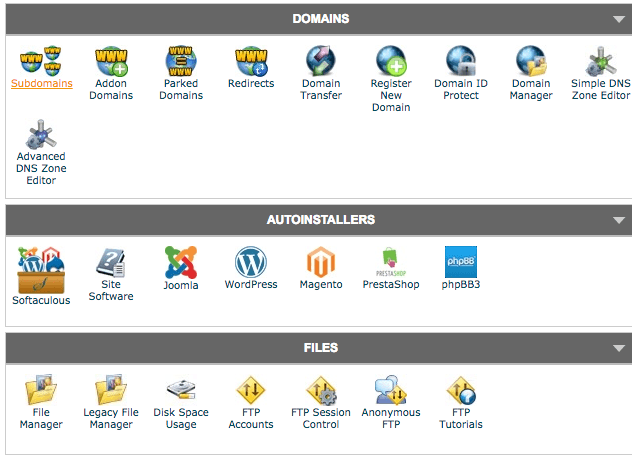
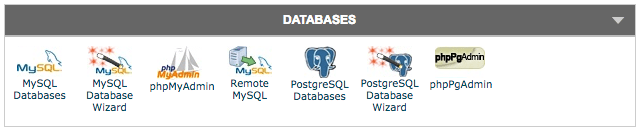
- Find the button that says "MySQL Databases" (as seen on the far left of the screen below) and click it. The button may be on any of the rows, but you can normally spot it by looking for the MySQL name and the blue dolphin logo.
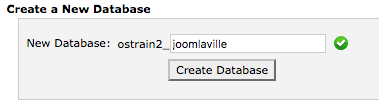
- Enter a name that is relatively easy to remember and click “Create Database”. Be sure to write this name down, and note that it’s likely to have your hosting account name before it. In the image below, our new database will be called ostrain2_joomlaville.
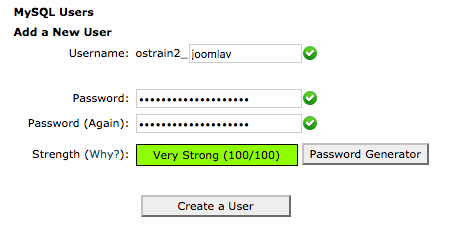
Next, we create a user account so that we can access the database. Without password protection, anyone might be able to log in and see our site’s important information. Here’s what you need to do:
- Choose a username. Enter a short username here, different from anything you’ve used before. In this example, I’m using "joomlav". The username is a little confusing because our hosting account name is added also, so in the image below, our full username will be ostrain2_joomlav.
- Choose a password. Some versions of CPanel will help you choose a password that is very difficult to guess. If you set your own choice, please use a combination of numbers, punctuation and uppercase and lowercase letters so that the password is hard to guess.
- Be sure to record both your username and password safely. We’re going to need them again very soon.
- Click "Create User". You should see a message saying the user has been created successfully.
Now we need to allow our new user to be able to login to the database.
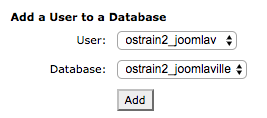
- Find the area called "Add User To Database".
- Choose your database name and then your username before clicking "Add".
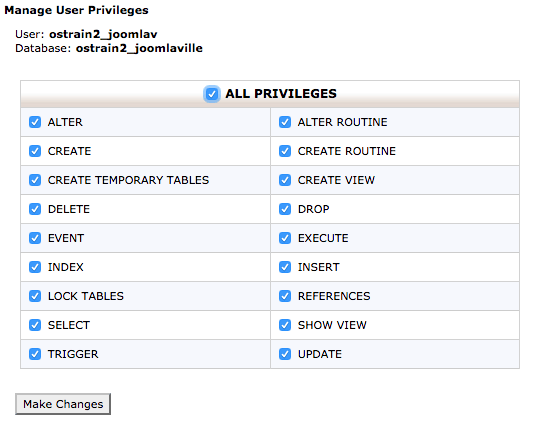
- The final step in this process is to decide what our new user can and cannot do with the database. As in the image below, we’re going to give them “All” permissions so that our Joomla site can make whatever changes it needs to the database. Click on "Make Changes”" to finish the process:
Step #2: Download the Joomla Files
Now that we have the database ready, we’re going to download the Joomla files. These contain all of the code and images that Joomla needs to run.
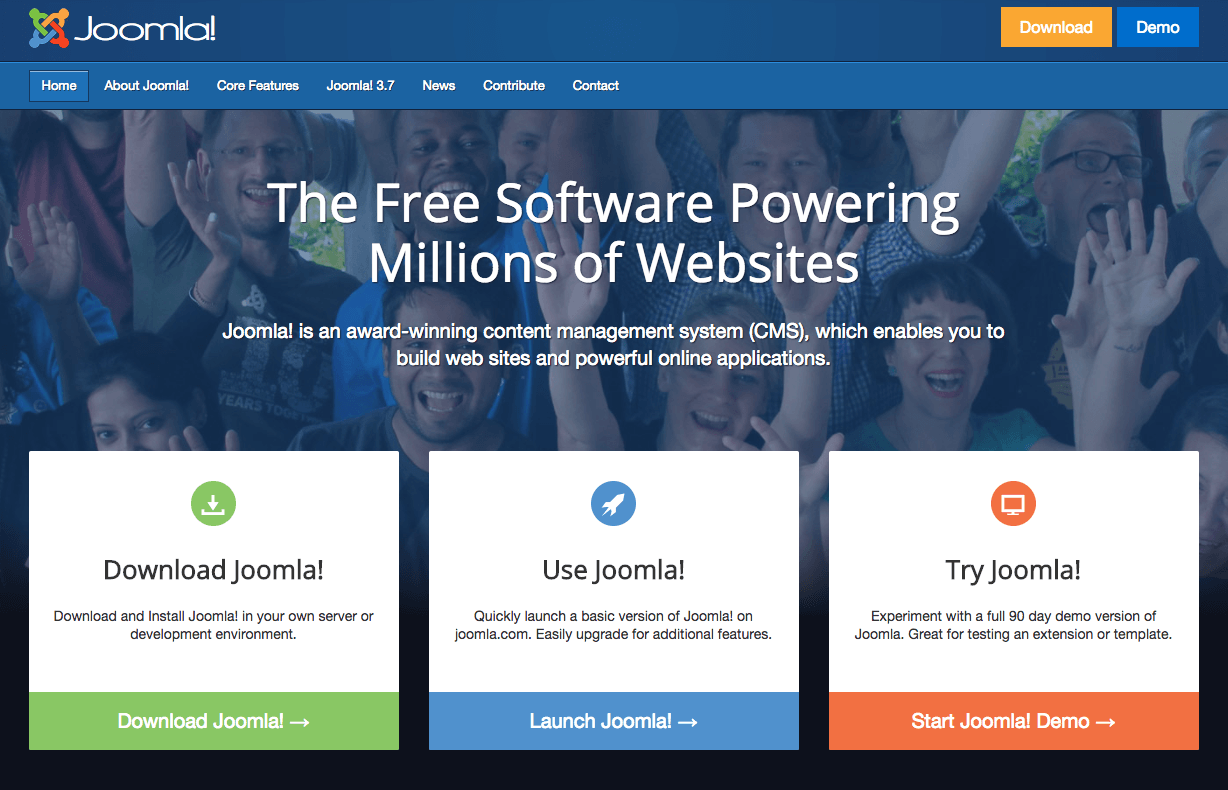
- Go to https://joomla.org and click on the button saying "Download Joomla!".
- You’ll now see a page with several download links. Click the "Download Joomla!" button on the left.
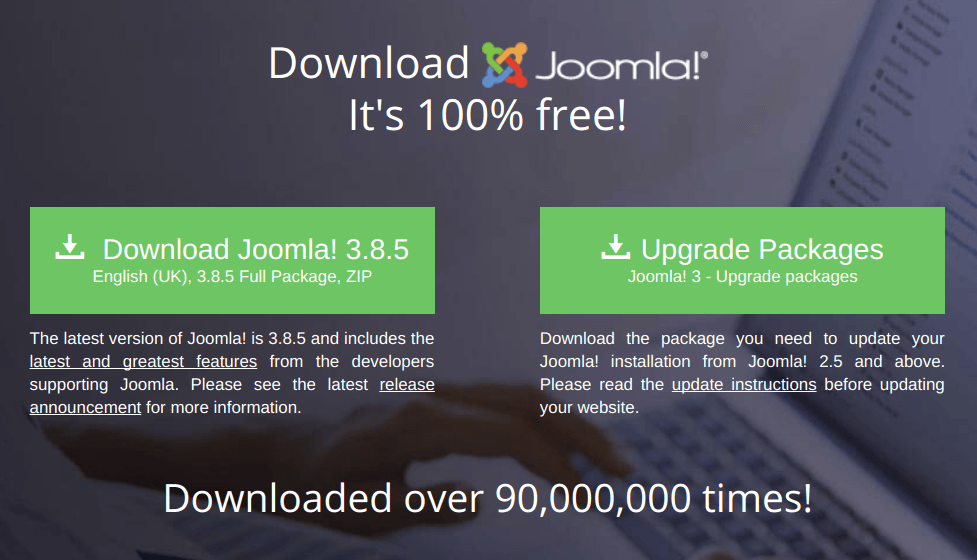
- After clicking the download link, you’ll receive a .zip file with a name like this: Joomla_3.8.5-Stable-Full_Package.zip. It contains all the files you’ll need to install Joomla.
- Now you need to uncompress the .zip file. On a Windows computer, you can right-click on the file and choose “Extract Here”. On a Mac, if the file doesn’t unzip automatically, you can click on "File" then "Open With" and choose "Archive Utility". The folder will have a name similar to Joomla_3.8.5-Stable-Full_Package. Right-click on the folder and rename it to /joomlaville/.
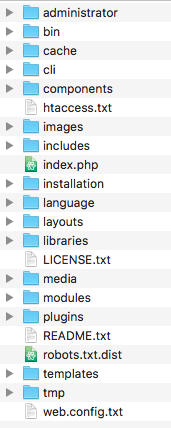
- Open the folder, and the contents will look like this:
We’re now going to start the process of moving our files on to our web server.
- The first step is to open your FTP software such as Filezilla. Then log in to your FTP account and browse to the folder where you want to install Joomla. Often this will be the root directory, which often has a name such as /public_html/, /www/ or /htdocs/.
- Select the folder that you just downloaded, extracted and renamed. Move this folder via your FTP software into the folder where you’re installing Joomla. With Filezilla this is as simple as dragging-and-dropping the files. Uploading might take from 5 to 30 minutes or more depending on the speed of your internet connection.
Step #3: Complete the Joomla Installation
We’ve now successfully set up the two halves of our Joomla site: the database (Step #1) and the files (Step #2). Our final step is to connect those two halves together.
- Start your browser and visit the URL where you uploaded the files. In the example I’ve been using, that was to https://ostraining.com/joomlaville/.
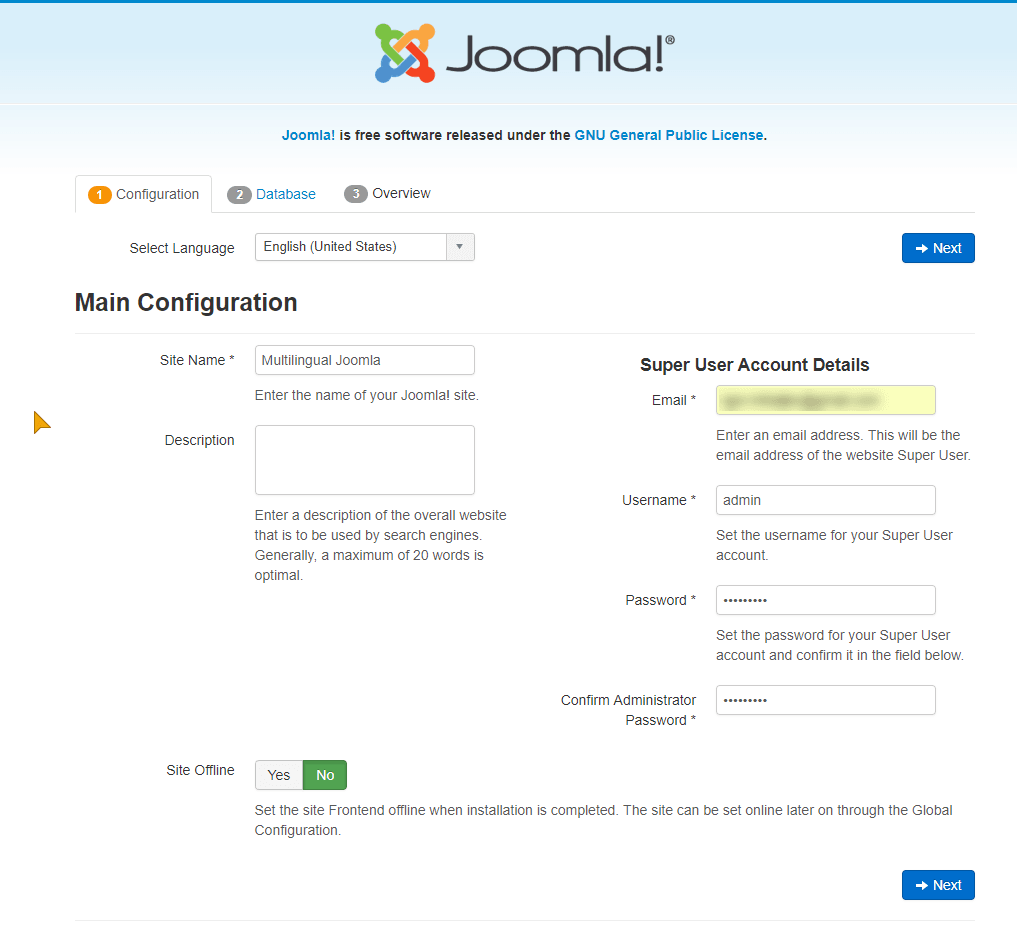
- You should see an installation screen like the figure below. This is the first step in Joomla’s easy-to-use installation manager.
Enter the information listed here, and then click the "Next" button:
- Site Name: Multilingual Joomla
- Admin Email: Enter your email address.
- Admin Username: Enter the username you want to use when you log in to your site.
- Admin Password: This is the password you’ll use to log in. Please don’t use “admin” here also! Don’t use “password”, “1234” or “iloveyou” either. A good combination of numbers, punctuation and uppercase and lowercase letters is vital.
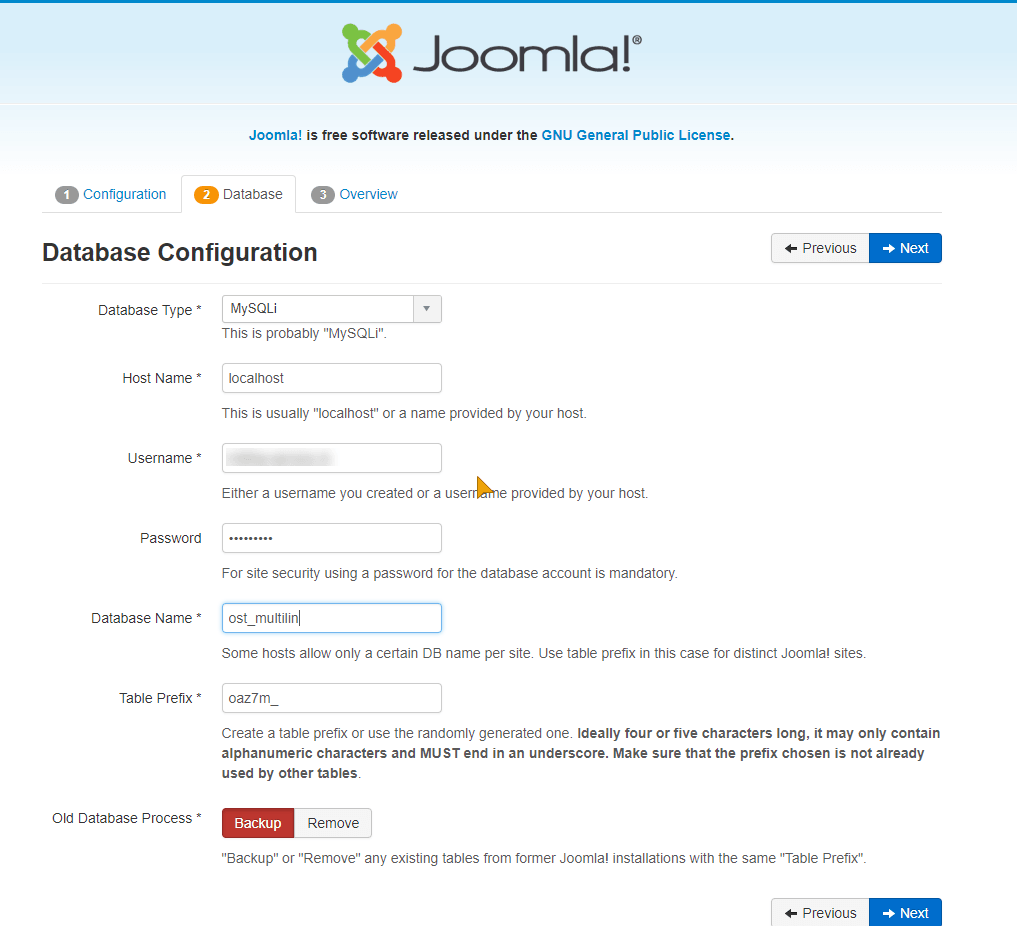
After clicking "Next", you will be asked for your database details. This is where you connect your files and database together.
We’re going to need the details we collected when we created the database earlier. Enter the information we list here, and then click the "Next" button.
- Username: Enter the details you collected earlier.
- Password: Enter the details you collected earlier.
- Database Name: Enter the details you collected earlier.
Next, let’s install some sample data so that our site is ready to use straight away. In the options below, choose "Brochure English", as shown in the image below:
- Install Sample Data: Choose Brochure English. This is going to give us some basic English pages that we can work with and translate into French. Don't worry if you skip this step or make the wrong choice.

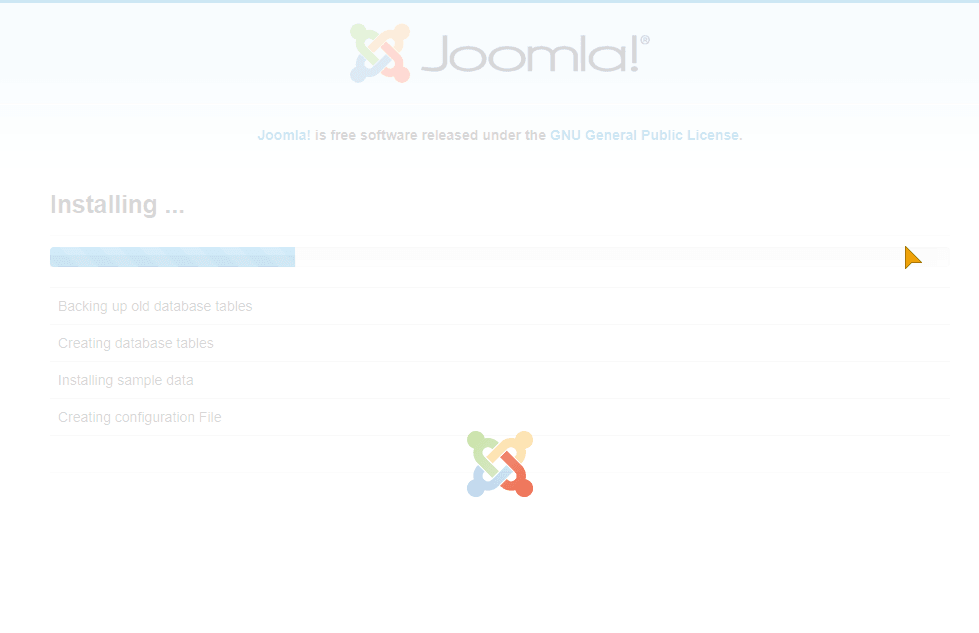
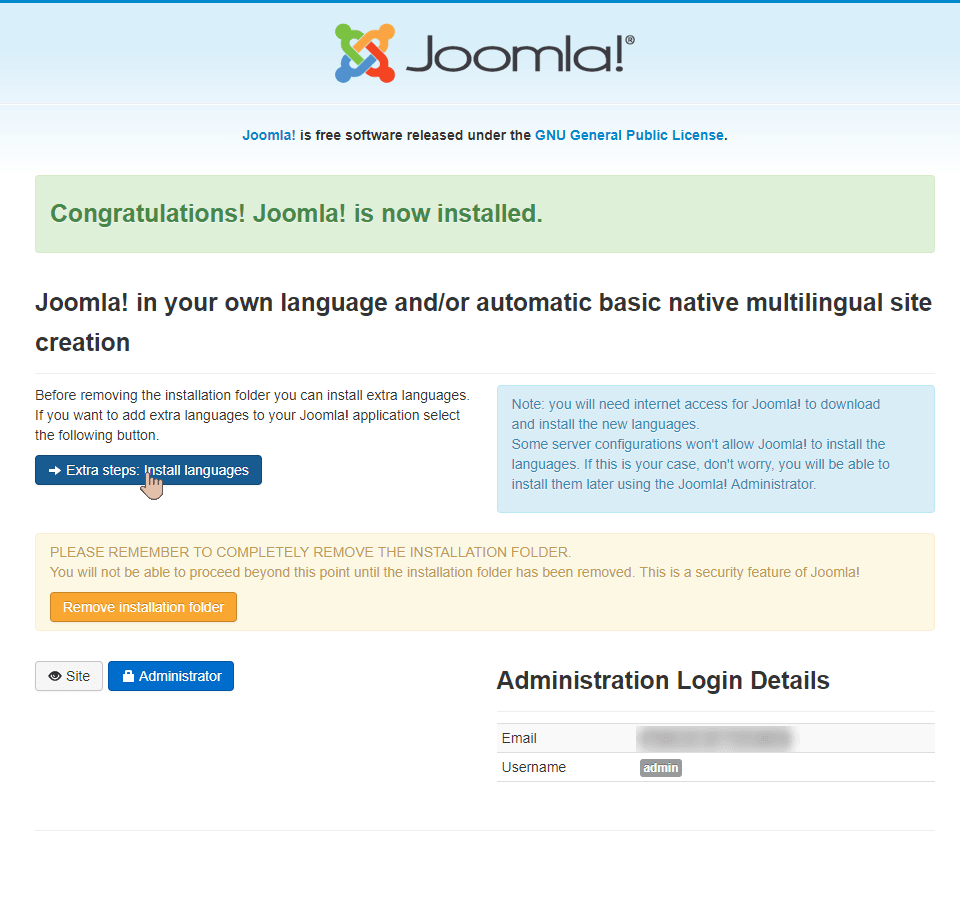
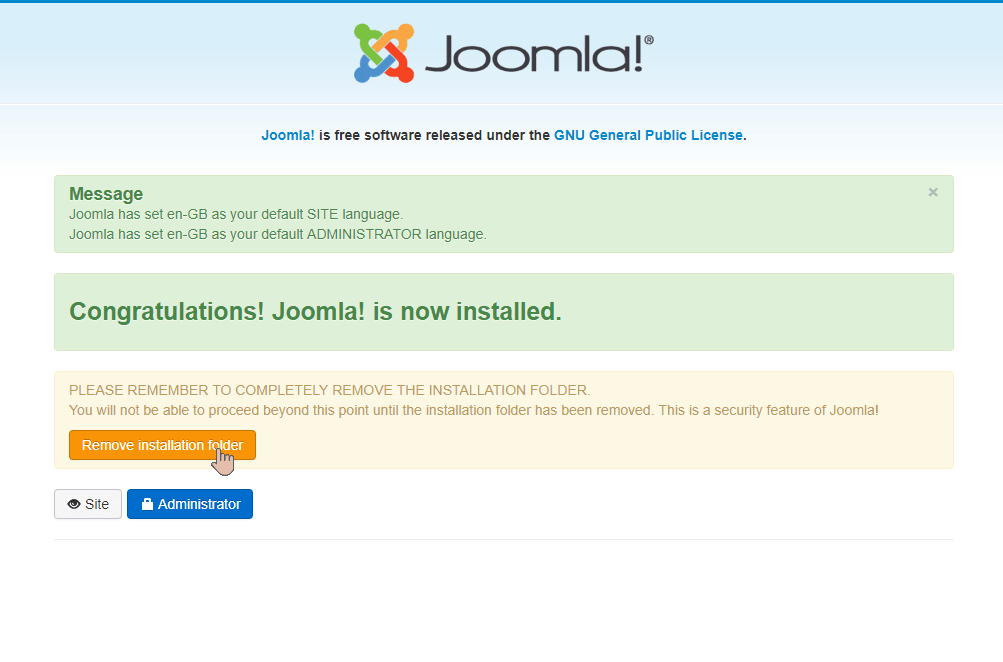
After you click on the blue "Install" button, Joomla is going to install your website. If you are building a multilingual Joomla website, the most important step is going to come on the next screen, after this installation process has finished.
Normally, you would click on the "Remove installation folder" button to finish the installation process. However, we need to take a different approach for our multilingual site.
- Go and click on the blue button with the title "Extra steps: Install languages".
You now get a choice of all the different languages that are available for Joomla: Afrikaans, Albanian, Croatian, all the way down in the alphabetical order.
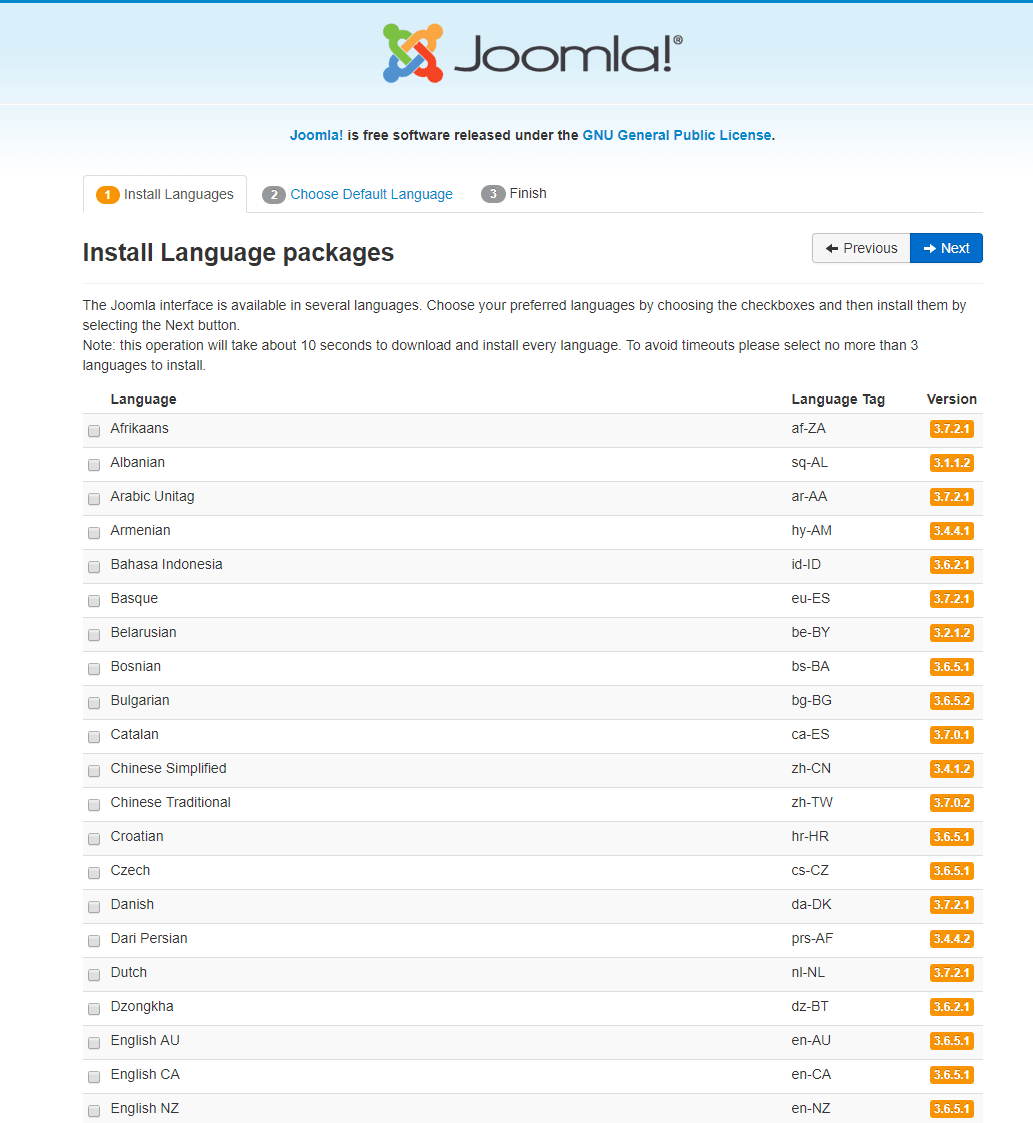
Don't worry too much if you see the message saying "Language pack does not match this Joomla version. Some strings may be missing". Despite this message, it is likely that you are going to have 98% or 99% of the language you need and maybe just one or two tiny items are missing.
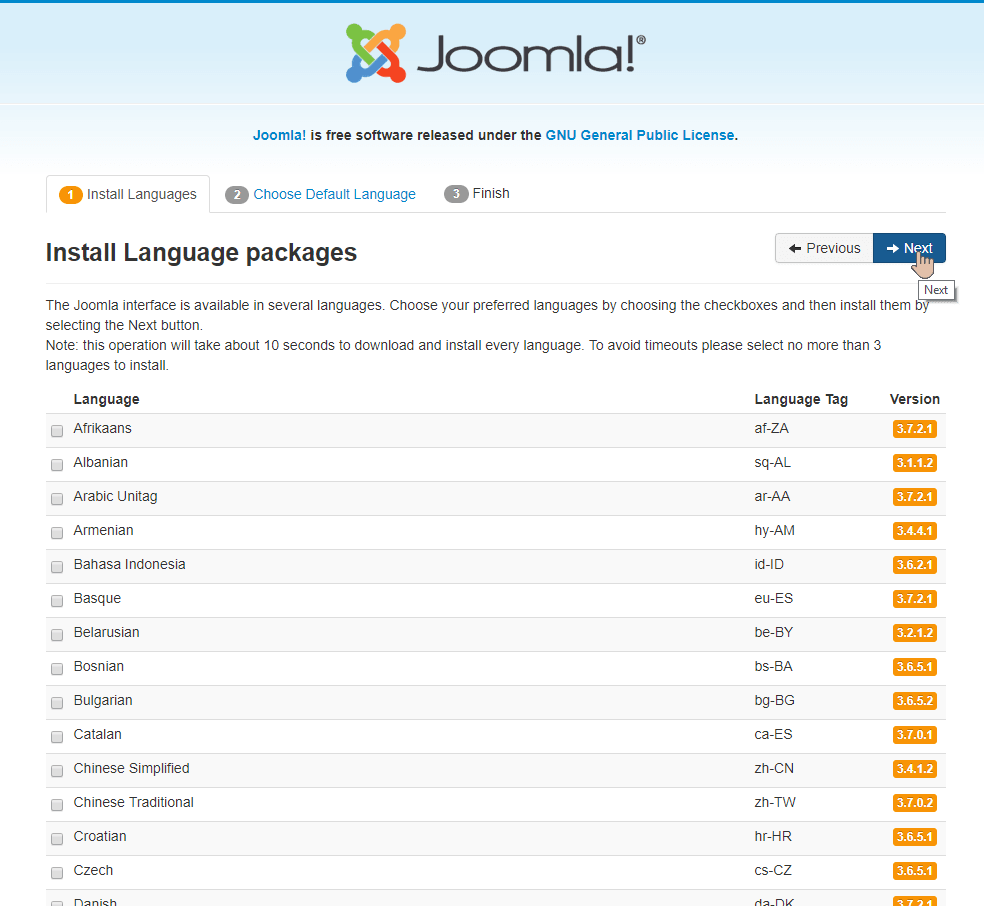
- We are building a website in English and French, so click on the "French" box.
- Scroll up to the top and click on "Next".
- In the "Default Administrator language" and "Default Site language" areas, choose the primary language for your site. This will be the default language that users see when they login, although they will quickly be able to choose a different language.
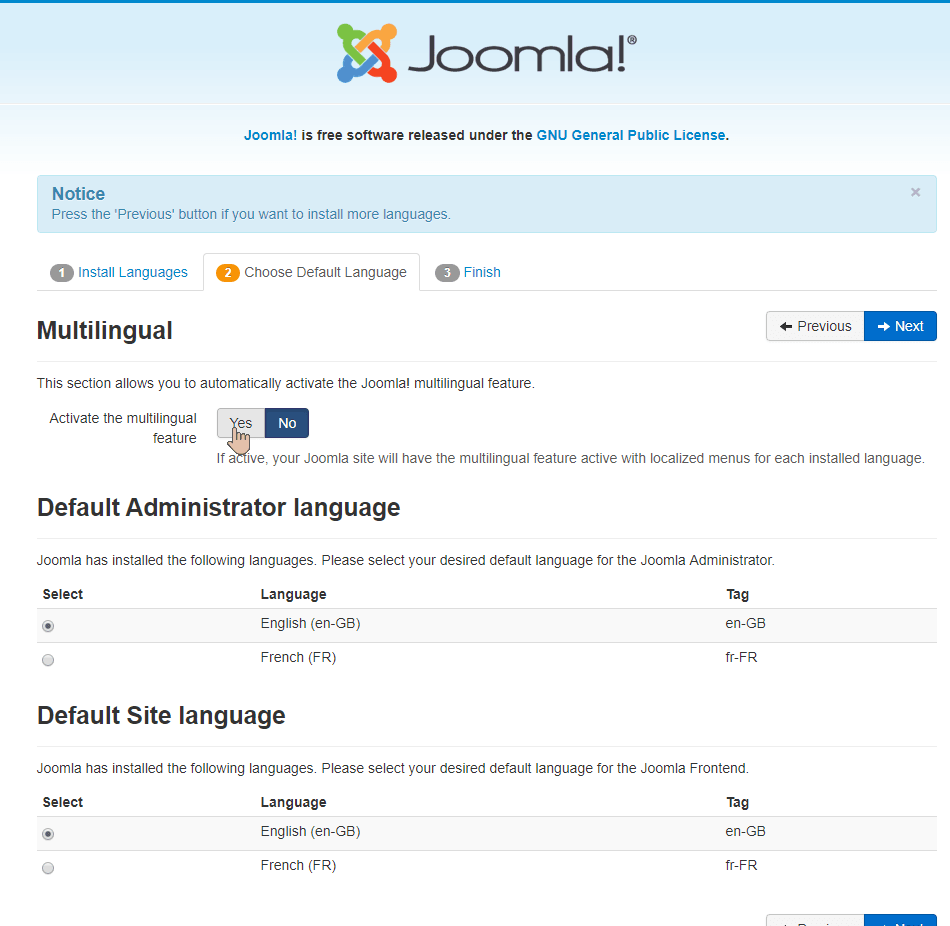
- Click Yes for "Activate the multilingual feature".
- Click Yes for "Install localized content".
- Click Yes for "Enable the language code plugin".
This language code plugin is important because it will create different URLs for different languages. For example, all the English pages may start with "en" in the URL. All the French pages may start with "fr" in the URL:
- https://example.com/en/about
- https://example.com/fr/faites-notre
This enables us to keep a clean organization of the URLs on our site.

At this point, we have nearly completed the installation process.
- Click on "Next", and you will be taken to the final page.
- Click on the "Remove installation folder" button.
- Click the "Site" button. You will be taken to visit your multilingual site.

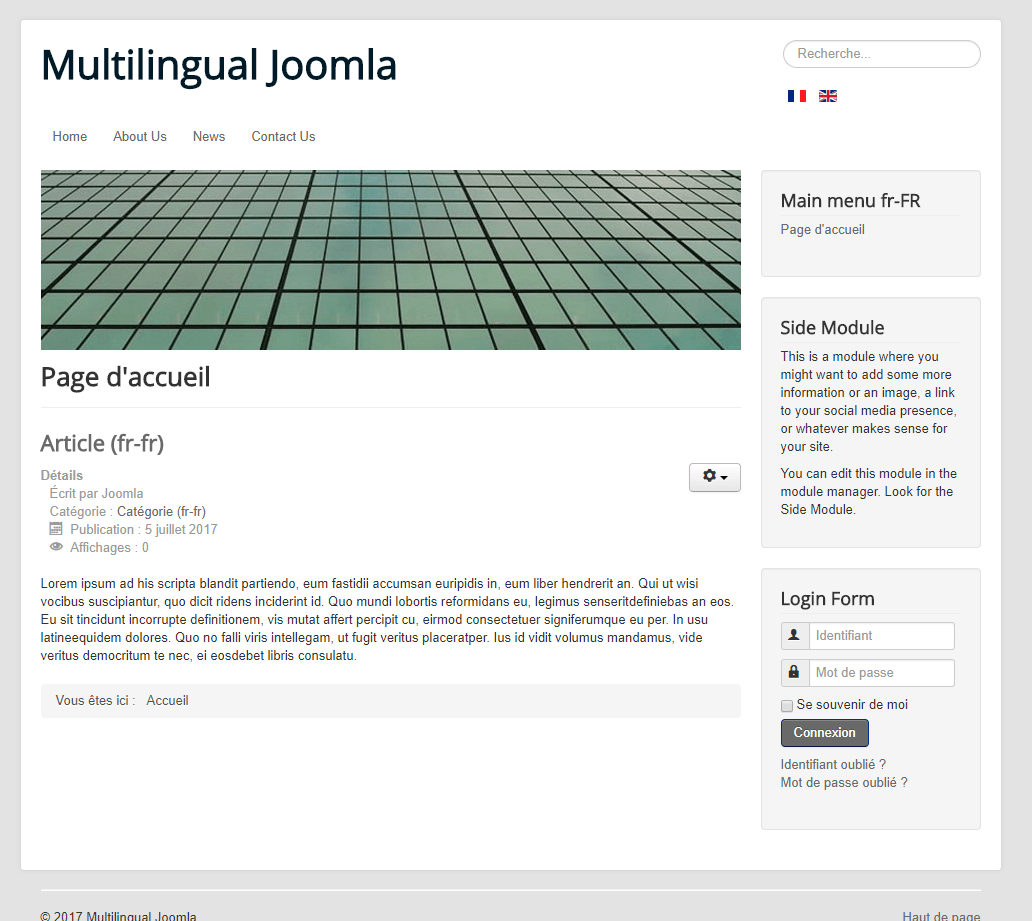
Look at your new site. You will notice several things:
- In the top right corner, there is a French flag and an English flag, already setup and already created for us.
- The default language of the site is English, although there is also some dummy content in Latin.
- Some of the English items are marked en-GB which means that the British version of English is being used.

- Click on the French flag in the top-right corner.
Notice how you can move back-and-forth between the French and English version of the site. As you change between English and French, you will see that that "en" and "fr" are in the URL.
We have a multilingual site that is working successfully! So, if you install a brand new Joomla site and choose the settings that we just did, it really is a big help in getting started with a multilingual Joomla site.
- Add the word "administrator" to your domain name so that you are visiting https://example.com/administrator.
- On the login screen, you will be presented with a language choice. If you login in English, you will be presented with an admin interface in the English language. However, if you login in French, you will be presented with an admin interface in French. The whole interface has been translated for you in French.
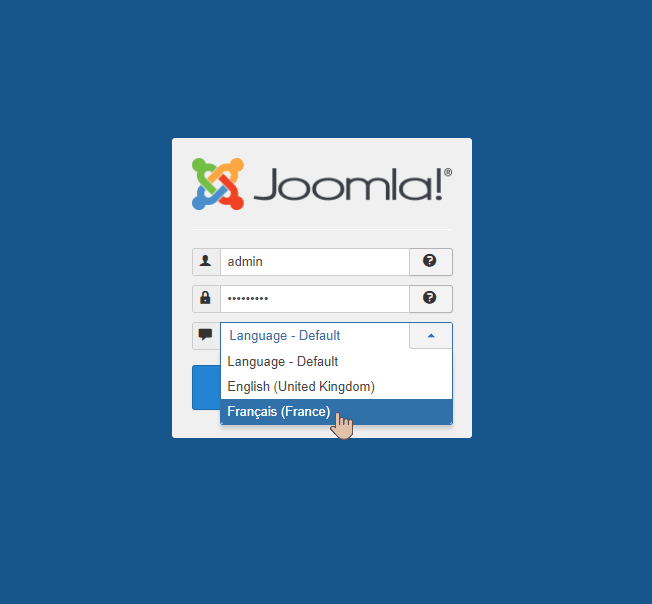
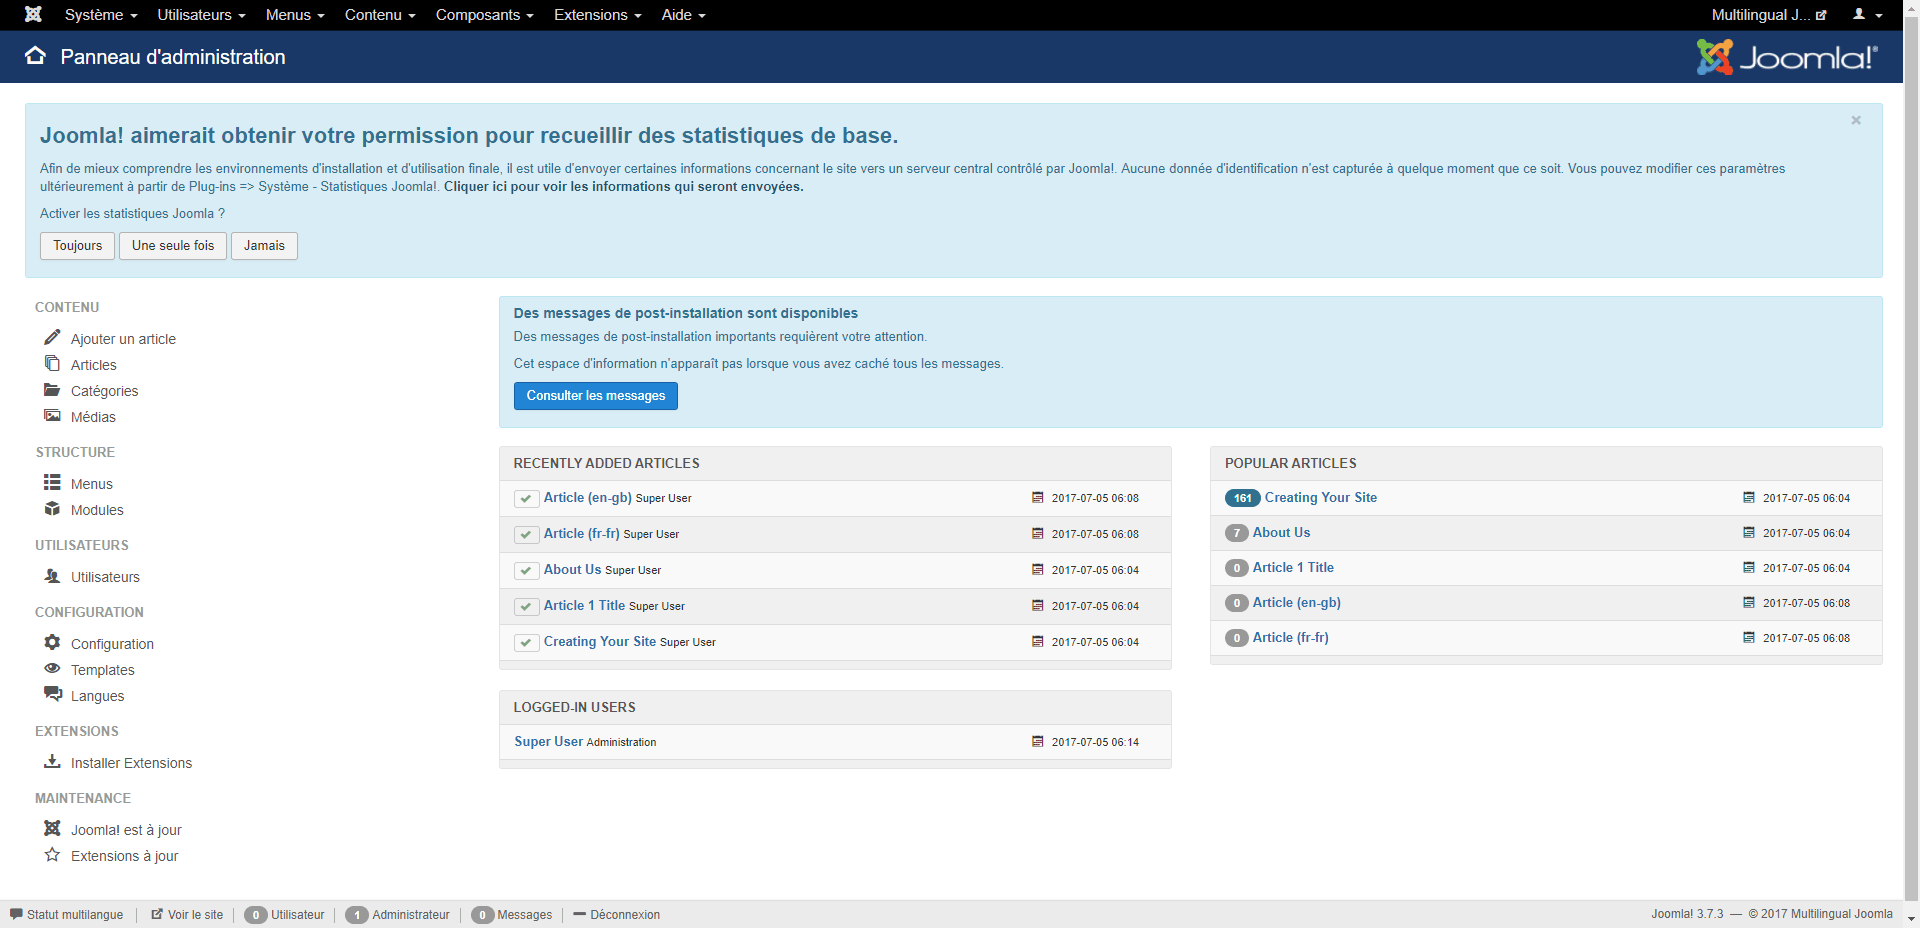
Take a look around at the French and English versions of the admin area. You may need to login and logout to change the language display.
You'll see that the whole of the admin interface is successfully translated. You really now do have a good basis for building a multilingual site.
Additional Reading
- Introduction to Joomla Multilingual Sites
- 3 Different Approaches to Multilingual Joomla Sites
- What are Multilingual Associations in Joomla?
- How to Create a Multi-Lingual Sitemap with OSMap
What's Next?
Do you want to learn more about Multilingual Joomla? Join the Joomlashack Everything Club and instantly download the "Multilingual Joomla Explained" book by Igor Muhaljko and Steve Burge.
About the author