Documentation for Joomla 5
After installing Shack Forms Pro on your Joomla 5 site, you'll have one Shack Forms Pro module available by default.
In many cases, you may want to show different Shack Forms Pro modules on different pages of your site. Each module can collect different data and have a unique design and layout.
For example, you might want to display three different form modules, each on a separate Joomla article page.
This setup requires four steps:
- Create the required number of Shack Forms Pro modules.
- Create a hidden menu item for each module.
- Assign each module to its corresponding menu item.
- Test the pages with the modules.
Let's walk through the process step by step.
Step #1. Create the Required Shack Forms Pro Modules
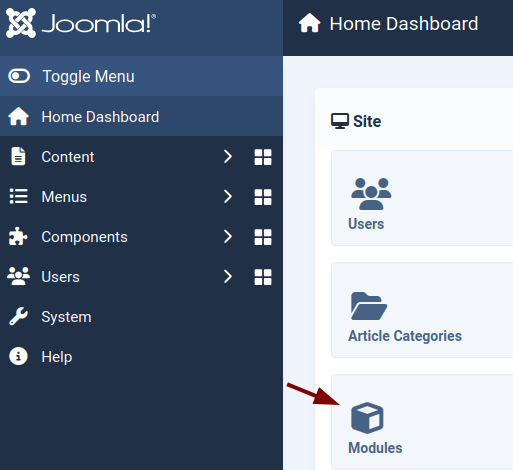
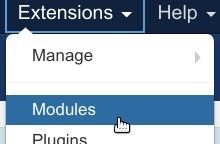
- In your Joomla 5 Administrator panel, go to Modules:
- Click New on the “Modules (Site)” screen:

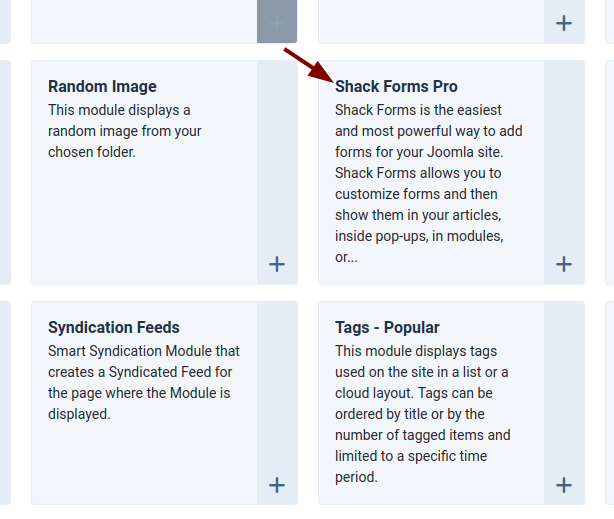
- Select Shack Forms Pro from the module type list:
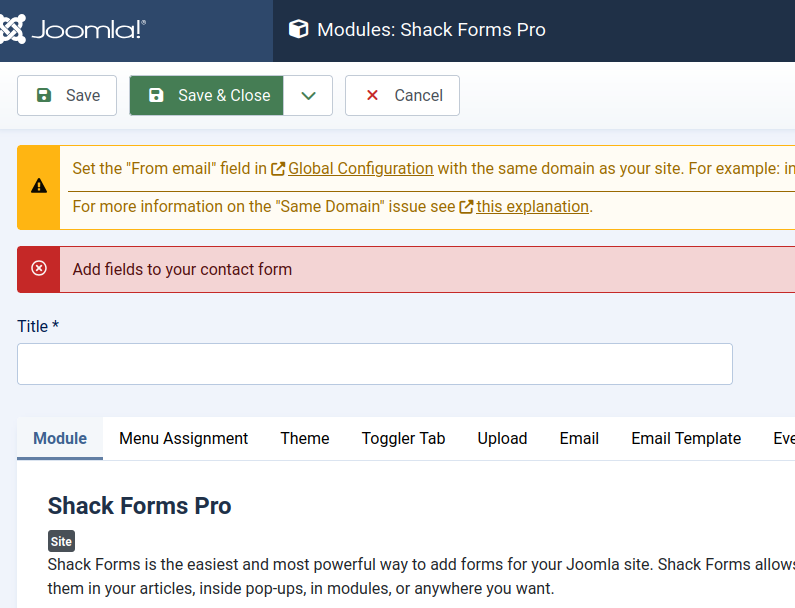
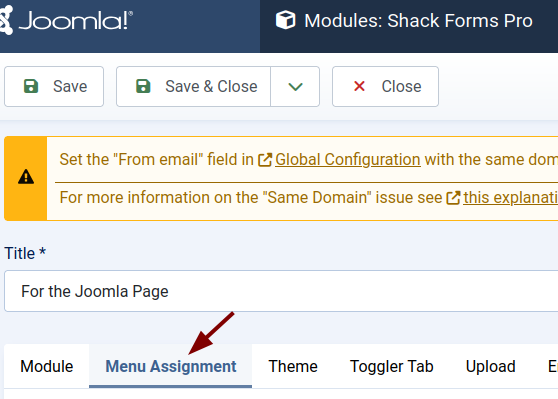
- You’ll arrive at the "Modules: Shack Forms Pro" screen. Configure your module settings as needed.
- Repeat this step to create additional Shack Forms Pro modules as required.
Great! You now have Shack Forms Pro modules ready for each of your targeted pages.
Step #2. Create a Hidden Menu Item for Each Module
In this step, you'll create a hidden menu item for each Shack Forms Pro module. This allows each module to be displayed only on its assigned page.
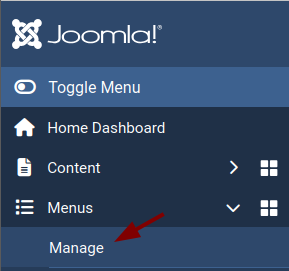
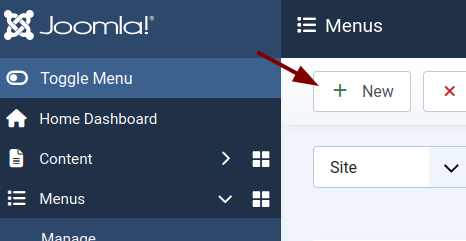
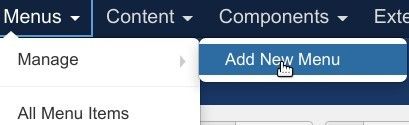
- Go to Menus > Manage:
- Click New on the “Menus” screen:
- Create a hidden menu with the following details:
- Title: For Shack Forms Pro Modules
- Unique Name: for_shack_forms_modules
- Description: Menu for my Shack Forms Pro modules
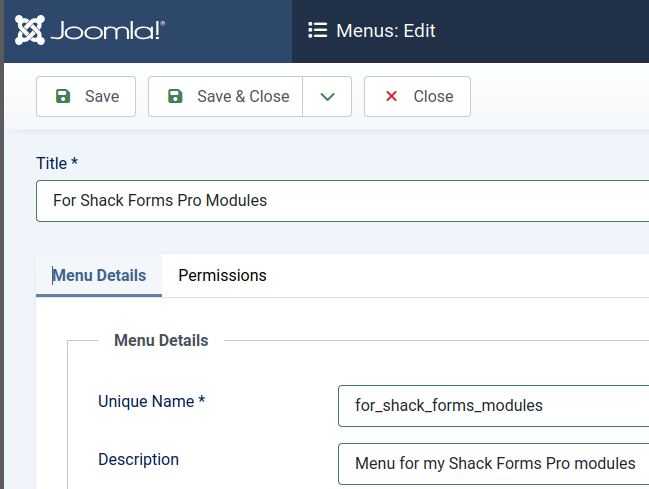
- Click Save & Close.
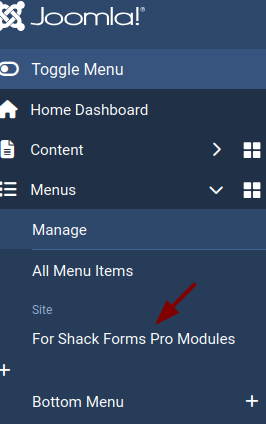
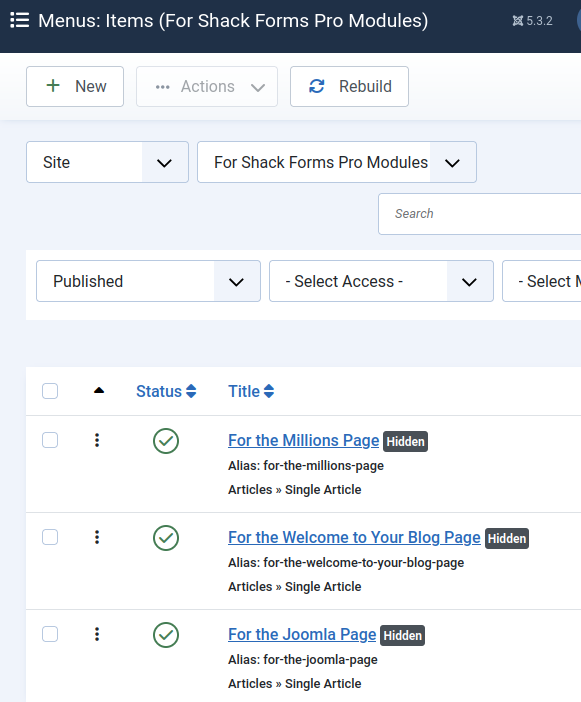
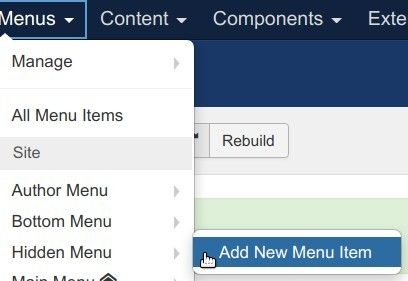
- Go to Menus > For Shack Forms Pro Modules:
- Click New to create a new menu item:

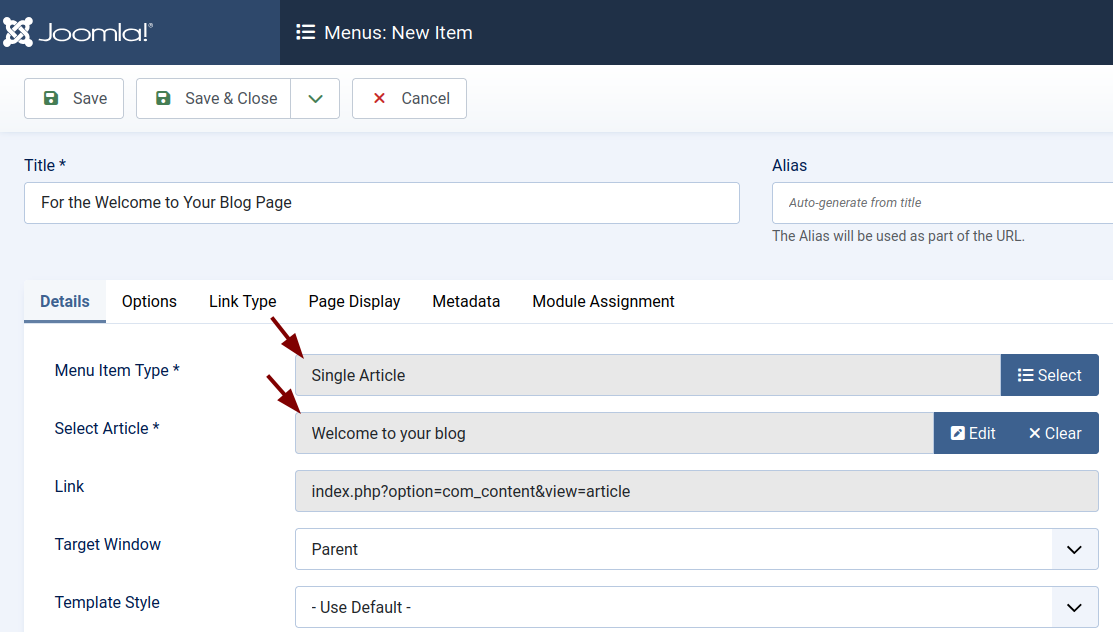
- This opens the "Details" tab. Enter a descriptive title.
- Select Single Article for the Menu Item Type.
- Select the required Joomla article for the Select Article setting:
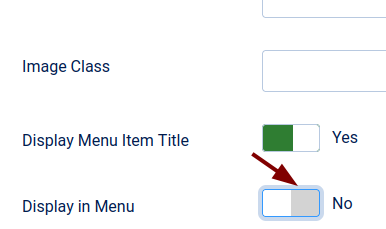
- Go to the Link Type tab and set Display in Menu to No:
- Click Save & Close.
- Repeat this process to create a hidden menu item for each additional module.
Well done! You've now created three Shack Forms Pro modules for your targeted Joomla pages:
You've also created hidden menu items for the pages linked to each Shack Forms Pro module:
You're now ready to connect the forms to their respective pages.
Step #3. Assign Each Shack Form Module to Its Menu Item
In this step, you’ll assign each module to display on a specific Joomla page.
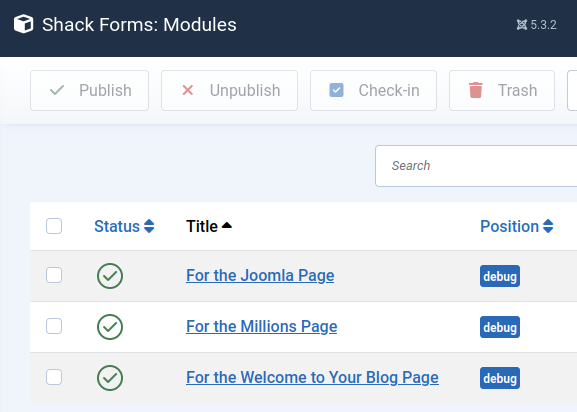
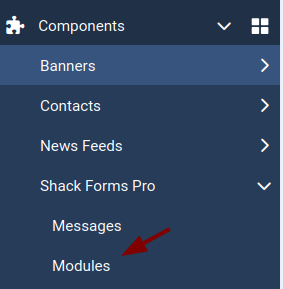
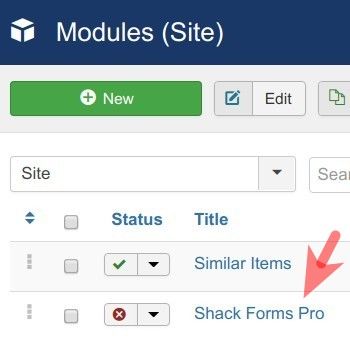
- Navigate to Components > Shack Forms Pro > Modules:
- Edit the module you want to assign to a specific page. In our example, this is the "For the Joomla Page" module.
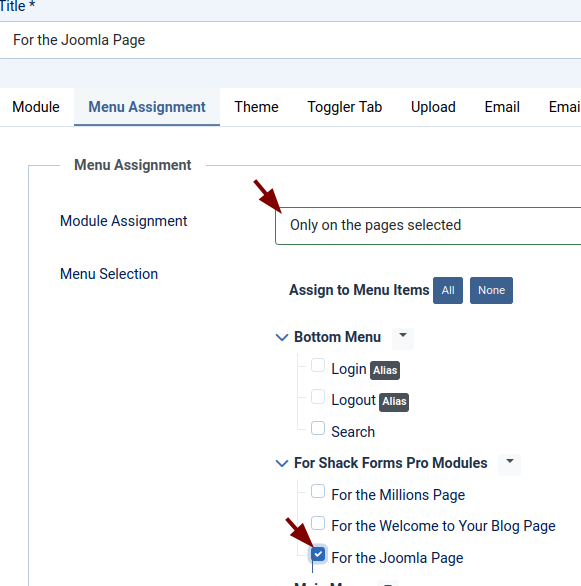
- Click the Menu Assignment tab:
- In the Menu Assignment field, select Only on the pages selected.
- Find the menu item created in the previous step and check its box. In our demo, this is "For the Joomla Page" under "For Shack Forms Pro Modules" menu:
- Click Save & Close.
- Repeat these steps for the remaining modules.
Step #4. Test Your Shack Forms
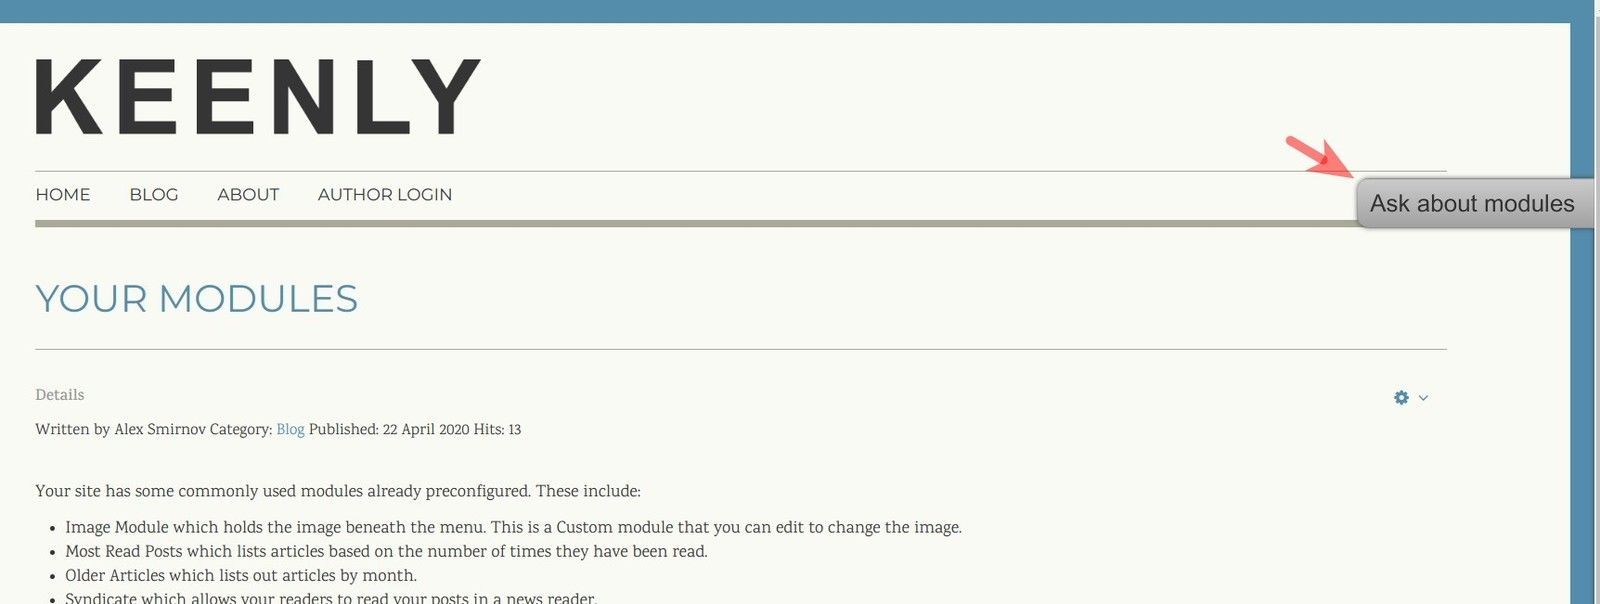
- Visit each of the pages where you've assigned a Shack Forms Pro module. You should see that each page displays its specific form, as intended.
Documentation for Joomla 3
Once you install the Shack Forms Pro on your Joomla site, you have one Shack Forms Pro module installed out of the box:
Sometimes you may want to display different Shack Forms for different pages of your Joomla site. You want each of the forms to collect different data. You also want each of the forms to be distinct and have a different feel and look.
For example, you may want to display three forms as follows.
- One - to display as a slide-in box at the top of the Home page:

Note: See this document on detailed instructions on how to display a Shack Form in a slide in box.
- Another one - to display as a slide-in box in the top right corner of the page of a Joomla article A:
- The third one - to display as a slide-in box at the bottom of the page of a Joomla article B:

Achieving this is a four-step process:
- Create the required number of Shack Forms
- Create a hidden menu item for each Shack Form
- Assign each Shack Form to its menu item
- Test the final result.
Let's take a look at this process in more detail.
Step #1. Create the required number of Shack Forms
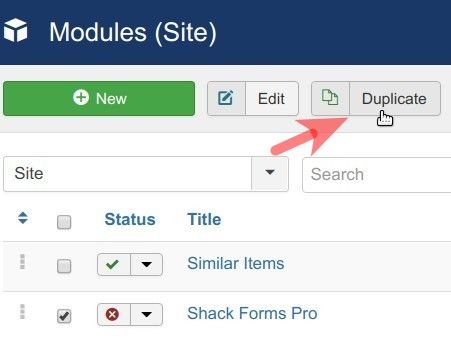
- In your Joomla administrator panel, go to "Extensions" > "Modules":
- You will be taken to the "Modules (Site)" administrative screen. Find the "Shack Forms Pro" module listing and click on the checkbox next to its name to select it:

- Click on the "Duplicate" button at the top of the screen:
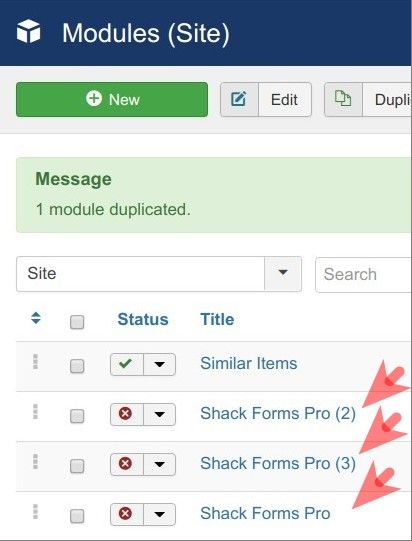
- Repeat this step one more time. You will now see three Shack Forms Pro modules displayed:
- "Shack Forms Pro"
- "Shack Forms Pro (2)"
- "Shack Forms Pro (3)":
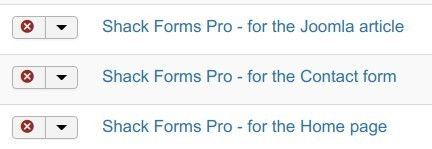
- Rename all three modules to something descriptive. For this document, I renamed my modules as follows:
- "Shack Forms Pro - for the Home page"
- "Shack Forms Pro - for the Joomla article A"
- "Shack Forms Pro - for the Joomla article B":
- Set the fields and feel and look individually for each module as you see fit.
Good job! At this point, you have three Shack Forms Pro modules for each of your required three pages.
Step #2. Create a hidden menu item for each Shack Form
In this step, you will create a hidden menu item for each of your Shack Forms Pro modules, except for the module for the Home page. This will ensure you will be able to assign each module to its required Joomla page.
- Go to "Menus" > "Manage" > "Add New Menu":
- Create a hidden menu similar to the one displayed in the image below:
- Title: Hidden Menu
- Menu Type: hidden_menu
- Description: My hidden menu items
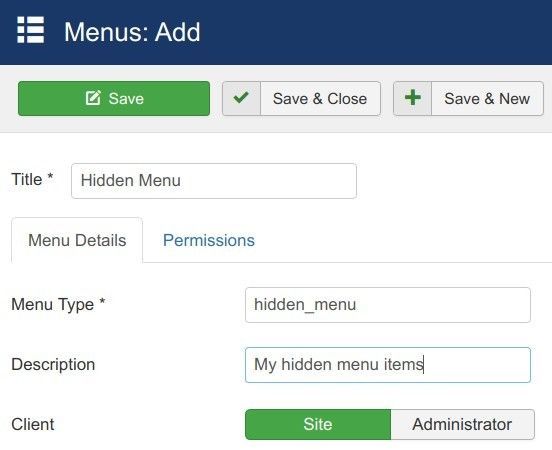
- Click "Save & Close".
- Go to "Menus" > ["Your hidden menu"] > "Add New Menu Item":
For my demonstration, at this point, I will create a hidden menu item for a page with a Joomla article. I will embed the "Shack Forms Pro for the Joomla article" module inside the text of this article.
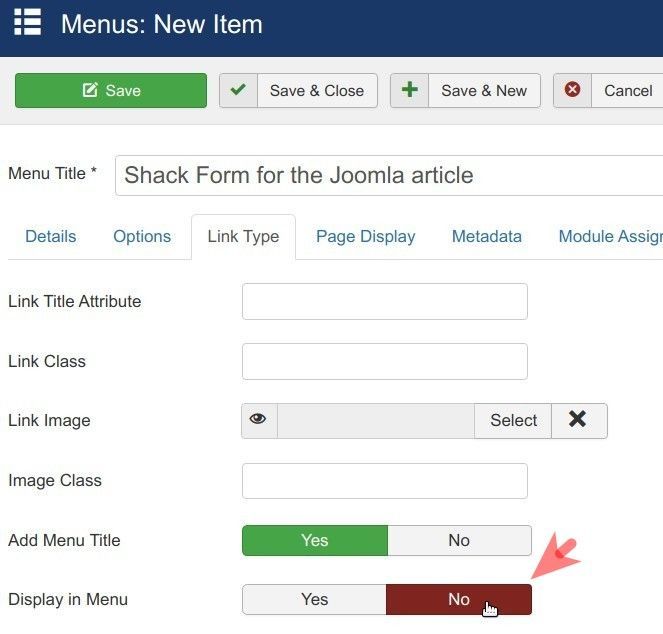
- Create the menu title: "Shack Form for the Joomla article A"
- Click "Select" and select your required Joomla article with the "Shack Forms Pro - for the Joomla article A" module embedded.
- Click the "Link Type" tab and set the "Display in Menu" parameter to "No":
- At the top of the screen, click "Save & New".
- Repeat the same step to create a menu item for another page with another of your Joomla articles.
Well done! At this point, you have three Shack Forms Pro modules. You created two hidden menu items for the pages with those two Joomla articles.
At this point, you are ready to start putting everything together.
Step #3. Assign each Shack Form to its menu item
In this step, you will tell each of your modules on what Joomla page you would like it to display.
- Go to "Extensions" > "Modules".
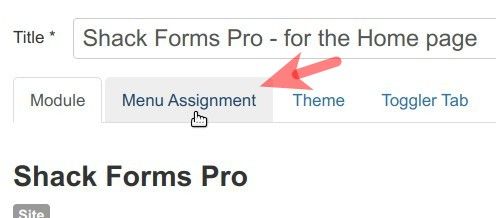
- Open up for editing the Shack Forms Pro module that you would like to display only on the Home page. In my demonstration, that will be the "Shack Forms Pro - for the Home page" module.
- You should see the "Module" tab open.
- Set the "Layout" parameter from the default "Static" to "Slide in box":

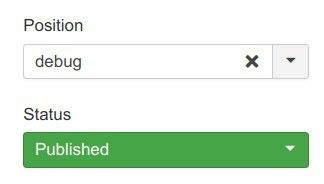
- On the right side of the tab, set the "Position" parameter to "debug" and the "Status" parameter to "Published":
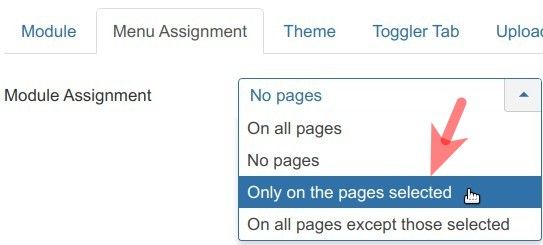
- Click the "Menu Assignment" tab:
- Click inside the "Menu assignment" field and in the dropdown list of options click "Only on the pages selected":
- You will see the "Menu Selection" box with your Joomla menus and their menu items:
- At the top of this box, click "None" to uncheck all the menu items. Then check the checkbox for the "Home" menu item of the "Main Menu":

- Click "Save & Close".
- Repeat this step for the "Shack Forms Pro - for the Joomla article A" module except checking this time the checkbox "Shack Forms Pro - for the Joomla article A".
- Repeat the same step for the "Shack Forms Pro - for the Joomla article B" module except checking this time the checkbox "Shack Forms Pro - for the Joomla article B".
Step #4. Test your multiple Shack Forms
- Visit one by one the three pages to which you assigned a Shack Forms module. You should see that each page now displays its own module, just as you intended.