![]() Virtuemart is the most popular Joomla shopping cart, but it can also be challenging for beginners.
Virtuemart is the most popular Joomla shopping cart, but it can also be challenging for beginners.
We have covered Virtuemart several times, including a comprehensive beginner guide.
In this tutorial, we're going to show you how to make your product information more interesting by using custom fields. This will allow you to add all sorts of specific details to your products, beyond simply the name, price and description.
Step 1: Navigate to Custom Fields
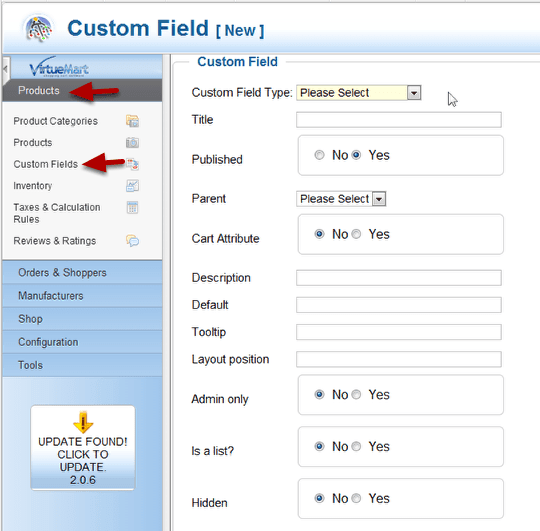
- Go to Components > Virtuemart.
- Go to Products > Custom Fields.
Step 2: Choose a type
- Click New.
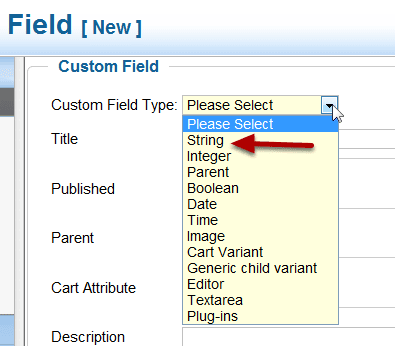
- Custom Field Type: Choose string. The types available are: string, integer, parent, boolean, date, time, image, cart variant, generic cart variant, editor, text area, plugins. For a simple information field like we're going to create, string is perfect.
Step 3: Give it a title and description
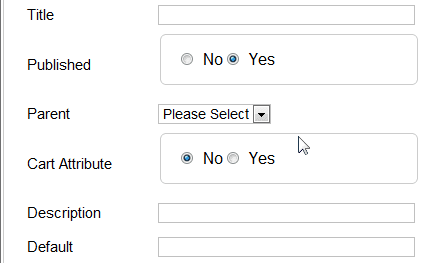
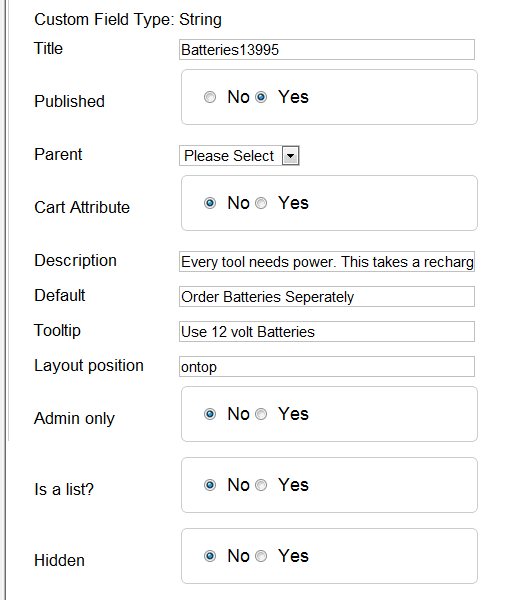
- Title: It helps if the title is meaningful, because this is the field name that will be shown when a custom field is selected for a product.
- Description: This will be visible on the site as well as in administration.
- Published: Yes or no. We want yes for the example.
- Parent: If you are making a group of custom fields that will go together, you will be able to select a parent item. This will be the first one, so no parents will be visible. We don't need a parent for this simple text attribute anyway.
- Cart Attribute: No in the example. Yes allows you to add some options to a product that can modify the product price.
- Description: Keep it short It shows on the website.
- Default: a default value that will show on the site.
Step 4: Choose the layout position and add a tool tip

Tool tip: If this is filled in there will be a tool tip that pops up when you click the information icon. Layout position: There are three default positions you can use here:
- ontop
- normal
- onbot
These layout positions do not work with "cart attributes" which means custom fields that will affect the price of the item. Those are handled in a different way.
Advanced users can create any type of position they want by adding code to the template. I'll include the code here even though it's beyond the scope of this tutorial.
 product->customfieldsSorted['my-position'])) {

       $this->position='my-position';

       echo $this->loadTemplate('customfields');

    }

    ?>
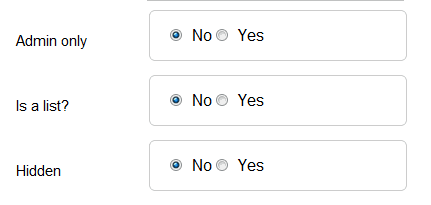
Admin only and Hidden are self-descriptive. The one that causes most confusion is "Isa list?" You you would use this to create a selection list of multiple attributes like a list of radio buttons for colors. We're just making a simple label. We'll use this when we have a more complicated example. For now "No" is the best answer.
Exercise: Adding a message to a product
Let's suppose that for certain items, batteries are not included. You need to put that notice on some items but not others. Below is an example of how to fill out the form. Let's fill out the whole form and then see what it looks like.
Step 5: Add the field to a product
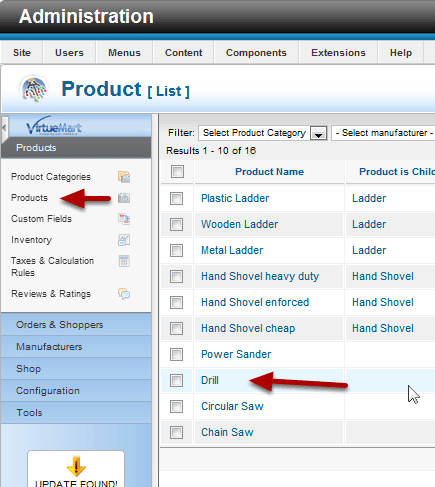
- Click Products in the admin menu.
- Click the name of a product or create a new product.
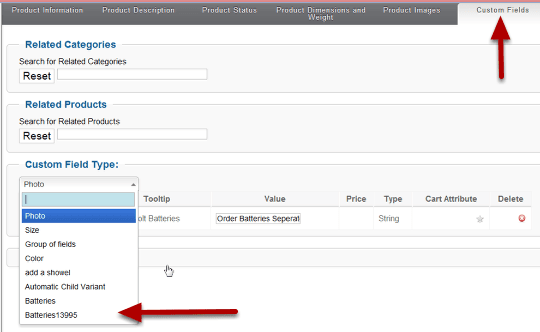
- Click the Custom Fields tab.
- You'll see a dropdown box for any fields you've created.
- Expand the box and double-click the name of the custom field.

- You'll see your new custom field listed under Custom Field Type.
- Notice that the Value column has the value of the Default field you used in the creation form. You can edit this directly in the list and don't need to open the form again to edit it. It will only change it for this one product, however. Changing it here does not make a global change.
Result
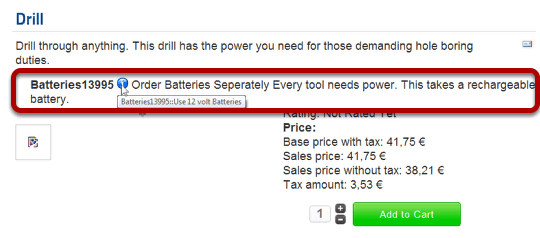
You can see the results of your effort on the product detail page. Everything you entered shows on the site, so take care with your wording. If you entered a tool tip, you will see the blue tooltip icon, otherwise there won't be one there. Mouseing over the icon reveals the tip.
This is the procedure for a simple text message. You can add more than one text message to a product. The design and layout of the message is not controlled through the administration. This is dependant on the template and the CSS.