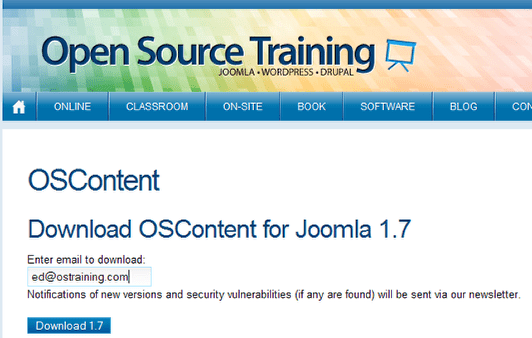
OSContent - Quickly add categories, menu items and articles to Joomla
-
-
Written by Ed Andrea Ed Andrea
-
Published: 02 October 2011 02 October 2011
OSContent is an extension for creating and deleting articles and categories in bulk. You can even create menu items for the newly created content.
Why waste time repeating steps over and over again, when you can do the same thing with just a few clicks?
This extension will allow you to:
- Create articles in bulk
- Create categories in bulk
- Create menu links in bulk
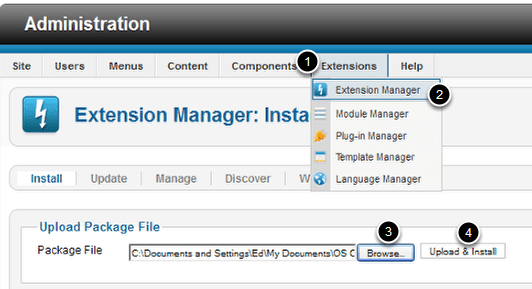
Step 1. Download and Install
Go to Extensions > Extension Manager and Upload the Package File by clicking Browse, then Upload & Install
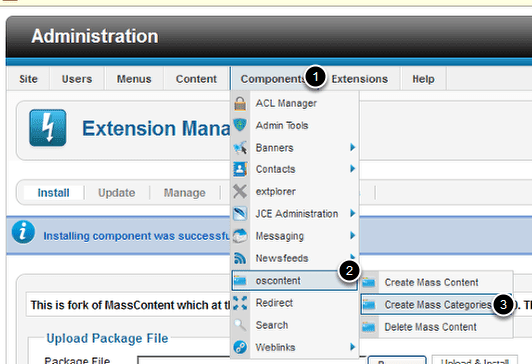
Step 2. Access OSContent
Go to Components > oscontent > Create Mass Categories.
It's best to create your categories first. Then you will have a place to put all your articles.
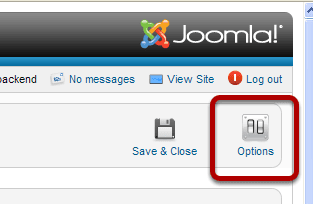
Step 3. Configure your global options
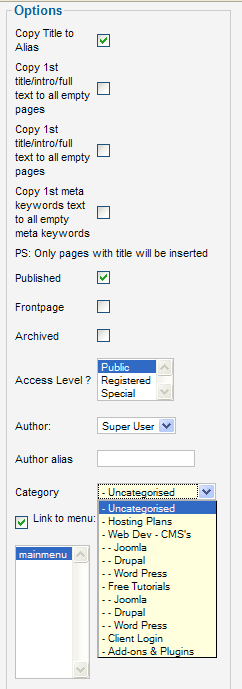
The Options button is in the upper right. Click it to explore your options.
There is not a lot to do here, but if you have a lot of categories to enter, you might want to increase the number of categories from the default number of 10. Doing that will allow you to list all the categories on one screen so you won't need to repeat the step. You can do the same for the number of mass content (which is the number of articles) that you will be creating at one time.
Save this and you are ready to start.
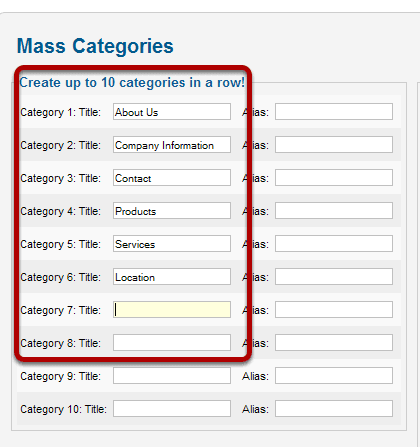
Step 4. Create the top level of categories
You can create many categories as you want, but you can only create one level at a time. You should prepare an outline of your categories and how they are nested in advance so you can move through this quickly.
Type the name of your categories into the list. If you want to create unique aliases type them as well. But if you don't want to type the aliases, you can take care of that in the next step by clicking a check box.
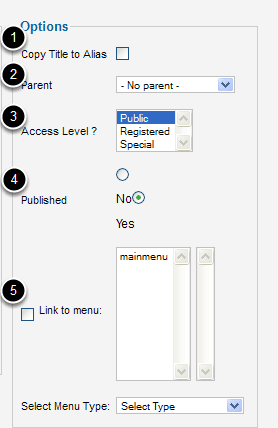
Step 5. Choose options for this group of categories
To the right of the list you just created is a list of options you can apply to this group of categories.
Copy Title to Alias - if you left the alias blank when you created the list, when you check this box, the aliases will be automatically created for you.
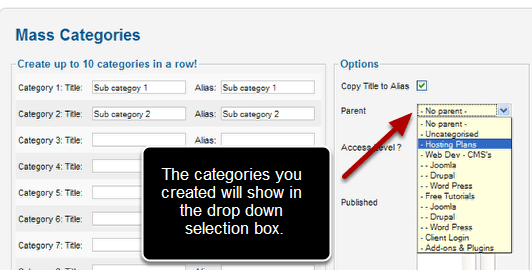
Parent - Since this is the top level of categories, they will have no parent. When you go to create your list of subcategories, you will want to choose the correct parent from the list.
Published - Yes or no. That's pretty simple.
Link to menu: Clicking this box will allow you to instantly create menu items for all of these categories and place them on your main menu or whichever menu you choose.
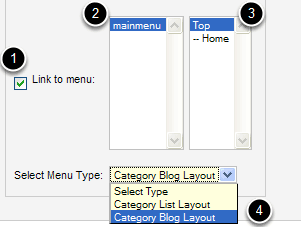
Step 6. Create the menu items and choose the type of layout
- Check the Link to menu box
- Choose the menu - If you have created additional menus they will show here.
- Choose the parent menu item.
- Choose the menu type - you can have a category list or blog layout.
Since these are top level menu items, you should choose Top in the right-hand window. Choosing Home would create sub menu items with Home as the parent. Anytime you create a list of categories and choose to link them to a menu, you can put them in the proper level in your link outline. You can make changes in the Menu Manager after you're done if you need to.
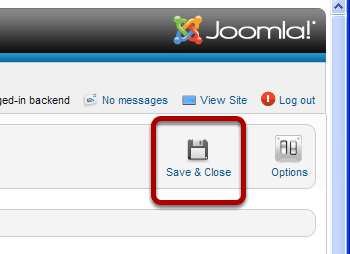
Click Save & Close and you have now created all the top level categories and added menu links to them.
Step 7. Create sub-categories
Go through the same process to create sub-categories. Except this time you will see all the previous categories you created in the Parent drop down box. Do this for each sub-category list you have created. Of course, if you don't have sub categories, you can skip this step.
You can't assign sub-categories to more than one parent, so you will need to repeat this step for each top level category that has sub-categories.
Click Save&Close to save your new additions.
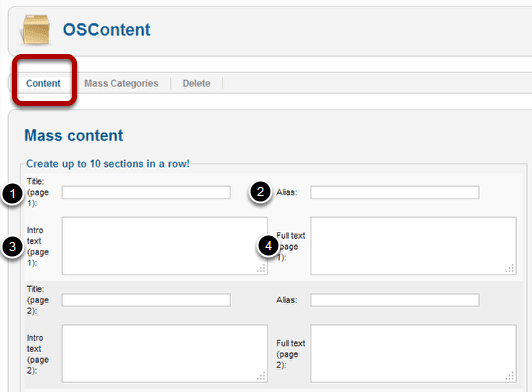
Step 8. Add Articles to the categories
Click the Content Tab to get to the area for adding content. You will see the list of boxes for adding the actual articles. Hopefully you have prepared the articles in an editor and you can just cut and paste the content in the windows. You will see this set of boxes for each article you can enter.
- Title - the title of the article
- Alias - you can fill this in for a custom alias, or you can check the Copy Title To Alias check box to automate the task.
- Intro text - If you fill this in with the intro paragraph, a Read More Link will be generated. Leave it blank if you are not going to use short intros.
- Full text - the full text of your article, with all coding if desired.
These are text windows and will accept full HTML so you can use html markup or paste an entire page of content with markup from an external editor.
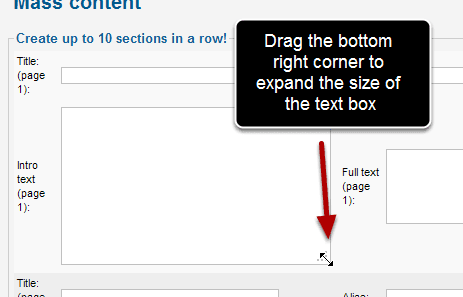
Step 9. Enter text and code
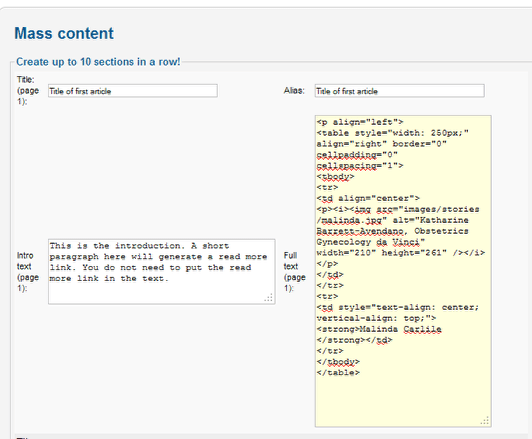
You can enter text directly by typing, or you can cut and paste. The windows are resize-able so you can expand them to fit your text. Place the cursor over the bottom right corner and you can drag it diagonally to expand the size of the text area. Here's a sample entry:
You can type in plain text and edit it after you've saved it using the Article Manager, or you can write or paste code directly into the text areas.
If you enter anything into the intro text box, a read more link will be created automatically on saving the entry. When you're done you can edit the articles in the normal fashion in the Article Manager.
Step 10. Adjust the parameters, assign them to a category and create menu links
Select your options with check boxes.
Assign your articles to a category. You can assign this group of articles to only one category. If you created your categories first, they will be visible in the drop down menu.
To create menu links, click the Link to menu check box, then highlight the menu you want to assign the articles to. A single article menu link will be created, and added to the menu you choose.
Repeat these steps for each group of articles, assigning them to the appropriate categories and menus each time.
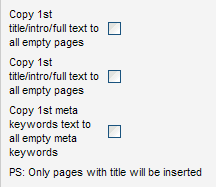
Option: Copy dummy text to all articles
If you are going to use dummy text you can paste it into the first article's intro box and full text box, and just put titles in the rest of the articles. Select check the box for "Copy 1st...to all empty pages" and the same sample text will autofill all the articles. You will see all of the boxes filled immediately after you check the box. When all the boxes are filled, save this group.