 Now here's a strange coincidence ... while I was writing this tutorial, one of my sites got hacked because it wasn't updated. I had neglected to update my site because it involves downloads and uploads and who has time for that? Well I should have taken the time. I learned my lesson, and I'm getting ready for the future.
With Joomla 2.5 the upgrades are much easier, so I've decided to migrate all my Joomla sites to 2.5. There is a simple, new tool for making the transition, and it works - SP Upgrade. You may not need to do this today, but when that day eventually arrives, this tutorial will help you make this transition very smoothly. A note before we start: this extension is commercial. If you're looking for a free alternative, try our tutorial on jUpgrade.
Step 1. Get ready to migrate
To make it quick, start with preparation.
- Make a list of all your plugins and components. These will not be copied to the new site, and you will most likely need to upload versions compatible with Joomla 2.5.
- Download and have ready for install all of the updated plugins.
- Get an updated version of your template if possible
- Create a clean (clean no sample data installed), installation of Joomla 2.5 on your server. If you have to delete the sample data, be sure you empty all the trash.
- Check your installation to see if you are up-to-date. If you are using Quick Install or Fantastico you might not have the latest version of 2.5, so use the upgrade feature of 2.5 to update to your latest version. You can also install Akeeba Admin Tools, if you prefer using that. It won't affect the migration.
- Check your installation to see whether your new site is using MySQLi. (Instructions below)
- Gather all your usernames, passwords and file directory paths and have them handy.
Gathering the database information from the original site.
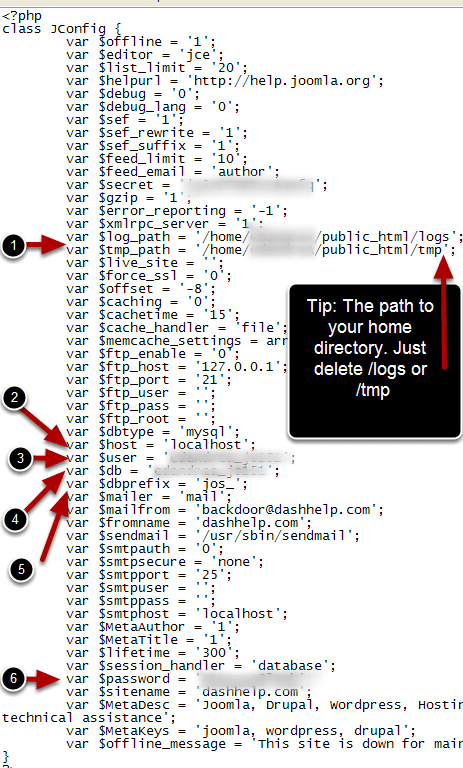
Before you start use a file manager or FTP to open your configuration.php file, All you need to know will be there. During the process you will need some information so you can fill in the fields correctly.
- Server path to your J15 home directory
- Hostname
- DB Username
- Database name
- DB Prefix
- DB Password
Tip: The path to your tmp or log folder will give you a clue to the path to your current J15 installation. Unless you changed the default tmp folder, it will probably say something like /home/username/public_html/tmp - just delete the /tmp from the path and you're at your Joomla 1.5 root. In this case, /home/username/public_html is what I need for now. If you changed the default path, you probably don't need any advice from me.
Step 2. Check your J17 installation for MySQLi database installation.
Make this the first thing you do after you install J17. Check and/or modify the Global configuration.
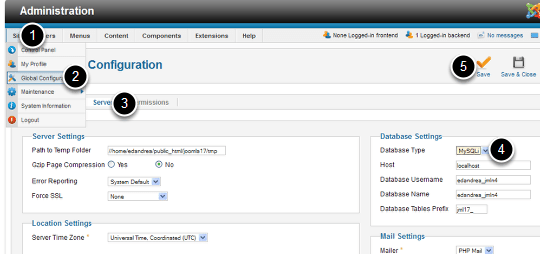
The first thing you'll see after you install the plugin is this warning, "Important Note: It is very important before you proceed with migration to make sure that your J16 installation is MySQLi and not MySQL (see note below in case it's not MySQLi). You can check from \Global Configuration\, tab \Server\, section \Database Settings\, field \Database Type\. "
- Go to Site
- Click Global Configuration
- Go to the Server Tab
- Check if MySQLi is selected in the Database Type.
- a. If it doesn't already say MySQLi in the dropdown, stop this tutorial and please contact the SP Upgrade Team and they will give you instructions on how to remove the MySQLi prerequisite.
b. If it does say MySQLi please continue with the tutorial.
Reading the comments online and some notes from the developer this seems to be the only stumbling block for beginners. In fact all the reviews are 5 stars on the JED except for one, and I'm betting that guy didn't do this first or didn't understand the note. If you have all the information ready, and understand how to fill in the forms, I can't see where you could possibly have any trouble using this extension.
NOTE: MySQLi stands for My SQL Improved. You can get a quick explanation of it from Wikipedia or for the technical minded https:php.net has the manual online.
Step 3. Download and install the plugin.
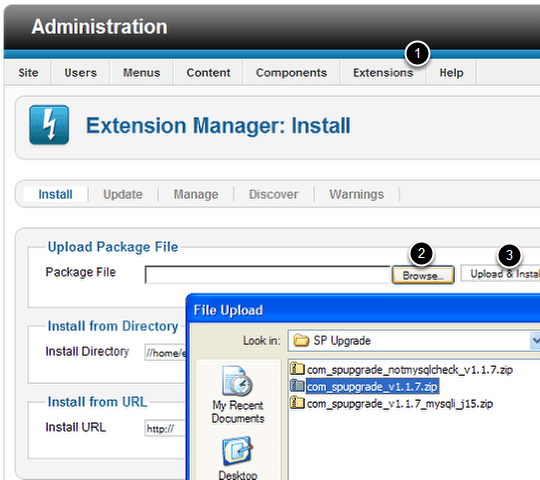
You can get the plugin from the JED. (Joomla Extension Directory) After you've downloaded it go to:
- Extensions > Manage Extensions
- Browse for the file
- Click Upload & Install
Step 4. Fill in the Database Information
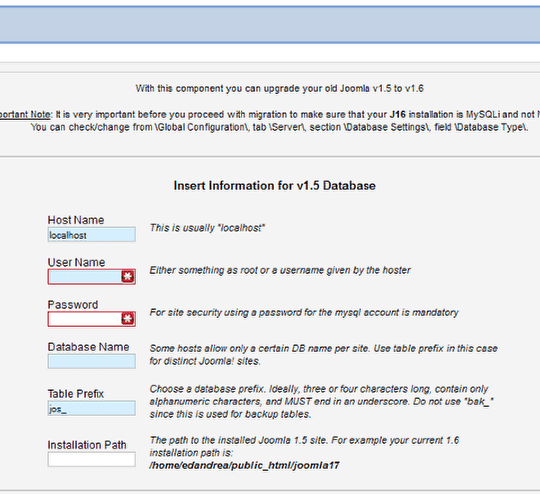
All of this information is available in your configuration.php file. Refer back to Step 1.
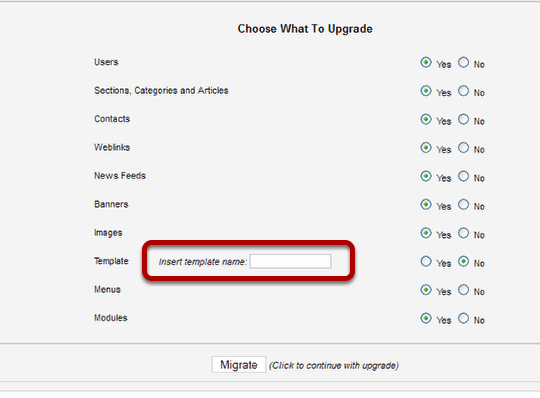
In the Template field, fill in the exact name that is on the directory in your templates directory.
The template will be copied over, but if it is not compatible with J17, it's not going to work until you modify it. There was no updated version of the original template when I did this, so I just left this field blank and set to no. Everything was transferred and the default 2.5 template was used on the new site.
Step 5. Monitor your progress.
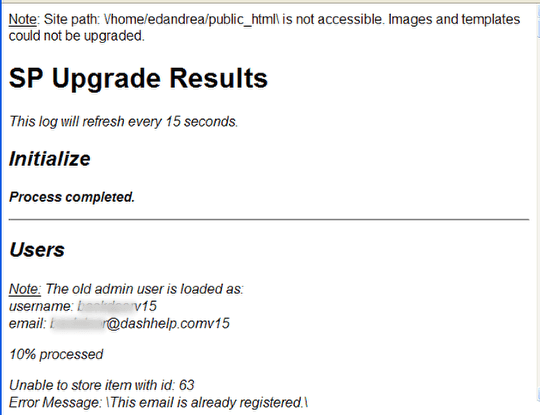
You'll see pop up window that shows your progress through all the steps. Note that at the beginning of the progress log, it gives you some valuable information, so don't close the window right away when your finished.
In this case I used the same username and password for the new site as the old, and as you can see here the plug-in added the old admin user but added v15 to the end to avoid conflicts.
There were a few other messages as well. Nothing affected the migration, but you might want to look at these before you close this window.
Step 6. Get ready to do the "hand work".
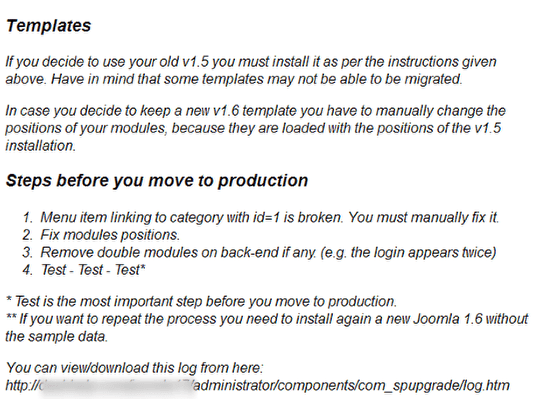
The last thing you see in the progress window is some advice on how to proceed from here. Also the path where you can find the log file for the migration in case you need to refer to it. It would be a good idea to record the path somewhere, just in case.
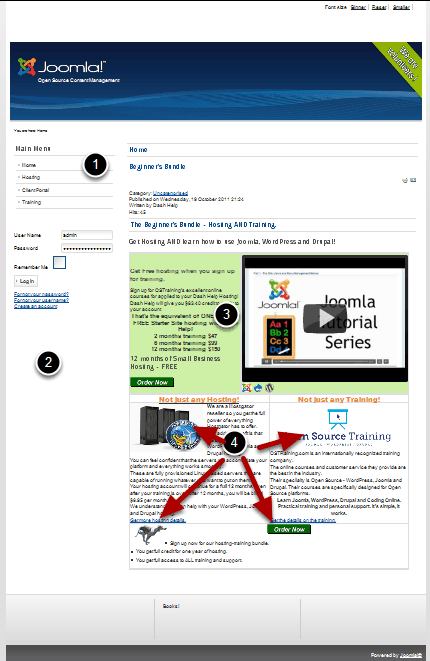
The Original Site
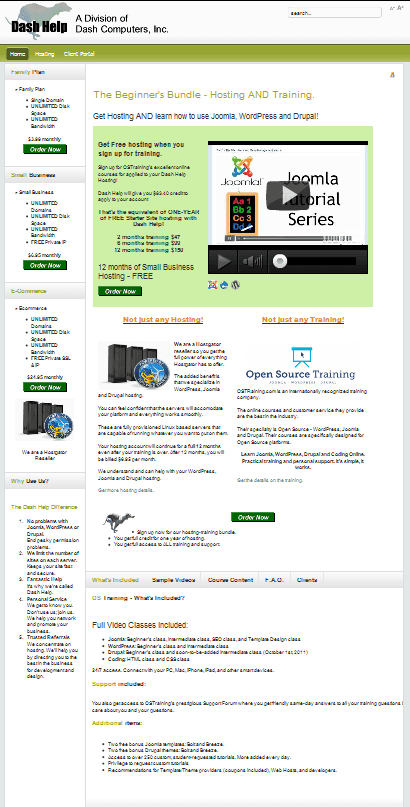
On the original I have several modules published plus some graphics and a YouTube video. It's using RocketTheme Versatility 4 as the template. When I did the migration I did not specify any template migration.
After migration
- The menu is correct and it works. I did not have to change any links.
- The modules are uploaded, but don't show and they won't until I change the positions.
- The YouTube video did not show originally, but I installed the AllVideos Plug-in on the new site, and the everything was back to normal.
- Check to see if your graphics and images are present.
The first time I tried this, none of the images originally showed, however on subsequent tests, everything transferred perfectly and I had no trouble. My problem was that I entered an incomplete path on the first entry form. If you look at the error log (See the message at the top of the image in Step 5), it shows that what i entered wasn't accessible, so images and templates were not transferred.
If the images don't transfer, you can use a file manger to copy everything in the old images directory to the new one. Be sure to preserve the entire directory structure from the old site. J17 uses a different images directory ( no more stories directory in J17) and this plugin transfers the paths from the old site, so the easiest thing to do is maintain the folder and file structure for the images directory from J15.
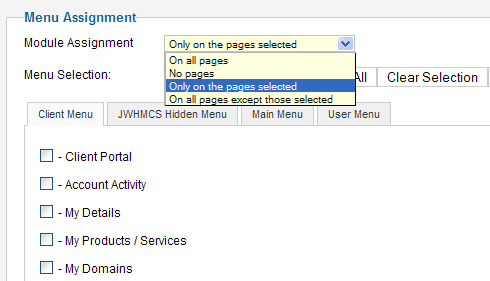
- Change module positions for each module, When you change the module positions, be sure to make your menu assignments or the modules won't show.
- Upload your plugins or any updates that you need.
- You will also need to redo the global parameters for your articles and category displays, and may need to tweak a menu item.
- Read the installation log and see if any aliases have been changed. It will automatically change aliases to avoid conflicts, and you might want to adjust them for SEO.
Check for updates

- Go to Extensions
- Extension Manager
- Discover Tab - Click the Discover icon on this page and then Install if anything was discovered.
- Update Tab - Click Find Updates on this page and install any updates necessary.
If you started with good preparation, you have everything you need at hand and can complete the rest of the migration fairly quickly. Work methodically and try not to rush. With J17, and Update as part of the Extensions component, maybe you won't procrastinate those security updates.