If you want to add an exciting extra feature to your site, there’s a good chance it’s a component. Do you want to show an advertising banner? That’s a component.
Want a contact form? That’s a component too. How about an events calendar or a discussion forum? Both are components.
Joomla arrives with eleven default components such as advertising banners and contact forms. In this blog post, we show you how they work.
In this blog post, we'll go over the eleven default Joomla components:
- Banners: Shows advertising banners.
- Contacts: Creates contact forms.
- Joomla Update: This allows you to update your site.
- Messaging: Sends private messages to other site administrators.
- Multi-lingual Associations: This feature helps if you're building a multi-lingual site.
- News Feeds: Shows news from other websites.
- Post-installation Messages: Shows information about what's included in new Joomla versions.
- Redirect: Tracks when people try to visit pages that don’t exist on your site and allows you to redirect them to the correct pages.
- Search: Allows people to search your site.
- Smart Search: Allows people to search your site in more advanced ways.
- Tags: Allows you to organize your content in a more flexible way than categories.
Banners Component
The Banners component has two main tasks:
- It shows advertising banners.
- It collects all the data about those banners, such as the number of times each one has been shown and the number of times each one has been clicked on.
Banners uses the CASh workflow of Categorize, Add, Show. Let’s use that workflow to add an advertising banner on our site.
Let’s walk you through the process of setting up an advertising banner. Here’s how we do it.
Step #1. Categorize
Just as with our articles, our banners are organized into categories. So we need to create a category for them:
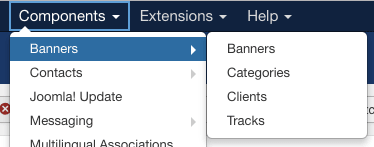
- Go to "Components", then "Banners", and then "Categories":
The Banners categories will each be used for different areas of the site, so naming them according to their position (Leaderboard, Left Column, Right Column) is a good idea.
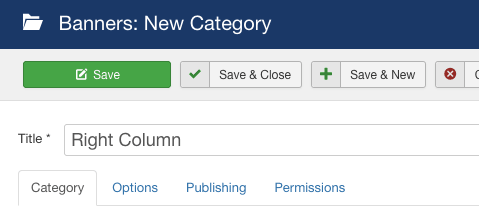
- Click "New".
- Let’s create a banner for the right-hand side of our site, so enter Right Column into the Title field, as in the image below.
- Click "Save & Close" when you’re finished.
With the Banners, there’s also a second method of organization called “Clients”. This allows you to organize banners by advertising client. Why is this useful?
You might want to sell banner space to several different clients and have an easy way to track all their banners.
If you want to do this, the process of setting up a client is exactly the same as for a category.
Step #2. Add
Now let’s create the banner that visitors will see:
- Go to "Components, then "Banners".
- Click "New", and you see the banner setup page.
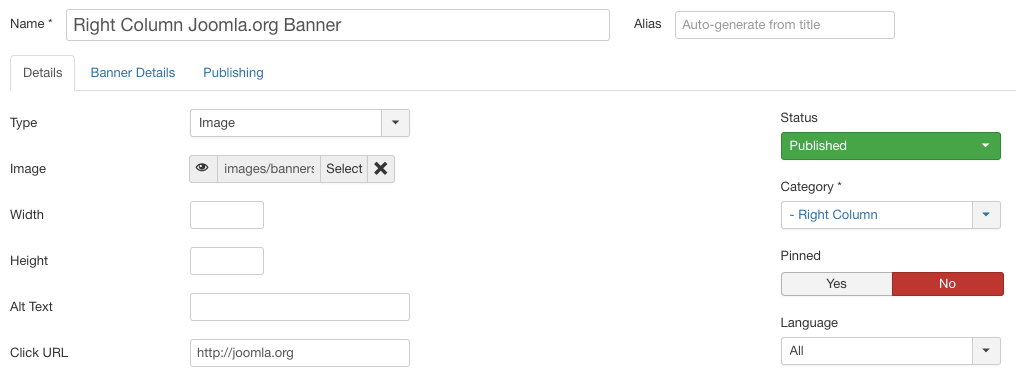
- Name: Give the banner a descriptive title. In this case, enter Right Column Joomla.org Banner.
- Image: Click "Select", and you see a pop-up. This takes you to the banners folder in Media Manager. You can upload a new advertising banner here or even browse to other folders. In this case, click on the image called "white.png", and then click "Insert".
- Click URL: This is the Web address to send people to when they click the banner. Let’s put https://www.joomla.org in here.
- Category: Choose the Right Column category you created earlier.
Step #3. Show
Now we just need to tell Joomla where to show the banner:
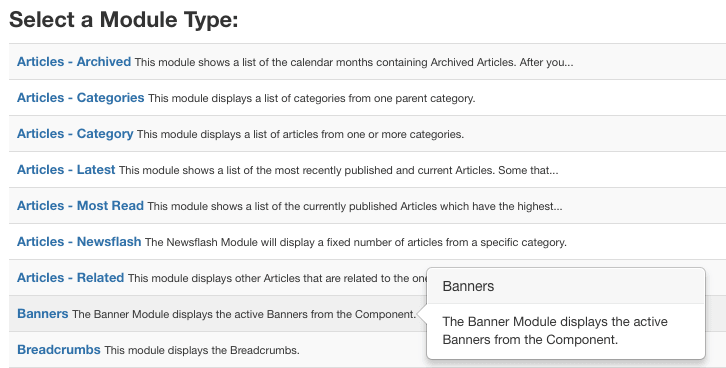
- Go to "Extensions", then "Modules", and click New.
- You see a screen where you can decide which type of module to create. Click "Banners".
You see a screen like the one below. There are four key options to choose:
- Title: Right Column Banner
- Category: Right Column
- Show Title: Hide
- Position: Right
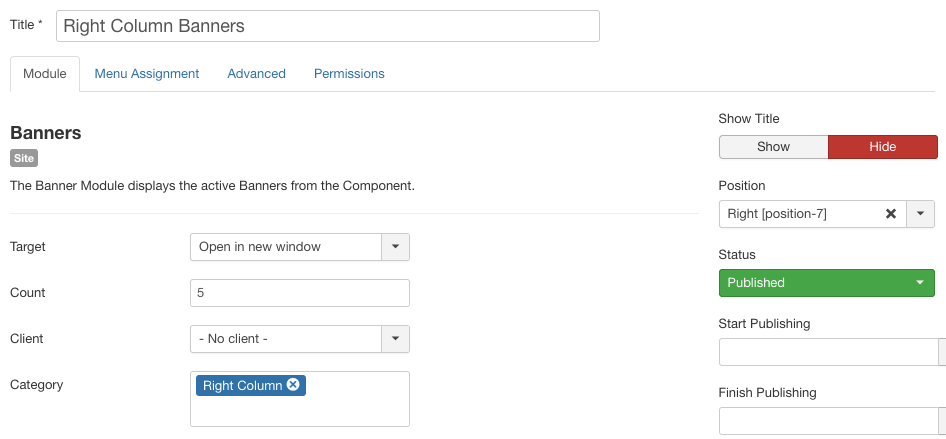
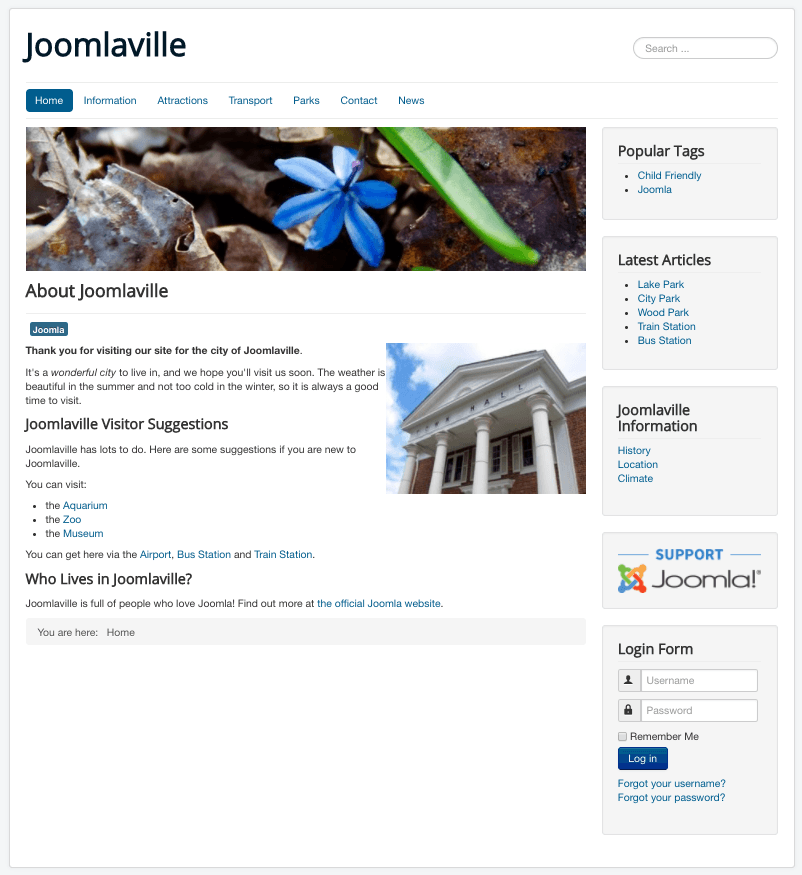
- Click "Save & Close" and visit your site. You can see the "SUPPORT Joomla" banner in the right column, as in the image below. Go ahead and click on the banner to test that it works. It should send you to https://joomla.org.

Banner Data
Joomla can collect basic data about how often the banner is shown (Impressions) or how often it’s clicked on (Clicks). Here’s how you can start collecting that information:
- Go to "Components", then "Banners".
- You'll see that Joomla has started to track both the impressions and the click for this banner:

Please note that the data recorded for impressions and clicks is not accurate enough to replace any professional advertising systems. However, it does work well enough for the average user’s needs.
Contacts Component
The Contacts component has one main task: It allows visitors to contact you. You probably guessed that already!
Contacts allows you to easily set up forms. If you just want one contact form for the whole site, that’s easily done. You can also set up a whole directory of contact forms for different people or different departments.
You can also create more advanced forms using the fields that we saw earlier in "Joomla Fields Explained".
The CASh workflow applies to contacts, just as much as for content, menus, and banners. We’re going to Categorize, Add, and then Show.
However, now that you understand the CASh workflow, we're going to show how to skip the first step.
Step #1. Categorize
This time, we're going to combine Step 1 and Step 2. So we'll do the "Categorize" step in the instructions below.
Step #2. Add
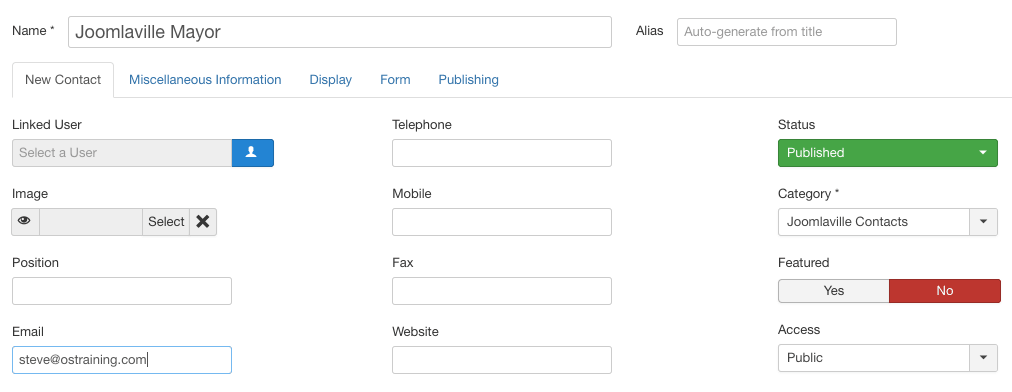
- Go to "Components", then "Contacts".
- Click "New".
- Name: Joomlaville Mayor
- Email: Enter your e-mail address into the Email field. This e-mail won’t be made public, but whenever anyone uses the contact form, an e-mail gets sent to this address.
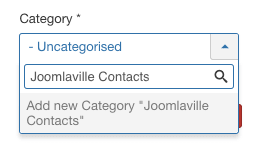
- Category: Type Joomlaville Contacts and then press "Enter" or "Return" on your keyboard. This is a faster way to complete Step #1.
When all three fields are filled in, your screen should look like the one below:
We’re also going to make a small option change. This is a design change because I personally think another layout is easier to read than the default Contacts layout:
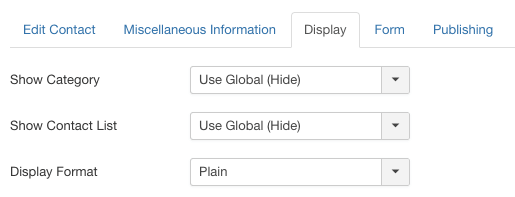
- Click the "Display" tab.
- Set the "Display Format" option to "Plain", as shown in the figure below:
Step #3. Show
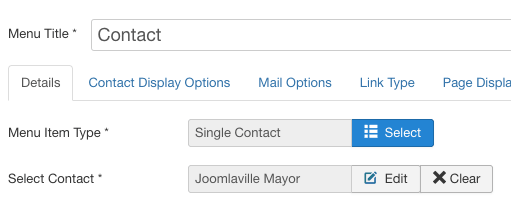
Now that you have your contact form ready, the final step is to make it publicly visible via a menu link.
Because we already have a Contact Us menu link, we’re going to edit that instead of adding a new link.
- Go to "Menus, "Main Menu", then "Add New Menu Item".
- Title: Contact
- Menu Item Type: Single Contact
- Select Contact: Joomlaville Mayor
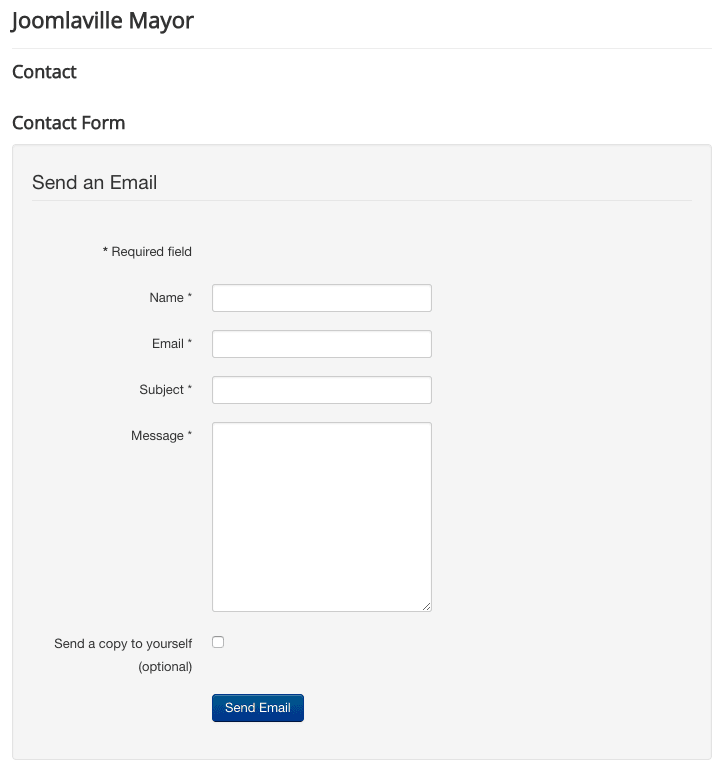
Now visit the front of your site, and your contact form will look like the image below:
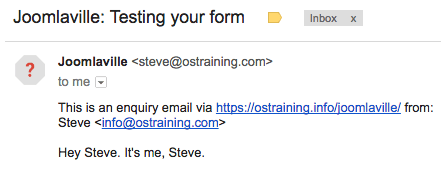
If anyone uses this form, you will now get an email that looks like this:
Advanced Contact Options
There are some useful features you can use to improve your form. For example, you can add more data about your organization:
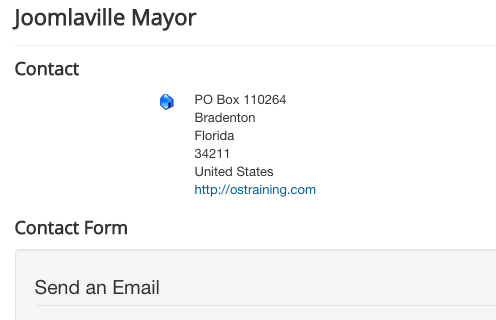
- Go to "Components", then "Contacts" and edit "Joomlaville Mayor".You will see a variety of contact fields, including Address, City or Suburb, State or Province, Telephone, and Website. The image below shows some sample data from OSTraining:

Here's how that data will appear on the front of the site:
You can also create custom fields to improve this contact form. This process will be similar to the process we used in "The Absolute Beginners Guide to Joomla's Custom Fields", but there will be some small differences.
- Go to "Components" and "Contacts".
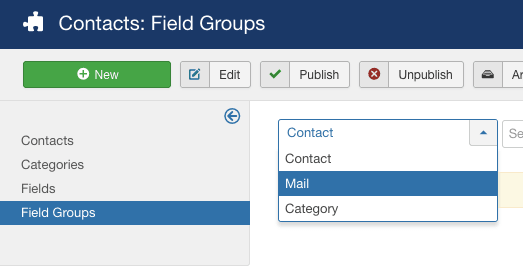
- Click "Field Groups" in the left-hand sidebar.
- This is the important new task: choose "Mail" from the dropdown menu. This means your fields will be attached to contact forms that users can rely on to send an email. If we choose "Contact" or "Category", our fields will only be available to site administrators.
- Click "New".
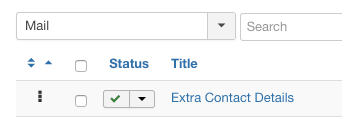
- Title: Extra Contact Details
- Save the field group and make sure your next screen looks like this:
- Click "Fields" in the left-hand sidebar.
- Again, choose "Mail" in the dropdown menu:

- Click "New".
- Title: What is Your Question About?
- Type: Checkboxes
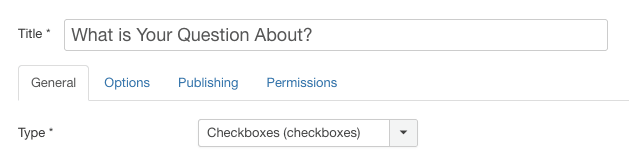
- Field Group: Extra Contact Details
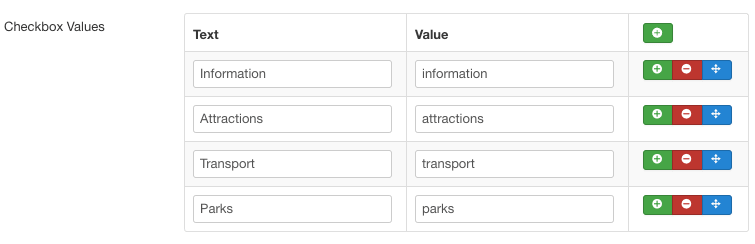
- Checkbox Values: Enter topics that people might be contacting you about.
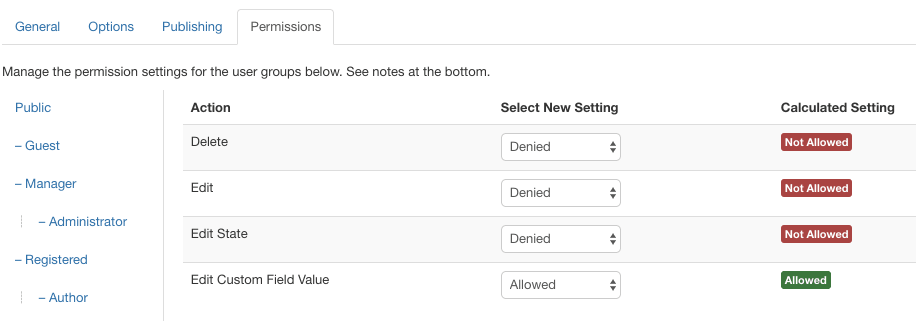
- Click the "Permissions" tab.
- Set "Edit Custom Field Value" to "Allowed". This will allow anyone to enter data into this field.
- Visit the front of your site, and your contact form will now have a custom field:

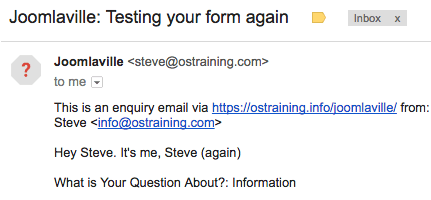
- Any fields you add using this method will get added to emails you receive:
Joomla! Update, Messaging, Multi-lingual Associations and Post-Installation Messages
There are four components that we'll skip over in this blog post:
- Joomla! Update: This is where you go to update your Joomla site.
- Messaging: This is one of the simplest components. It allows you to send private messages to other members of your site. However, it really does have very limited features and in many years of using Joomla, I've never seen it used on a real site. Click here for more on Messaging.
- Multilingual Associations: Check out this guide to multilingual associations.
- Post-Installation Messages: This shows messages about new features in Joomla.
News Feeds Component
The News Feeds component allows you to automatically show news from other websites.
News Feeds uses a technology called RSS or Real Simple Syndication to pull in the feeds from other sites.
Let’s walk you through the process of setting up feeds on your site. We'll use our CASh workflow again.
Step #1. Categorize
Just as with our articles, banners, and contacts, our news feeds are organized into categories:
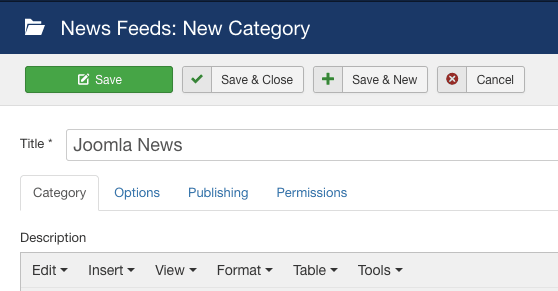
- Go to "Components", "News feeds", and then "Categories".
- Click "New" and enter a general title for our category, such as Joomla News. Your screen looks like the one below:
Step #2. Add
Next, we need to find the feeds that we’re going to import. The normal way to do this is to browse to the sites you’re interested in and look for a little RSS icon.
The common design for an RSS icon is a square image with a dot in the bottom-left corner and two waves coming out of it toward the top-right corner.

When looking for RSS feeds on other sites, you may need to hunt around a little as different sites put the feed in different places.
Some put their RSS icon in the browser bar, some in the sidebar, and some in the site footer.
In this example, we’re going to list the latest tutorials from Joomlashack.
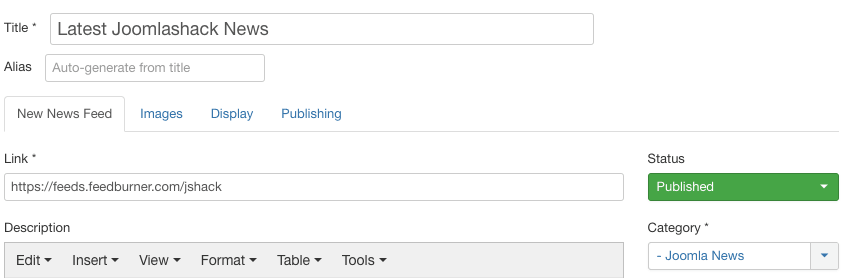
- Go to "Components", "News Feeds", and then "Feeds".
- Click "New".
- Title: Latest Joomlashack News
- Link: https://feeds.feedburner.com/jshack
- Category: Joomla News
Step #3. Show
All we need now is to make a menu link to our news feed:
- Go to "Menus", "Main Menu", then "Add New "Menu Item".
- Menu Title: News
- Menu Item Type: Click "Newsfeeds", then choose Single News Feed.
- Feed: Latest Joomlashack News
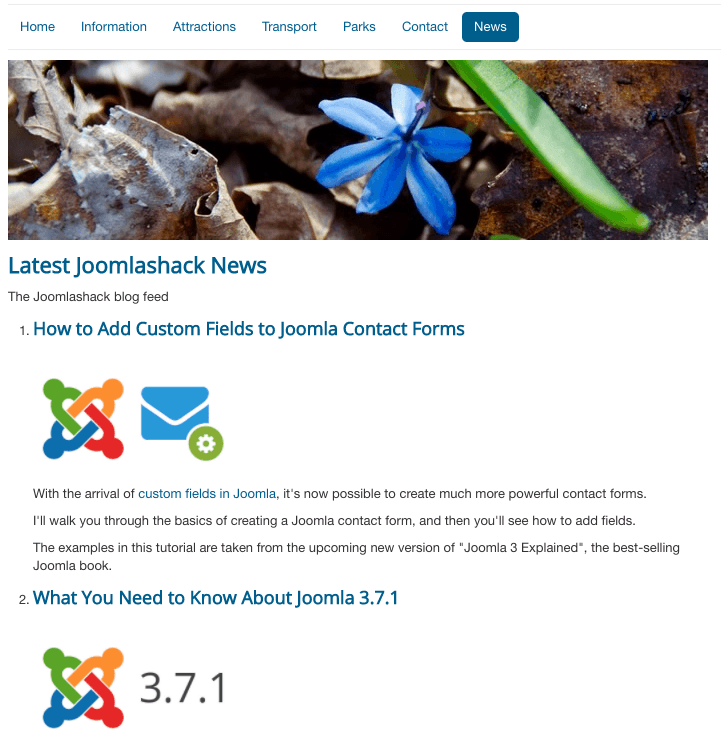
When you’re finished, the front of your site will look like the image below:
Redirects Component
The Redirects component records broken links that people try to visit on your site and allows you to safely redirect them to a working page.
Why would there be broken URLs on your site? There are two likely reasons:
- Mistyped URL: Someone may have mistyped the URL to one of your pages - it may even have been you. If this is the case, the location of the broken URL shows in the Referring Page column so you know where to go to fix the link.
- Old URL: If you moved your site to Joomla from another type of Web site, it’s possible that your URLs have changed. People may still be trying to visit those old URLs.
The Redirects component is here to fix those links for you. It can automatically redirect broken URLs to a working URL of your choice.
Because the Redirects component isn’t needed for every site, it isn’t enabled by default. Here’s how to enable Redirects:
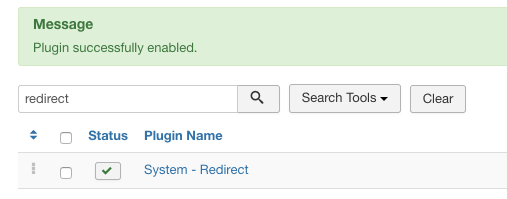
- Go to "Extensions", then "Plugins".
- Type "Redirect" into the Search box, and you’ll see the "System - Redirect" plugin:
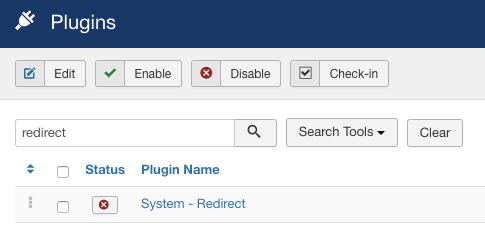
- Click the red X button. It will turn to a green check mark, and that will mean the plugin is enabled.
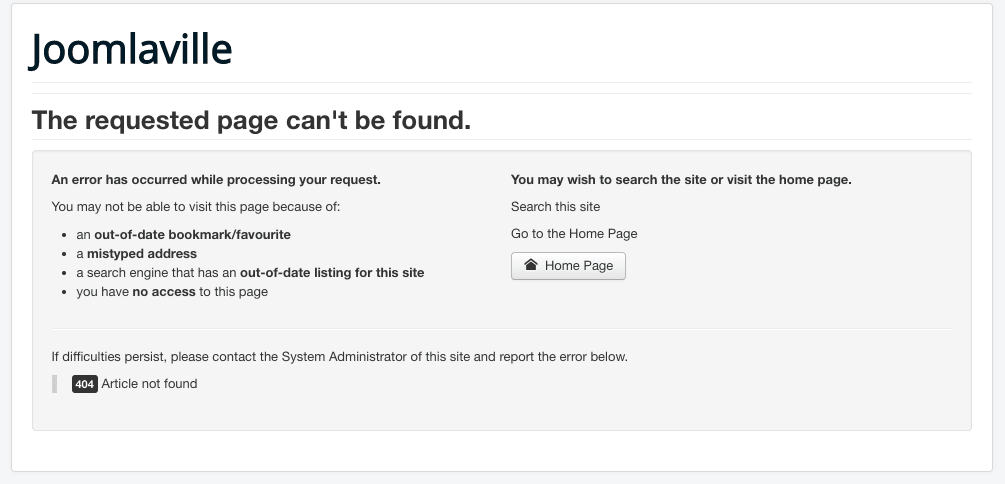
Now, let’s generate some broken links so we can see how they are recorded by the Redirects component.
- Go to the front of your site.
- Try to access a broken URL. For example, click the "Contact" link. In the browser bar, delete the “act” from the end of the URL and try to access that URL. You know that you’ve found a broken link when you get a message saying “The requested page cannot be found", as in the image below:
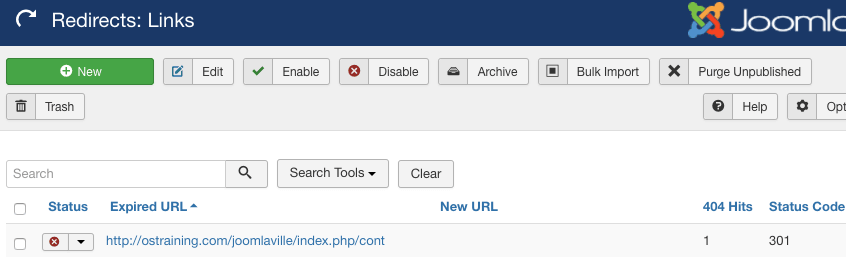
Now let’s see how Redirects recorded that broken link.
- Go to "Components", then "Redirects". You should see at least one recorded link, as in the image below:
- Click on the broken URL.
- Destination URL: Enter the URL of the page you want people to be redirected to, as in the image below.
- Status: Enabled
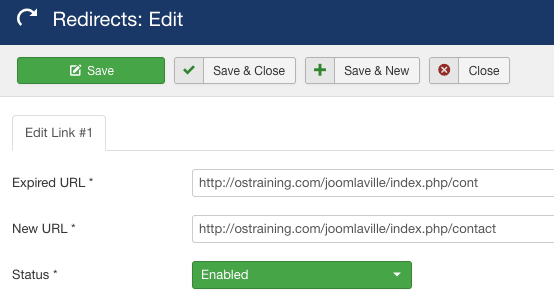
Now you can test to see whether the redirect is working.
- Copy the Expired URL and paste it into the address bar of your browser. That broken URL should automatically redirect to the New URL. In this example, I could type in https://ostraining.com/joomlaville/index.php/cont and be automatically redirected to https://ostraining.com/joomlaville/index.php/contact.
The Search and Smart Search Components
The Search component allows people to search for keywords on your site.
Of all the components introduced in this blog post, this is the one that is guaranteed to be used on almost every Joomla site.
Everything you need to use Search is already set up. There is a search form available on your site, as shown in the image below:
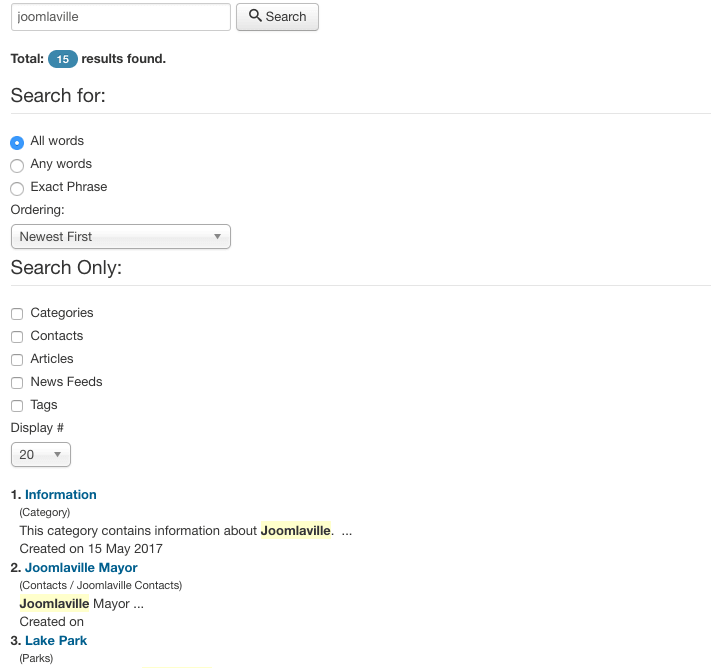
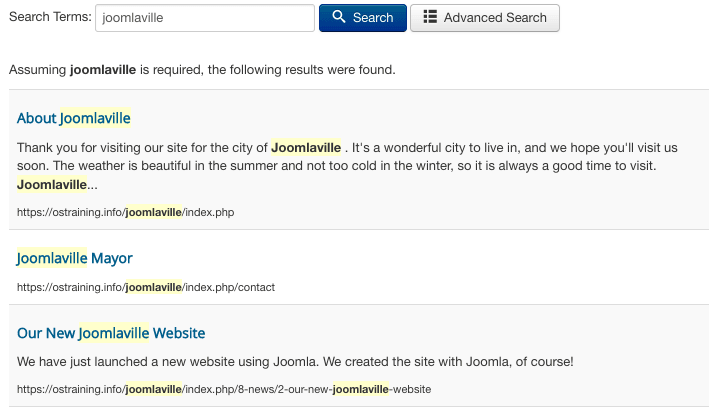
- Type "Joomlaville" into the search box and press Enter or Return on your keyboard. You see search results returned, as in the image below:
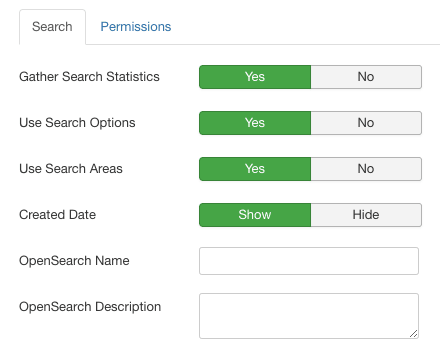
There aren’t many settings you can configure for the Search component, but one is particularly useful. The "Gather Search Statistics" option allows you to track all the searches that people have made on your site.
Those search results give you a good idea about what is popular or even what is hard to find on your site.
Here’s how to set it up:
- Go to "Components", then "Search".
- Click "Options" and set "Gather Search Statistics" to "Yes".
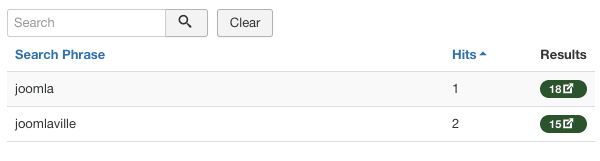
Now whenever someone uses your site’s search, it is recorded here inside the Search component, as in the image below.
I’ve used the search box several times to show you how it works.
The Smart Search component is a more sophisticated alternative to the Search component. It does allow you to search with more accuracy.
But it has another useful feature if you’re a Joomla beginner: it allows you to show your content in more advanced ways.
Here’s how we set it up:
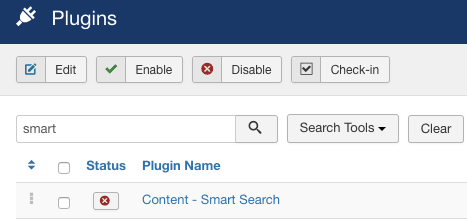
- Go to "Extensions", then "Plugins".
- Search for and enable the "Content - Smart Search" plugin.
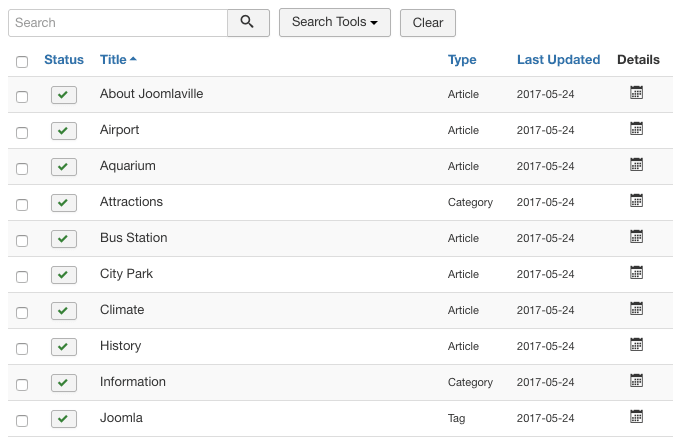
- Go to "Components", then "Smart Search".
- Click the "Index" button in the top-left corner, as shown in the image below.
- You’ll now see a pop-up box, and shortly afterwards you’ll see a message saying “Indexing Complete”.
- Close the window, and you’ll see that Smart Search now has a list of all your content, as in the image below. In the future, every time you add content, Smart Search will automatically add it to this index.
Now that Smart Search is ready, let’s make it available to our site’s users.
- Go to "Extensions", then "Modules".
- Click the green check mark next to Search, so that it turns to a red cross, as in the figure below. This will unpublish the default Search box.

Now we’re going to replace the Search box with a new Smart Search box:
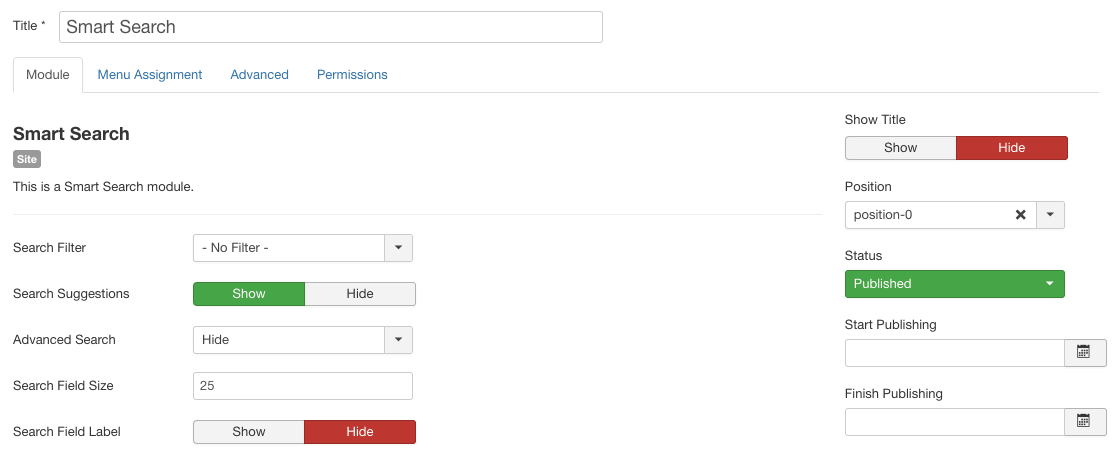
- Click "New".
- Click "Smart Search".
- Title: Smart Search
- Search Field Label: Hide
- Show Title: Hide
- Position: Search [position-0]
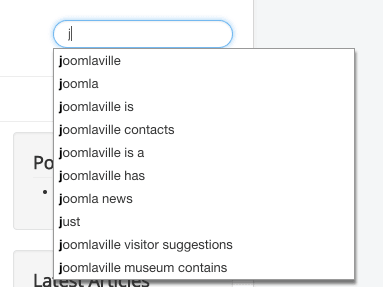
- Visit the front of your site. You’ll see what seems to be an unchanged search box. However, if you start typing, this new Smart Search feature will automatically recommend results, as in the image below.
- Choose one of the search options. You’ll find that the results are different than with the basic search. The Smart Search results are shown in the image below.
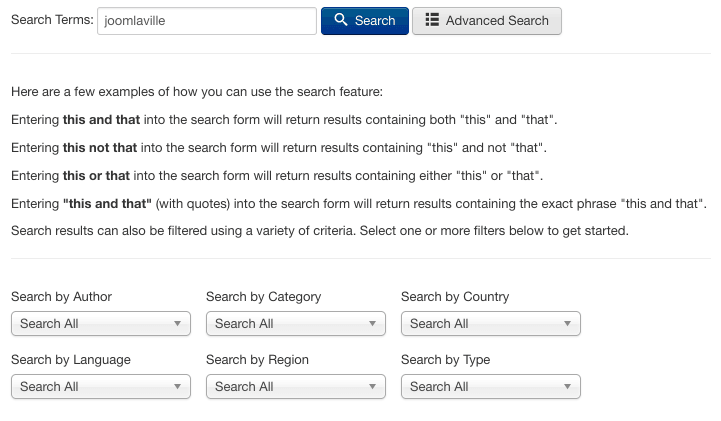
- Also, if you click on the "Advanced Search" button at the top of the search results, you’ll see many more ways to find content. As shown in the image below, you’ll see that you can search by Author, by Category, and by multiple other filters.
Smart Search looks wonderful, right? Why on earth would you not rush out and make it the default on your site?
There’s only one real reason why you might avoid it: Smart Search doesn’t support every Joomla extension. It does support all of the default extensions in this blog post, but in one of the future posts you will see how to add hundreds of new extensions. Smart Search doesn’t support all of those extra extensions.
Tags Component
The Tags component is a flexible and useful alternative to categories.
Throughout this blog, we’ve used categories to organize our content. I still recommend that you continue to use categories, but there’s no denying that Tags will allow you to do things that categories will not.
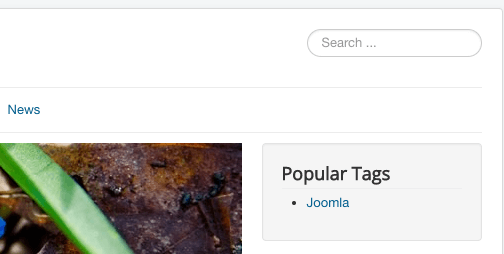
Let’s go to the front of our site, and you'll see a "Popular Tags" module in the right-sidebar. If you click "Joomla" in the menu, you’ll see all articles with that tag:

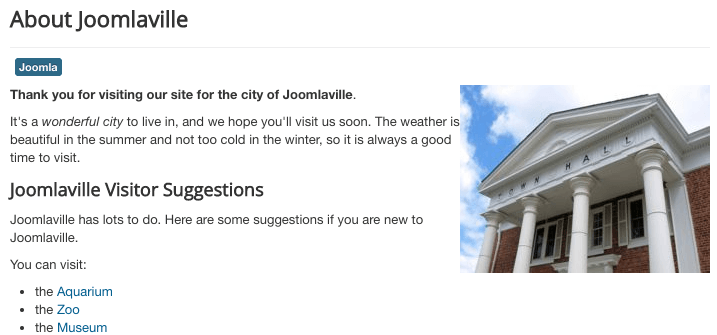
At the moment, only one article has the Joomla tag: About Joomlaville. If you look closely at that article, you'll see the Joomla tag in the top-left corner:
What if we wanted to create a list of places in Joomlaville that were suitable for young children?
Joomla only allows us to place articles in one category. If we wanted to create a list of places that are suitable for kids, we couldn’t use it for both Parks or Attractions.
That is the problem that Tags can solve. It allows us to organize content in more sophisticated ways than categories. Do as follows:
- Go to "Content", then "Articles".
- Open the "Museum" article.
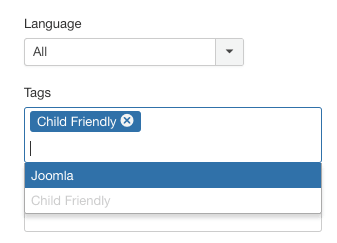
- In the Tags box, type in "Child Friendly" and press Return or Enter on your keyboard. You know that the Tag has been successfully created when it appears as it does in the screen below:
- Save the Zoo article, then add the Child Friendly tag to these articles: Lake Park and City Park. As you add the tags to those other articles, you’ll notice that Joomla automatically completes the tag for you.
Now let’s allow visitors to find our Child Friendly content:
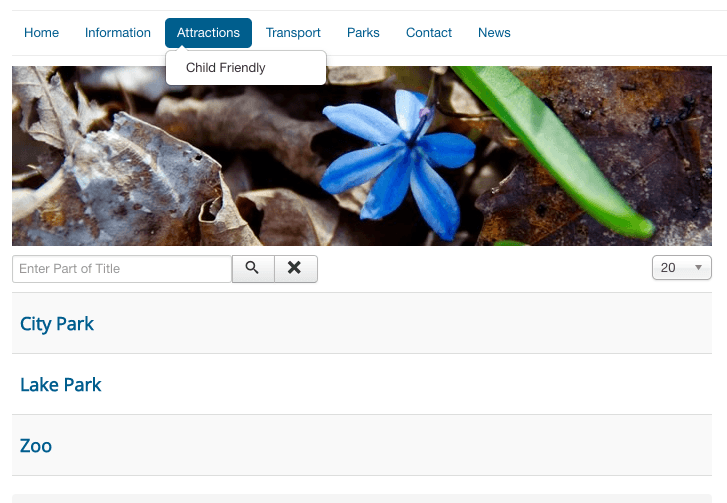
- Go to "Menus", "Main Menu" and then "Add New Menu Item".
- Menu Title: Child Friendly
- Menu Item Type: choose "Tags", then Tagged Items
- Tag: Child Friendly
- Parent Item: Attractions
- Visit the front of your site and under Attractions, you’ll find the Child Friendly page, which looks like the image below. On this page, you’ll see that you’ve included content from two different categories.
So Tags are more flexible than categories because an article can have multiple tags, but only one category.
Tags are also more flexible because they apply to articles, but also to Banners, Contacts, News Feeds, Users and more.
With tags, you can organize almost anything on your site and place it on the same page.
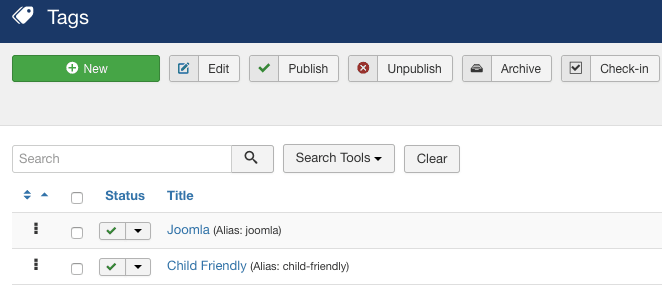
As you’ve seen, you can create tags from inside your articles. The area inside Components, then Tags, is to provide one central place to control all of the tags on your site.
Here you can edit, delete, rename and reorder all of your tags.
At the end of this blog post, your Joomlaville site will look similar to the image below. Don’t worry if your site is not 100% identical to the image.
The goal I have for you is to not perfectly re-create this site about Joomlaville. The goal is for you to understand the concepts and the processes that will help you to master Joomla.
If you now feel comfortable creating banners, contact forms, search boxes, tags, and more, that’s great: You’re ready to move on to the next blog post.