The Joomlashack Blog
Joomla Tutorial on How to Speed Up a Slow Site Using JCH Optimize
- Written by Nick Savov Nick Savov
- Published: 25 April 2011 25 April 2011
If you want to quickly get rid of your site's visitors, keep your site as slow as possible. However, if you want to make sure that your visitors have smooth transitions from page to page, then do everything in your power to speed things up for them.
This tutorial will walk you step-by-step through how to speed up a slow site by combining, minifying, and gzipping files using JCH Optimize . For detailed information on how the plugin works, click here.
Read more: Joomla Tutorial on How to Speed Up a Slow Site Using JCH Optimize
How to Import Products to Virtuemart Using CSV Import Improved
- Written by Nick Savov Nick Savov
- Published: 25 April 2011 25 April 2011
One of our students had a client that needed a shop setup in Virtuemart which would have about 1,000 products. Rather than create all the products manually, we created this tutorial for our student so that he could automate the process and import all the products into Virtuemart using a CSV which he obtained from his client.
This tutorial will walk you step-by-step through how to import products into Virtuemart using a CSV.
Read more: How to Import Products to Virtuemart Using CSV Import Improved
Admin Tools - The Quick and Easy Way to Change Database Collation in Joomla
- Written by Nick Savov Nick Savov
- Published: 25 April 2011 25 April 2011
A common problem experienced while using Joomla extensions is the infamous "Illegal mix of collations (utf8_general_ci,IMPLICIT) and (utf8_unicode_ci,IMPLICIT) for operation '=' SQL=SELECT......." This is something that can be quite tricky for a new Joomla user to fix, however not any more. This tutorial will walk you through step-by-step how to fix a database collation problem the quick and easy way using Admin Tools by Akeeba.
Read more: Admin Tools - The Quick and Easy Way to Change Database Collation in Joomla
Joomla Security Release 1.6.2 and How to Upgrade
- Written by Nick Savov Nick Savov
- Published: 15 April 2011 15 April 2011
Joomla 1.6.2 was released today (Apr 15, 2011) and we recommend that everyone running Joomla 1.6 upgrade their version to Joomla 1.6.2 A.S.A.P. Joomla 1.6.2 is a security release and contains a number of bug fixes as well.
Click here to see our tutorial on how to properly upgrade your Joomla 1.6 site to Joomla 1.6.2.
Create a Two Column Layout in a Joomla Article Using JCE
- Written by Nick Savov Nick Savov
- Published: 07 April 2011 07 April 2011
One of our students was wondering how to create a two column layout in a single Joomla article. We offered to create this tutorial for her.
This tutorial will show you step-by-step how to create a two column layout in a single Joomla article using JCE, a WYSIWYG editor. The tutorial will not use any tables which are not recommended as they can become quite messy.
Read more: Create a Two Column Layout in a Joomla Article Using JCE
Joomla Security Release 1.5.23 and How to Upgrade
- Written by Nick Savov Nick Savov
- Published: 06 April 2011 06 April 2011
Joomla 1.5.23 was recently released (Apr 5, 2011) and we recommend that everyone running Joomla 1.5 upgrade their version to Joomla 1.5.23 A.S.A.P. Joomla 1.5.23 is a security release and contains a number of bug fixes as well.
Click here to see our tutorial on how to properly upgrade your Joomla site to Joomla 1.5.23.
How to Secure and Hide Your Joomla Administrator Area Using jSecure
- Written by Nick Savov Nick Savov
- Published: 06 April 2011 06 April 2011
jSecure hides your administrator backend from potentials hackers and only allows those that have the secret url to access the administrative area. This tutorial will show you how to setup jSecure step-by-step.
Read more: How to Secure and Hide Your Joomla Administrator Area Using jSecure
New! JS Meme Joomla 1.5 & 1.6 Template Released!
- Written by JohnFlanagan JohnFlanagan
- Published: 05 April 2011 05 April 2011
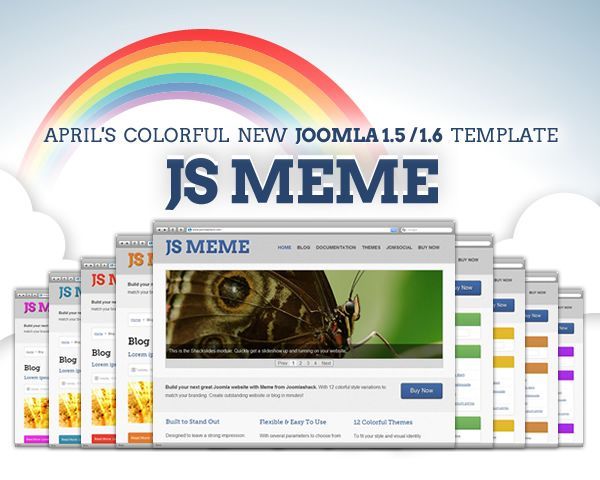
We've just released a brand new Joomla 1.5 / 1.6 template today called JS Meme!
How to Enable SSL HTTPS Only on Certain Joomla Pages
- Written by Nick Savov Nick Savov
- Published: 28 March 2011 28 March 2011
If you want to enable a secure socket layer (SSL) https encryption only on certain pages or components but not on the rest of the pages or components, it isn't possible in Joomla by default, however with Yireo SSL Redirection, a 3rd party extension, it is. It also has the added benefit that if a user comes in through http rather than https, it will redirect them appropriately and vice versa.
This tutorial will take you step-by-step how to configure SSL https encryption only on certain pages or components.
Read more: How to Enable SSL HTTPS Only on Certain Joomla Pages
The next step: New SEO College Coming Soon.
- Written by Joomlashack Joomlashack
- Published: 25 March 2011 25 March 2011
To us it just seems like the next step in a natural evolution. Since 2005, with our cool Joomla Templates and Extensions, we have helped hundreds of thousands create Joomla-powered Websites. Then in 2009, we launched the School of Joomla at Joomlashack University to teach you how to build better Joomla-powered websites.
Today we are excited to announce the SEO College (search engine optimization) and Conversion Optimization.
Its the next logical step because we first helped you create websites. Then we taught you how to build better sites. Today we want to provide you and your clients with the necessary tools to make your websites more successful.