The Joomlashack Blog
10 Great Free Joomla 2.5 Templates
- Written by Steve Burge Steve Burge
- Published: 24 March 2011 24 March 2011
Joomla 2.5 has been out since early January and people are starting to launch more and more new 2.5 sites.
Of course, if you want a 2.5 site you're going to need a template. Here's a rundown of 10 of the best free 2.5 templates.
Adana

How to Create a Google Custom Search Engine in a Joomla Site
- Written by Nick Savov Nick Savov
- Published: 23 March 2011 23 March 2011
This tutorial will show you step by step how to create a Google custom search engine for your Joomla site (and/or another site) in your Joomla site. This tutorial uses Joomla 1.5 but you can use exactly the same steps on Joomla 1.6.
Read more: How to Create a Google Custom Search Engine in a Joomla Site
Joomlashack Makes Donation to Red Cross and Habitat for Humanity
- Written by JohnFlanagan JohnFlanagan
- Published: 21 March 2011 21 March 2011
As I mentioned in my last blog post, Joomlashack pledged to donate 50% of Tuesday's sales to help the victims of last week's devastating earthquake & tsunami in Japan.
I'm proud to announce that thanks to our loyal customers, Joomlashack was able to make a very generous donation to the American Red Cross and Habitat for Humanity on Friday.
Thanks are also in order to PayPal and Missionfish-- a wonderful service which allowed us to wire 100% of our donation through PayPal to both charities quickly and easily and with no fees!
Again, on behalf of everyone here at the 'Shack, thank you so much for helping us help the good people of Japan during this very difficult time.
-Shawn
How to Use a Drop Down Menu in Joomla 2.5
- Written by Nick Savov Nick Savov
- Published: 21 March 2011 21 March 2011
Many templates do not have built in drop down menus. Coding your own drop down menu can be an extremely difficult task for most people; fortunately, Joomla has several great extensions on JED for drop down menus.
This tutorial will show you step by step how to create a drop down menu for your site using Maxi Menu CK which is also used as the main menu system at Joomla.org.
How to Update your Joomla 2.5 Site Using the Automatic Core Update Feature
- Written by Nick Savov Nick Savov
- Published: 20 March 2011 20 March 2011
Joomla 2.5 brought a lot of new features with it and although most Joomla 2.5 users know about the new ACL controls and nested categories, there is a simple but excellent addition that is worth noting and which few know. Joomla 2.5 now has automatic Joomla core updates! So you can go from Joomla 2.5.0 to Joomla 2.5.1 with a few button clicks. This tutorial will show you how to update your Joomla 2.5 version using the built-in core upgrade.
Extension Manager
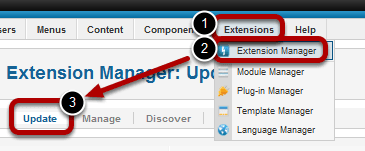
Go to Extensions >> Extension Manager >> Update
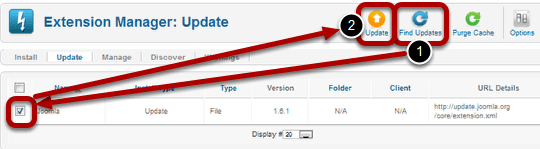
- Click on Find Updates and Joomla will automatically find any potential updates available to you.
- If you see that Joomla is now an option, check the box next to Joomla and click Update.
- Joomla will automatically update the next version of 2.5 for you.
Find Joomla Version and System Information in Joomla 2.5
- Written by Nick Savov Nick Savov
- Published: 16 March 2011 16 March 2011
If you are having trouble with a Joomla extension, the developer might ask you for your Joomla version, PHP version, and what type of server you are using (e.g. Apache, IIS, etc). Here is a quick way you can get that information.
Go to Site then System Information
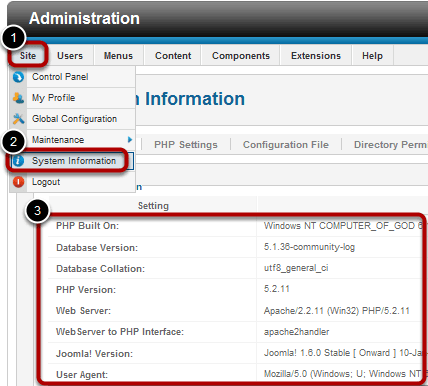
Go to Site then System Information
For Joomla 1.5, you would have to go to Help then System Information.
Adminsitrator Footer

You can also quickly find your Joomla version in the Administrator Footer. For Joomla 1.5, you could look in the top-right corner of your Administrator section.
Sample UNI Lesson: Automating daily site backups with Akeeba Backup Pro
- Written by Forest Linden Forest Linden
- Published: 08 March 2011 08 March 2011
Here's a 12 minute sample of one of our latest video tutorials at Joomlashack University called "Automating daily site backups with Akeeba Backup Pro."
Akeeba Backup is one of the most popular and most helpful extensions for Joomla that there is.
With Akeeba Backup Pro, the paid version, you can make it even more useful by setting it up to automatically make daily backups of your site and have those backup files sent to a server of your choice, such as an Amazon S3 or Rackspace Cloudfiles account.
In this video lesson, you'll see how to set up a Cloudfile account and how to configure Akeeba Backup Pro to automatically send it's daily backup files to the Cloudfile account.
Read more: Sample UNI Lesson: Automating daily site backups with Akeeba Backup Pro
Remembering the Alamo: Joomlashack team meets up in San Antonio for annual company retreat
- Written by JohnFlanagan JohnFlanagan
- Published: 02 March 2011 02 March 2011
 One of the many cool things about working for an online company, like Joomlashack, is that you can log in and work from the comfort of your own home. We all get to see our families a bit more each day; can work in our PJs all day if we want; and never, ever have to worry about long commutes to work. It's a pretty sweet deal.
Our team is spread out all over the world, so working out of one central office would be a bit difficult at the moment. And that's why Skype has been such a godsend to us. It’s allowed our team to stay connected to each other despite us all being in multiple timezones.
NEW! JS Elated: An upbeat, fun & multi-purpose Joomla 1.6 template!
- Written by JohnFlanagan JohnFlanagan
- Published: 23 February 2011 23 February 2011
You'll LOVE how our latest template will make your site stand out with its feel-good colors & design
E*lat*ed - [ih-ley-tid] - adjective
very happy or proud; jubilant; in high spirits
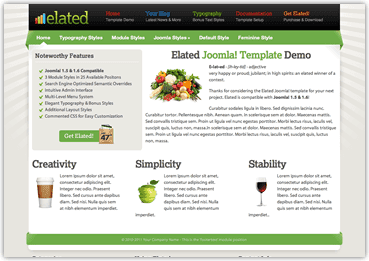 We're *elated* to announce the release of our latest Joomlashack template, JS Elated!
JS Elated is a fun & upbeat multi-purpose template that's simply perfect for any website or blog that compliments its cool, feel-good colors & styles--like a book review site/store, foodie & recipe site, scrapbooking or hobby site, a parenting blog, a coupon site, and more. This template will add warmth to any site and will make your visitors feel comfortable and right at home!
JS Elated is a Joomla! 1.5 & 1.6-compatible template featuring:
Read more: NEW! JS Elated: An upbeat, fun & multi-purpose Joomla 1.6 template!
JoomEdit - Make Joomla Dynamic Using JQuery
- Written by Nick Savov Nick Savov
- Published: 16 February 2011 16 February 2011

JoomEdit - The easy way to make your Joomla site extremely dynamic.
Don't know Javascript but want to make your website interactive and dynamic? No worries, just install JoomEdit! JoomEdit integrates Joomla with IxEdit, a powerful JavaScript-based interaction design tool.