The Joomlashack Blog
How to Backup a Joomla 2.5 Site
- Written by Nick Savov Nick Savov
- Published: 14 January 2011 14 January 2011
This tutorial will take you step by step how to backup your Joomla 2.5 installation using Akeeba Backup.

Download now.
Install Akeeba Backup

Extensions >> Extension Manager

Browse >> com_akeeba >> Upload & Install
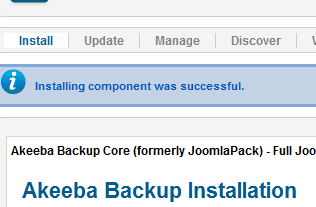
Success!
Backup

Components >> Akeeba Backup
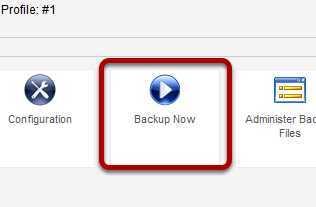
The general settings are fine and there is no need for any modification unless you are trying to do something more advanced.
Backup Now.
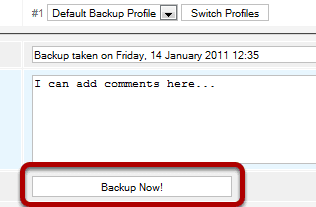
Fill in information appropriately. Then Backup Now!
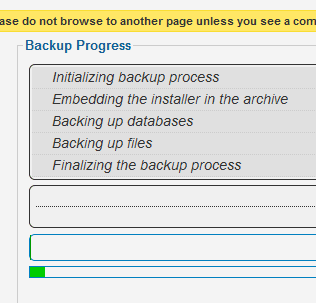
Patiently wait for completion. Do not exit this screen until finished.

Success!
Three New Joomla 1.6 Overview Videos Including ACL
- Written by Steve Burge Steve Burge
- Published: 10 January 2011 10 January 2011
Joomla 1.6 is here and we've put together 3 videos that will provide a great overview of what you'll need to know about administering a Joomla 1.6 site.
- Part 1 - The Site, Users and Menu Management Menus (9:52)
- Part 2 - The Articles, Components, Extensions and Help Menus (15:29)
- Joomla 1.6 Access Control Lists (26:31)
They should give you a good start on your preliminary planning for 1.6. At the moment we don't recommend that youupgrade, but we do recommend that you consider building new sites with Joomla 1.6.
Part 1 - The Site, Users and Menu Management Menus
Sorry, this video is no longer available
Part 2 - The Articles, Components, Extensions and Help Menus
Sorry, this video is no longer available
Joomla 1.6 Access Control Lists
Sorry, this video is no longer available
There'll be a lot more information about Joomla 1.6 coming in the next few days from around the web. In the meantime, get a head start with these tutorials.
My Joomla htaccess File is Blank or Misconfigured
- Written by Nick Savov Nick Savov
- Published: 03 January 2011 03 January 2011
Recently about 5-10% of our Joomla questions on the forum have in some manner been related to the infamous htaccess file. This tutorial will give you a sample of what a typical Joomla htaccess should look like in case yours is blank or badly misconfigured. Please understand that not all htaccess files will look like this, although this is the norm for most cases.
Please note that any line that begins with # is commented out and therefore will not be executed by the server.
Read more: My Joomla htaccess File is Blank or Misconfigured
How to Embed a Google Map in a Joomla Article
- Written by Steve Burge Steve Burge
- Published: 03 January 2011 03 January 2011
Update: we highly recommend the OSEmbed extension for embedding code in Joomla.
One of our students asked us how one can find Google code for a map of their location in order to embed a mag in an Article, so we created this tutorial for him. This tutorial will walk you step by step through the process.
Get the Google Map HTML to Embed in Website
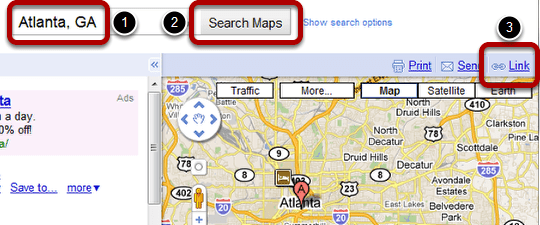
Go to https://maps.google.com/ and type in the location and then click on "Search Maps". In this example, we typed in "Atlanta, GA," however, you can put the full address of your desired location.
Click on Link.
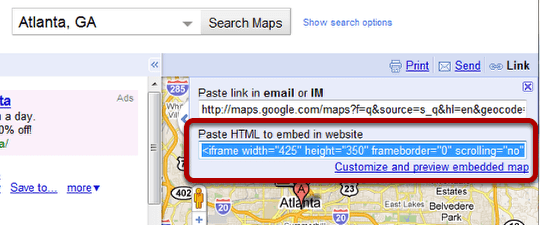
Copy the code in the "Paste HTML to embed in website" area.
If you desire to customize the map, such as changing the width or height, the zoom level, etc, then click on "Customize and preview embedded map".
Paste the Google Map Code in Your Article
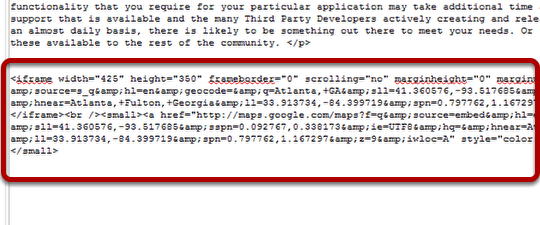
Next, go to your article and paste the code within the editor.
Note: It is best to place the code within the html/code section if you are using a WYSIWYG editor such as Tiny MCE, JCE, etc, or you can simply not use a WYSIWYG editor and paste it in. If you paste it within the actual WYSIWYG editor, the code can be reformatted by the editor. If the map does not appear, this is likely the reason.
Save your changes.
Check Your Map on the Front End
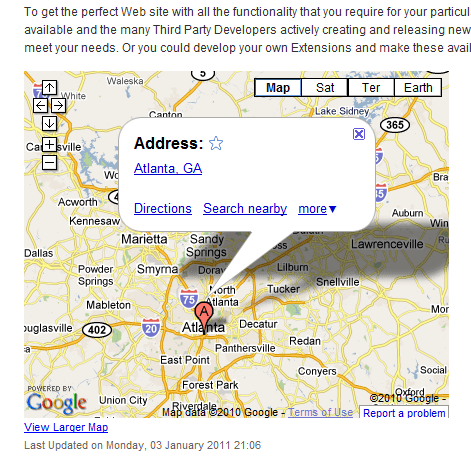
Looks like everything worked.
If it did not work for you, then make sure you are pasting the code in the html/code area or try not using any WYSIWYG editor. Also, if you're using Joomla 1.6 or great make sure that you don't have filtering for the super admin, go to article manager >> options >> filtering >> super users >> set it to no filtering.
My Joomla template.css is Unwritable. How Can I Fix It?
- Written by Steve Burge Steve Burge
- Published: 29 December 2010 29 December 2010
This is a question that we get often at Joomlashackg and it has generated quite a bit of confusion over the years. If you do a Google search for "template.css unwritable" you can see how widespread this little bug is. Thankfully, it is normally a cosmetic issue and has no negative affect on your site.
This tutorial will provide a bit of insight into the issue and how to correct it if desired (yes, if desired).
Read more: My Joomla template.css is Unwritable. How Can I Fix It?
Onyx Business Edition Released: New Lighter Styles!
- Written by JohnFlanagan JohnFlanagan
- Published: 21 December 2010 21 December 2010

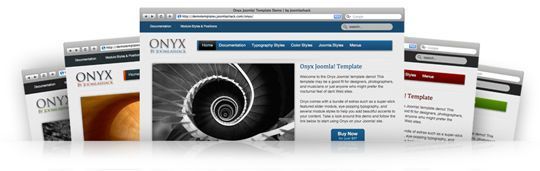
Last month, we released a beautiful dark template called ONYX. Due to overwhelming response, we've just released an updated version of ONYX called Onyx Business Edition. Onyx Business Edition contains last month's dark version PLUS four brand-new light color variations & styles! It's perfect for businesses and blogs alike that need a lighter, more conservative look.
Read more: Onyx Business Edition Released: New Lighter Styles!
How to Add a Debug Module Position on an Artisteer Joomla Template
- Written by Nick Savov Nick Savov
- Published: 17 December 2010 17 December 2010
Many extensions on the Joomla Extention Directory need to be in the debug module position to function. However some templates do not contain a debug position and therefore you have to insert the new module position in the template. A common example is an Joomla template generate by Artisteer.
This tutorial will walk you through step-by-step how to insert a debug module position in an Artisteer template or any template for that matter.
Read more: How to Add a Debug Module Position on an Artisteer Joomla Template
Joomla's Banner Component for Banner Advertisements
- Written by Nick Savov Nick Savov
- Published: 15 December 2010 15 December 2010
Joomla's Banner Component is perhaps one of Joomla's least used features, yet at the same time one of its more advanced features that comes with the core installation of Joomla.
One of the primary reasons this powerful component is not utilized is because of users' lack of familiarity with it. When you are given a banner to put on the site, the tendency is to create a custom module and insert the banner in there, then assign it to a module position and menu item.
However, there is very little organization with this approach and if you are managing a bigger site, you will soon be wasting needless hours that you could have spent elsewhere. Furthermore, with that approach there is no way to keep track of the number of impressions and clicks on the banner, thus the reason for the banner component and this tutorial.
The tutorial will walk you step-by-step through how to set up a banner via the banner component and shed some light on it along the way.
Read more: Joomla's Banner Component for Banner Advertisements
New 'Phenom' template released. Get a free $20 gift coupon with purchase
- Written by JohnFlanagan JohnFlanagan
- Published: 14 December 2010 14 December 2010
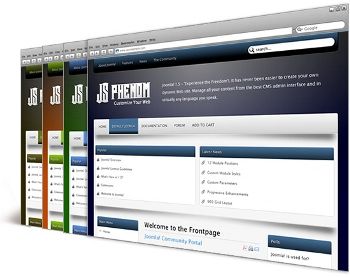 This week we're excited to announce the release of our latest Joomlashack template called Phenom!
Phenom was designed to give you maximum customization options with minimal CSS editing. In fact, you won't even have to open the css file at all to customize this beauty.
Phenom comes with 8 cool preset color schemes to get you started and over 24 style parameters can be easily edited right from the Phenom template parameters page in your Joomla backend--such as font colors, link colors, page columns, logo options, backgrounds and many more.
This is one 'phenomenally' easy template to customize!
Phenom also comes loaded with 4 built-in module & typography styles, 12 stackable/collapsible module positions, AND bonus styles for the new Shackslides module by Joomlashack!
* And if you purchase Phenom from now until Monday December 27, 2010, we'll send you a FREE $20 Gift Coupon by email--good for $20-off your next Joomlashack purchase in January!
Read more: New 'Phenom' template released. Get a free $20 gift coupon with purchase
Update your Joomla 1.5 Version Using Admin Tools
- Written by Nick Savov Nick Savov
- Published: 07 December 2010 07 December 2010
So you are faced with having to upgrade your Joomla Core version. Where do you begin? You could do it manually, however, if you are new to Joomla, that can get a bit complicated. Thankfully, there is a great extension released by Akeeba, Admin Tools, which does the hard parts for you! Best of all, it is quick, easy, and safe!
Things to note first:
- If you have made any changes to the core Joomla files, you will need to upgrade manually.
- Backup first! (use steps 1 to 5 here)
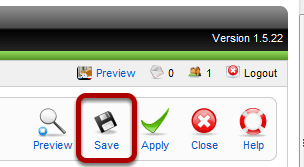
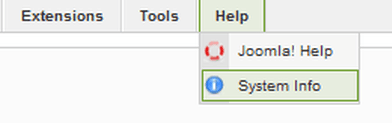
Find Your Joomla Version
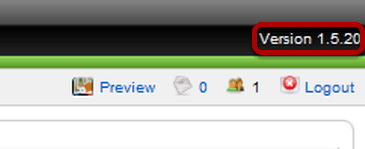
You can almost always find your Joomla version in the top right of your administrator backend. If it's not there you can go to Help -> System Info (see next image)
Download

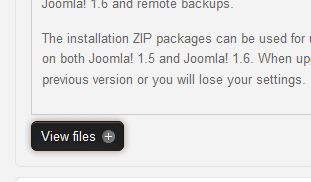
Go to https://www.akeebabackup.com/download/admin-tools/admintools-2-2-12.html and then View files.
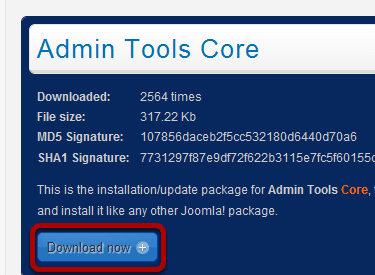
Download now
Install
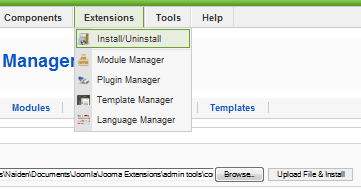
In your site's administrator area, go to Extensions >> Install/Uninstall, click Browse to find the file and click Upload File & Install to complete the upload.
Upgrading Your Joomla Version

In your site's administrator area, go to Components >> Admin Tools
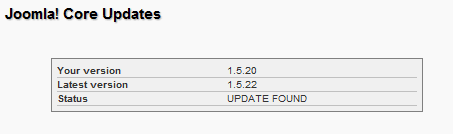
Near the top right will be displayed your Joomla version and the latest Joomla version available.
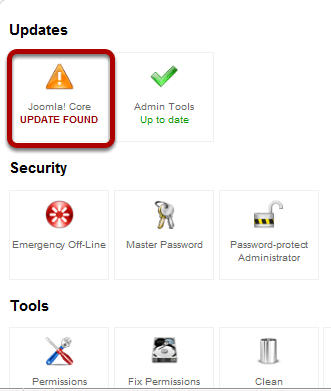
Click on "Joomla! Core UPDATE FOUND" near the top left to get started.
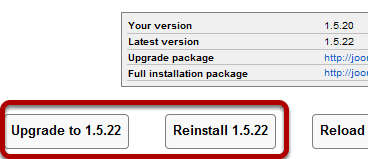
You have two options for getting the latest version. (1) Upgrade (2) Reinstall.
In most cases it is best, and the recommended path, just to upgrade, as that will only install the necessary files to get to the most up-todate version from your current version. However, if your site has issues with corrupt files, then you would want to reinstall 1.5.22 which will replace all the core files, thus correcting any corrupted files.
In this example, we will upgrade to 1.5.22 which is, at the date of this tutorial, the most recent version.
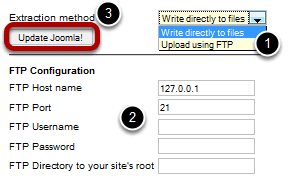
Now you are given two options for extracting the files: (A) Directly (B) Using FTP
The simplest method is just to use the default "Write directly to files", however, with many shared hosts that is not possible, and so an FTP method is given. If you go with "Write directly to files", there is no need to change any of the FTP conguration; if, however, you use FTP, you will have to enter the correct credentials.
Once you've decided which method, simply click Update Joomla.
That is it! You have just updated your Joomla version, saved yourself a significant amount of time, and secured your site from known vulnerabilities! Mission accomplished by the powerful Admin Tool by Akeeba!