The Joomlashack Blog
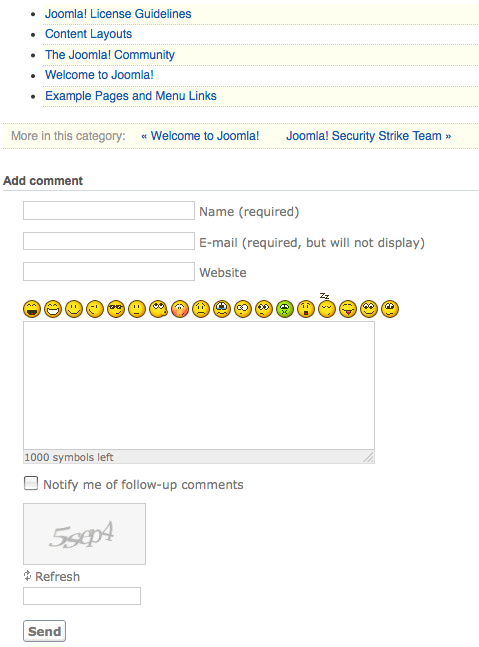
Pop-up Messages in Joomla using JDialog
- Written by Steve Burge Steve Burge
- Published: 24 October 2010 24 October 2010
One of our Joomla training members wanted to place an agreement in front of their users on certain pages. They wanted to force them to agree before going any further.
Our solution was the JDialog module. This works not just for agreements but for almost any type of pop-up message you want to display.
Showing Different Content to Different Joomla Users
- Written by Steve Burge Steve Burge
- Published: 24 October 2010 24 October 2010
One of our Joomla training members asked this question: "I need to give access to certain login individuals to specific content."
Now, there are Joomla extensions that will close off different parts of the site to different groups of users, but this member wanted something different. They wanted to drill down much more accurately and show different content to different individual users, even within one article.
To do this you need the "inline ACL Content Plugin" and here's how you use it.
Install inline ACL Content Plugin
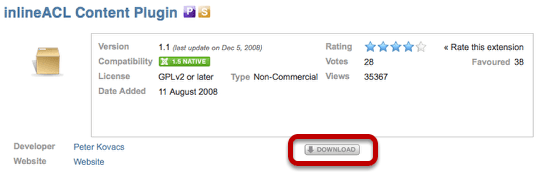
Visit the inline ACL page on https://extensions.joomla.org. Click "Download" to go to the developer's site and find the file. Download the file to your desktop.
In your Joomla administrator area, go to Extensions >> Plugin Manager and enable the plugin.
Different Content to Different Joomla Users
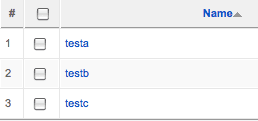
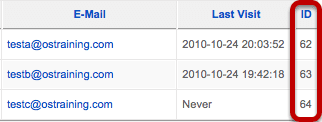
In order to test out the inline ACL plugin, I went to Site >> User Manager and create three different users. Take note of their username and also their number in the right-hand column called "ID". You'll be able to use either the username or the ID# to show users different content:
Create The Content For Each User
Go to Content >> Article Manager and open up and article that you want to place content inside.
Use this formula for the code:
 {iACL type=username testa}Hi testa!{/iACL}
{iACL type=username testb}Hi testb!{/iACL}
{iACL type=username testc}Hi testc!{/iACL}
When the "testa" signs in, they will see "Hi testa!". When "testb" signs in, they will see "Hi testb!" and so on.
You can also do this by using the ID#s:
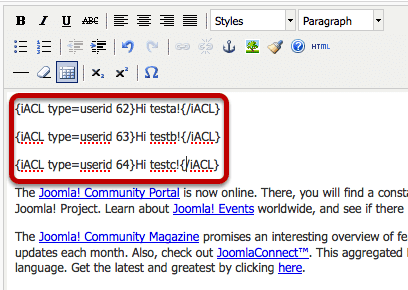
 {iACL type=userid 62}Hi testa!{/iACL}
{iACL type=userid 63}Hi testb!{/iACL}
{iACL type=userid 64}Hi testc!{/iACL}
When the user with ID# 62 signs in, they will see "Hi testa!". When the user with ID# 63 signs in, they will see "Hi testb!" and so on.
If you want to show content only to unregistered users, use this:
{iACL type=userid 0}Hi unregistered users!{/iACL}Other Options Using inline ACL
{iACL type=!userid 62}Your text{/iACL}{iACL type=!username testa}Your text{/iACL}{iACL type=group author,guest}Your text{/iACL}{iACL type=!group author,guest}Your text{/iACL}Using JComments with K2
- Written by Steve Burge Steve Burge
- Published: 20 October 2010 20 October 2010
We've written often about K2, the excellent content extension for Joomla. You can read and watch our introductions here in Part 1 and Part 2.
In this tutorial we'll show you how to use JComments instead of native K2 comments. Why would you want do this? Here are some reasons:
- JComments is a more fully-featured commenting option than the default K2 option.
- JComments can provide comments elsewhere on your site, not just K2. Your site visitors will be presented with a unified solution.
- It has a captcha system that works on all hosts unlike Recaptcha which can cause problems on hosts such as GoDaddy.
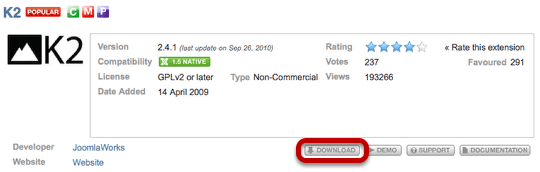
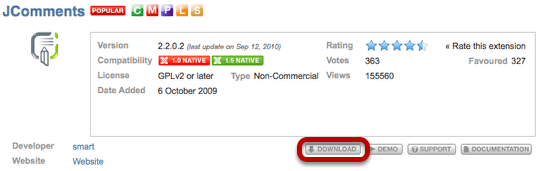
Install K2 and JComments
In order to integrate K2 and JComments you first need need to have both of them installed on your site.
If you haven't done so, you can find them on the K2 page on https://extensions.joomla.org and the JComments page on https://extensions.joomla.org.
Install the JComments for K2 Plugin
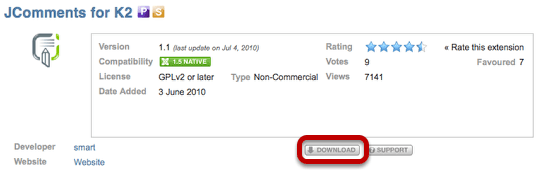
In order to integrate the two extensions, we're going to need the JComments for K2 plugin that you can download from its page on https://extensions.joomla.org.
Upload this plugin to your Joomla site and then go to Extensions >> Plugin Manager >> K2 JComments Plugin and enable it.
Visit Your K2 Articles
That's it, you're done. Unfortunately it's not possible to import your K2 comments into JComments.
October Template: Introducing "Cloud 9"- Joomlashack's newest Joomla Template
- Written by JohnFlanagan JohnFlanagan
- Published: 19 October 2010 19 October 2010
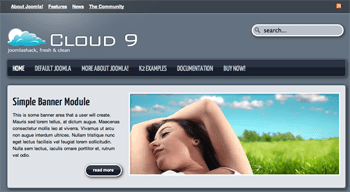 This week, we're on 'cloud nine' over the release of our latest Joomla template called...what else? Cloud 9!
Cloud Nine = A state of happiness, ecstasy, elation or bliss.
Cloud 9 is a clean and colorful template as big, blue, and spacious as a Montana sky.
Cloud 9's sparse and modern design makes it the ideal template for a blog, personal site, or social networking site--where users want easy access to content...not clutter! And Cloud 9's no-bloat, SEO-optimized code will have your visitors ecstatic over how fast your site loads.
You'll be ecstatic, too, when you see all the cool additions and features we've packed into our Cloud 9 joomla template...
Read more: October Template: Introducing "Cloud 9"- Joomlashack's newest Joomla Template
Add a Toolbar to Joomla with UserToolbar
- Written by Steve Burge Steve Burge
- Published: 18 October 2010 18 October 2010
One of our Joomla training members asked us if there an extension that can create a "facebook style footer admin panel" like the one found at the bottom of Facebook.com.
The answer is yes, thanks to an extension called UserToolbar.
Download and Install UserToolbar
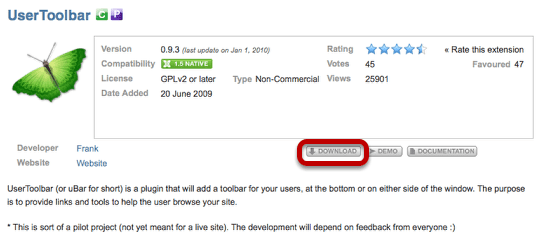
Go to the UserToolbar page on the Joomla Extensions Directory site and click Download.

You'll be taken to Joomlacode.org. Click on the link under "Files" and a file will be sent to your computer.
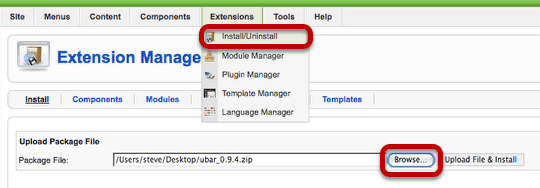
In the administrator area of your Joomla site, go to Extensions >> Install/Uninstall and click Browse. Find the file you just downloaded and then click Upload FIle & Install.
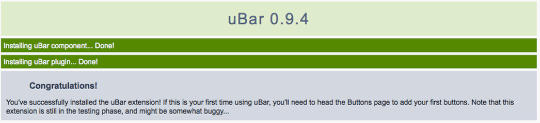
You should see a Congratulations message show that you've installed the component successfully.
Configuring UserToolbar
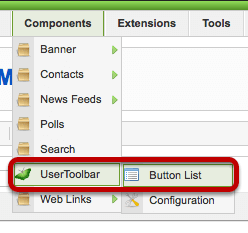
Once you've installed the component, go to Components >> UserToolbar >> Button List

Click New in the top-right corner.
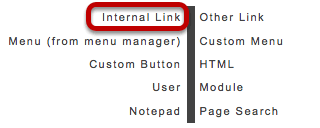
Here you can choose what you'd like to add to the toolbar on your site. In this example we'll choose an Internal Link.
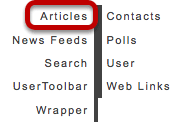
Next we'll click on Articles, but in reality we could choose any element of our site.
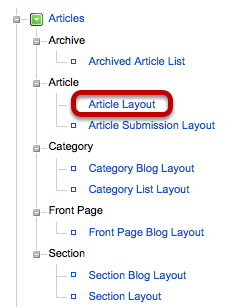
Click Article Layout just as you would when creating a menu link.

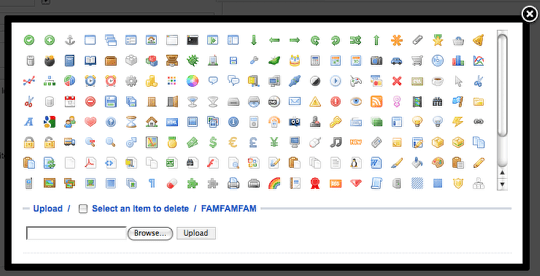
You'll now see a very slightly modified version of the menu creation page. You can click on Select Article to find the page you want to link to. You can also enter a name that people will see on the front of the site. Finally, click the Icon link to choose from the default images or upload your own.
Adding a Login Box to UserToolbar
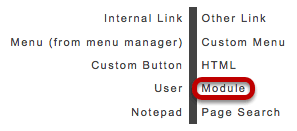
In this next example we're going to add a login module to the toolbar. In Components >> UserToolbar >> Button List >> New you can choose to add a Module.
Choose Login on the next page.

Now you'll see a modified version of the Login Module page. You can set a name and choose an icon as before. Save your choices.
Viewing the Toolbar
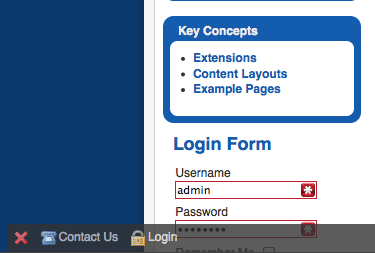
Visit the front of your site and your toolbar will look like the one above. You can add many more items, linking to almost any page on your site or someone else's site. A common use for these toolbars is to add contact links plus social website links such as Facebook and X / Twitter.
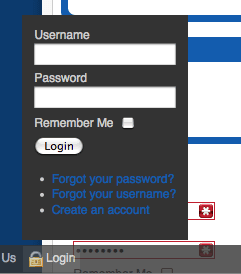
Click on the Login link and you'll see the login box displayed in a pop-up.
Creating Splash Pages in Joomla with SplashR
- Written by Steve Burge Steve Burge
- Published: 05 October 2010 05 October 2010
Normally I'm no fan of splash pages for some of the reasons outlined here by SEOMoz.
However, quite a few of our members have wondered how to set them up and sometimes clients do insist on them.
Splash pages are not very straightforward to do because Joomla always tries to load it's own pages first. In order to avoid this, we can use a module called SplashR:
Install SplashR
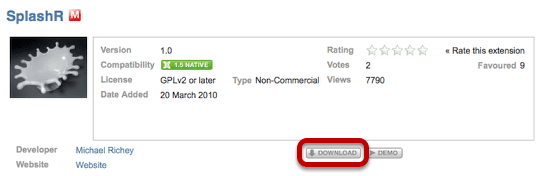
Go to the SplashR listing on the Joomla Extensions Directory and click Download.
Go to the administrator area of your site then Extensions >> Install/Uninstall, click Browse and upload the module file.
Then go to Extensions >> Module Manager and open up the SplashR module.
Edit the Module Settings
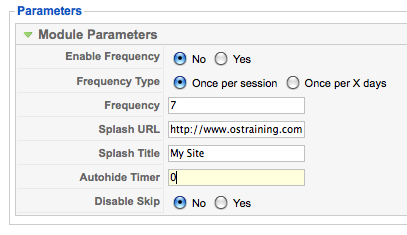
There are several settings you'd need to change here:
- Splash URL: the page you want to use for the splash screen.
- Splash Title: telling people what site they're visiting.
- Autohide Timer: setting this to 0 forces people to click through to your main site.
Once you enable the module, visitors to your site will see a screen like the one above. There will be a black bar across the top of the screen and a button in the top-right corner.
If you'd like to edit the design of the splash controls, go to this folder to replace the images: /modules/mod_splashr/assets/images/
Simple Subscribe: Joomla Subscription Extension
- Written by Steve Burge Steve Burge
- Published: 04 October 2010 04 October 2010
There are many great subscription extensions available for Joomla. However they tend to be very powerful and complex to setup. Some of our members have been asking for a very, very simple membership component. Simple Subscribe is it.
It doesn't do recurring subscriptions, lock down particular areas of the site or use anything except PayPal.
Basically Simple Subscribe allows people to pay a flat fee to become a Registered member of your site. That's it. If that works for you then Simple Subscribe is a great option. If not, click the link above a search for an extension with more features.
Installing Simple Subscribe
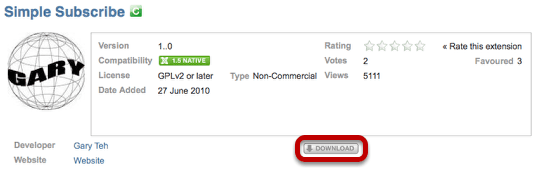
Go to the Simple Subscribe page on the Joomla Extensions Diretory and click "Download".
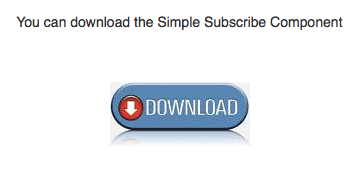
There should be a huge download button on the developer's website. Download the file to your desktop and then go to Administrator >> Extensions >> Install/Uninstall to upload the extension.
Configuring Simple Subscribe
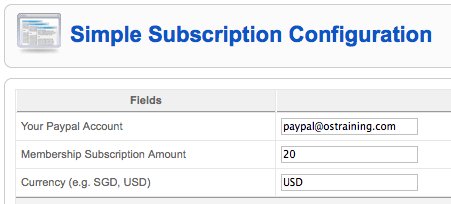
Configuring Simple Subscribe is easy. Go to Components >> Simple Subscribe. Then enter your PayPal information, the cost of membership and the currency code. If you aren't sure what the right code for your currency is, check this list.
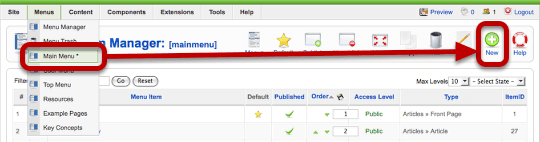
Next you'll need to make a sign-up link for people. Go to Menus >> Main Menu and click "New".
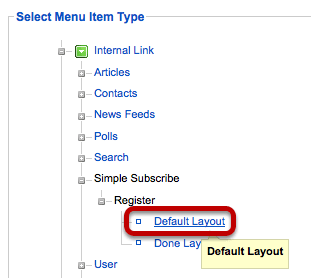
Choose "Simple Subscribe" and "Default Layout" from the dropdown menu.
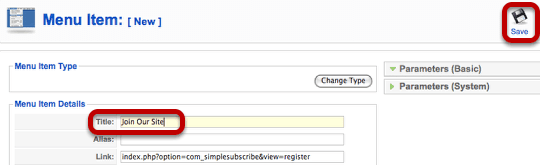
Give the menu link a title such as "Join Our Site" and then click "Save".
Registering People
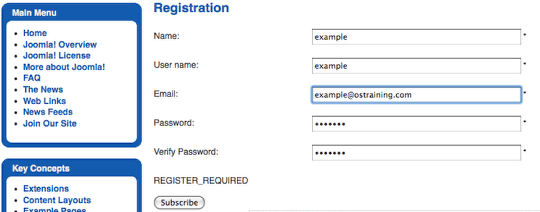
As soon as people click "Subscribe" they will be taken to PayPal where they can complete their subscription.
Extra Fixes Needed #1

There are a couple of extra fixes you'll need to make to make Simple Subscribe work perfectly. First, we're going to prevent people from registering without paying. Go to Extensions >> Module Manager and disable the "Login Form" module.

Instead of the default login module, we're going to use the Core Design Login Module. You can download it using the previous link to the Joomla extensions site. Download the file to your desktop and upload it via Administrator >> Extensions >> Install/Uninstall
Go to Extensions >> Module Manager >> Core Design Login module and open that module.
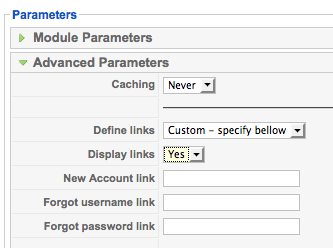
Under "Advanced Parameters", set "Define Links" to Custom - specify below". This means that people can't use the normal Joomla registration system to pay. They have to go through Simple Subscribe. In the "New Account Link" field you can enter this: index.php?option=com_simplesubscribe&view=register
Extra Fixes Needed #2
There is a small language mistake that appears on the Simple Subscribe registration screen.
To fix it, go to this file /components/com_simplesubscribe/views/register/tmpl/default.php
You'll need to find this line at the bottom of the file:
<?php echo JText::_( 'REGISTER_REQUIRED' ); ?>Either remove the line entirely or change the "REGISTER_REQUIRED" so that it reads "Required fields are marked with a *"
Content Slider Module to Display Joomla Articles
- Written by Steve Burge Steve Burge
- Published: 04 October 2010 04 October 2010
The Content Slider Module allows you to display Joomla articles so that they slide on and off the page.
You can include images, text or anything that you could place inside a normal Joomla article.
Create Your Articles

In your Joomla administrator area, create your articles as you would normally.
One thing to note is that you will need a special Section and Category for these articles, so be sure to create a category called "Slider News", "Headline News" or similar.
Download and Install Content Slider Module
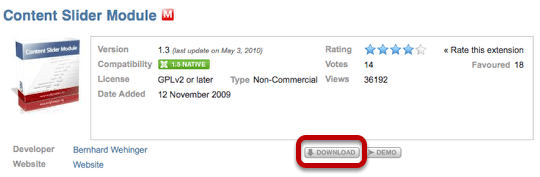
Visit the Content Slider Module page on the Joomla Extensions Directory and click Download.

You'll be taken to the extension developer's website. Scroll down to the find the latest version which at the time of writing is Version 1.3. You'll get a file on your desktop with a name very similar to mod_slider_1-3.zip.
In the administrator area of your Joomla website, go to Extensions >> Install/Uninstall, click Browse and upload the mod_slider_1-3.zip file.

Staying in the administrator area of your Joomla site, click Extensions >> Module Manager and search for the "Content Slider Module".
Publishing Your Slider
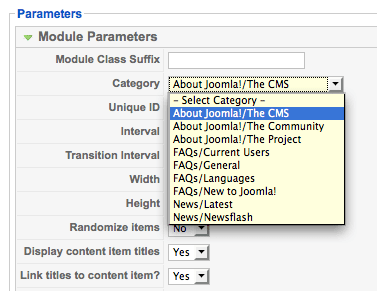
Choose the section and category in which you created all your articles. Set "Show Title" to "No" and set "Enabled" to "Yes".
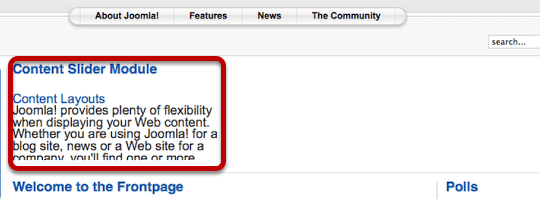
On the front of your site the module will now display. It's unlikely to be perfectly set up the first time you do it. If text is being cut-off, you'll need to go back to your module:
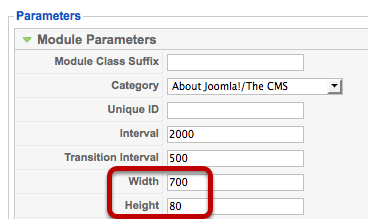
Change the width and the height of the module to fit your template space.
September: Record Month for Joomlashack
- Written by Joomlashack Joomlashack
- Published: 25 September 2010 25 September 2010
I don't want to wait till the month is over to thank our customers and fans for making September the best month in Joomlashack's 5 year history. We work very hard to create all these great products and your purchases, loyalty, and encouraging testimonials motivate us to work even harder. To loosely quote Mike Mulligan from the loved children's book, when so many of you are watching us, we strive to work much harder and better.
This is a perfect time to say how proud I am of the Joomlashack Team: Amanda, TJ, Forest, Shawn, Jeremy, Gary, Christopher, Casey and David. Just last month this great team launched an unprecedented 4 Joomla templates, 3 Premium Wordpress Themes, 3 New Professional Drupal Themes, the awesome Joomla Extension Lifestream, and a whole batch of new courses, classes and Joomla video tutorials for the University.
This month, we launched the cool and refreshing Cascada Joomla template, the ultra modern Nuvo Joomla 1.5 template, a free Wordpress Theme, a free Drupal Theme, as well as updates for Lifestream, and more Joomla lessons for the University.
Again thank you, and please keep watching us as we'll be launching more top-notch templates, themes, and training materials to help you with your online presence.
Eddie
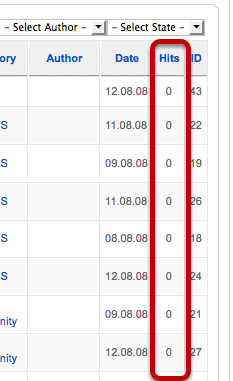
Reset Joomla Hits to Zero
- Written by Steve Burge Steve Burge
- Published: 24 September 2010 24 September 2010
Often if you're developing a Joomla site you may visit Joomla articles many times before launch. That means you can easily launch your site with some articles showing 100, 200 or more hits.
If you'd like to have a clean slate and reset the number of hits to zero, here's how to do it. First we'll show you how to reset the hits for one article, then for your whole site.
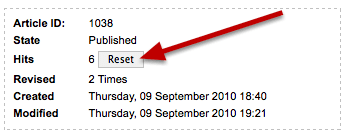
Reset the Hits for One Article
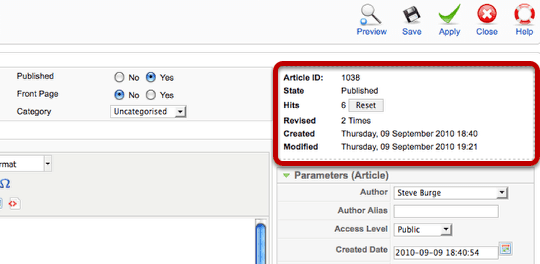
Inside each article there will be a "Reset" button on the right-hand side to change your hits back to zero.
Reset All the Hits for All Your Articles
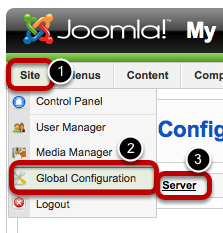
In order to reset all the hits for your site, you'll need to access your database. First of all, we need to double-check the name of the database we're using.
Go to Site >> Global Configuration and click on Server.
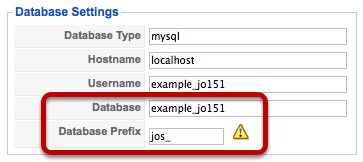
On the right-hand side under Database Settings, make a note of both your Database and Database Prefix.
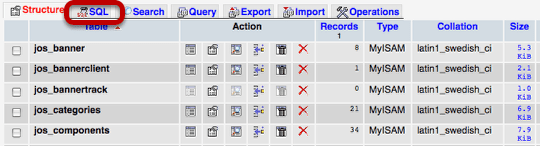
We'll now need to access our database. Many hosting companies will give you access via phpMyAdmin. If you don't know how to get there, ask your hosting company.
Once you are inside phpMyAdmin, click on your database name that you found in the previous step. Then click on "SQL" at the top of the page.
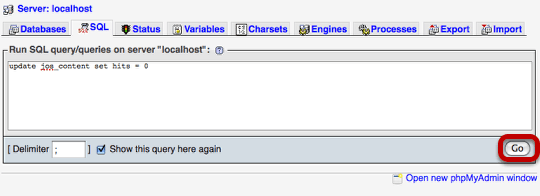
Enter this code into the box:
update jos_content set hits = 0Volia!