The Joomlashack Blog
Using Firebug to Edit Joomla Templates
- Written by Steve Burge Steve Burge
- Published: 10 September 2010 10 September 2010
UPDATE: Firebug is not supported anymore. Please try Dev Tools in Firefox, or Developer Tools in Chrome instead.
Firefox is a great browser for working with Joomla templates.
In another tutorial we covered the Webdeveloper plugin. In this tutorial we'll cover the Firebug plugin which allows you to debug and edit your template's HTML and CSS files:
Install the Firebug Plugin
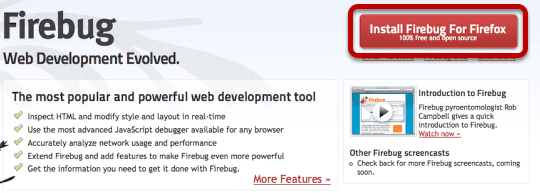
Click "Install Firebug For Firefox". You'll have to restart your browser for the installation to finish. When it is over, you'll see an extra Firebug icon in the bottom-right of your browser.
Enable Firebug
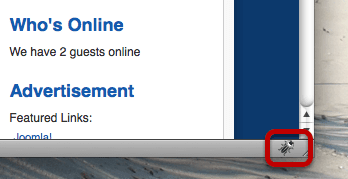
Click on the icon and it will be enabled.
Reload Your Page
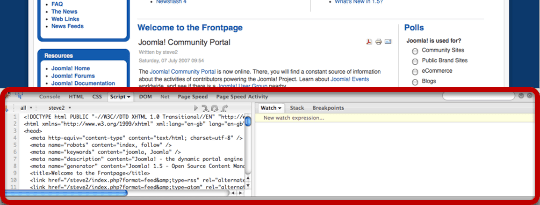
Refresh your page and you'll see Firebug starting to do it's work in a new panel at the bottom of your browser. There are lots of features in Firebug. We're going to use a couple that will allow us to analyse our Joomla template.
Use the Firebug Inspect Feature
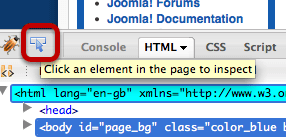
In the bottom-left hand corner of your browser, click on the blue arrow. You should get a pop-up message saying "Click an element in the page to inspect". That's what we're going to do.
Click the Logo

Click on the Joomla logo. There will be a blue box around the outside. At the bottom of the page, you'll see Joomla's HTML layout on the left and its CSS on the right. We can see that the logo area is placed on the page using this HTML:
. We can also see that it's controlled by the CSS i div#logo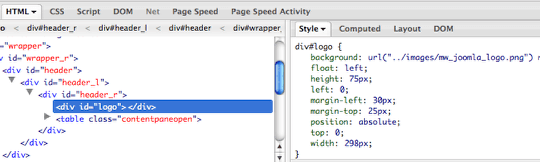
Edit the CSS

Put your cursor into the background CSS and it should pop-up as in the image above. You can edit any part of this. I'm going to choose to edit the image. I'm going to replace it with the Google logo: https://www.google.com/images/logos/ps_logo2.png

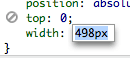
When you've done that, click your cursor somewhere else on the page and you should see that your change has taken effect:

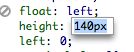
OK, that's great, but the image is still too large. Let's go back to the CSS. I'm going to change the width of the logo to 498px and also change the height of the logo to 140px.
Refresh your page and you'll be back to the design. All those changes only took place in your browser. No-one else saw them.
Fixing CSS Problems
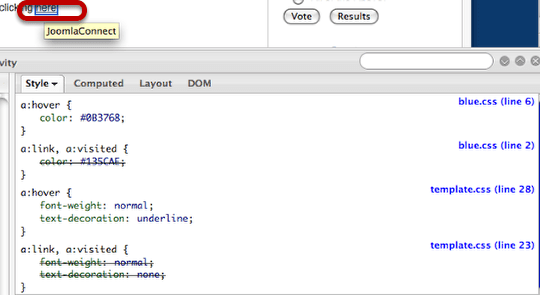
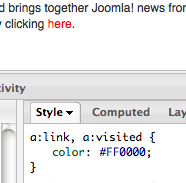
Imagine that I have a problem with the CSS in my template ... I'd like to change the color of my links. To get started, enable the Inspect feature and click on a link. The CSS will appear beneath. This image above shows all the CSS affecting the link, regardless of what file it appears in.

If you want to know where the CSS is stored so that you change it, Firebug will tell you exact file location and line number. However, first we need to make and test our changes. All you need to do is click on and change the color CSS:
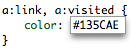
I'm going to change #135CAE to #FF0000 and that will change all the links to red:
Introducing Cascada: Joomlashack's Latest Joomla 1.5 Template!
- Written by JohnFlanagan JohnFlanagan
- Published: 09 September 2010 09 September 2010
 You want a template with personality? Here it is! Introducing JS Cascada, a Joomla 1.5 template overflowing with fun & flexibility and designed to stand out amongst other Joomla templates. It's super customizable, SEO-friendly, and features built-in Google Font support (for awesome headlines and titles), our new Slide Down Box Menu (makes menu items literally jump out and come to life!), six attractive color choices, 30 module positions, our free X / Twitter Annotation plugin, and Lifestream Joomla Extension support.
Cascada is a cool & refreshing Joomla 1.5 template and is packed with enough features to satisfy Joomla novices and power-users alike!
Read more: Introducing Cascada: Joomlashack's Latest Joomla 1.5 Template!
Delete Joomla Site Sample Data Quickly
- Written by Steve Burge Steve Burge
- Published: 07 September 2010 07 September 2010
Before you start to build your Joomla site, I recommend you delete all the sample content.
Is this a common problem?. A quick search for some of the default text shows over 4 millions sites who have forgotten to remove it. Also commonly indexed are Newsfeeds and Weblinks. The Joomla sample data isn't relevant to your site and can often clog up up the administrator area.
UPDATE: Mass Content is now called OSContent and is available from https://joomlashack.com.
Allow Joomla Users to Manage Their Own Articles on the Frontend
- Written by Steve Burge Steve Burge
- Published: 06 September 2010 06 September 2010
It's really useful for writers on a website to be able to easily find and manage their articles. With Joomla, there's no central control panel for writers to do that. Fortunately there's an outstanding extension called Shack Article Layouts which solves that problem. Here's how to use it ...
After installing the Shack Article Layouts extension, the key step is to create a menu link to Shack Article Manager.
- For the "Menu Item Type", choose "Shack Article Manager".
- Notice all the tabs for this menu link? Shack Article Manager has dozens of different options for your frontend article management:

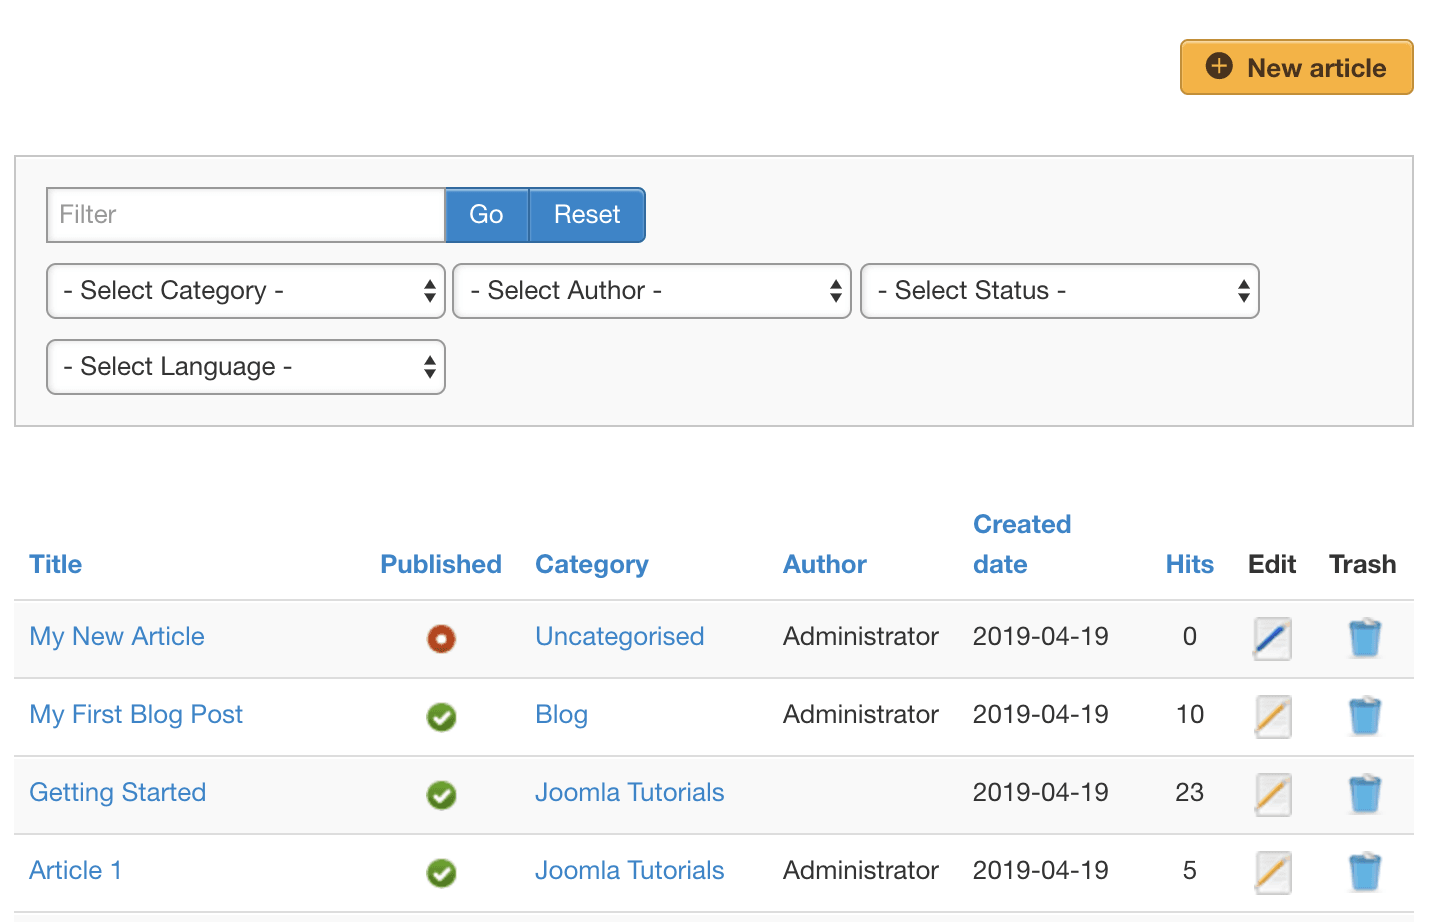
On the frontend of the site, visitors will be able to click this menu link and see the main Shack Article Manager screen. If you allow them, they can click "New article" and create content directly from the frontend of the site.
Here's a view of Shack Article Manager screen as an administrator sees it. They have full access to all the articles on the site:
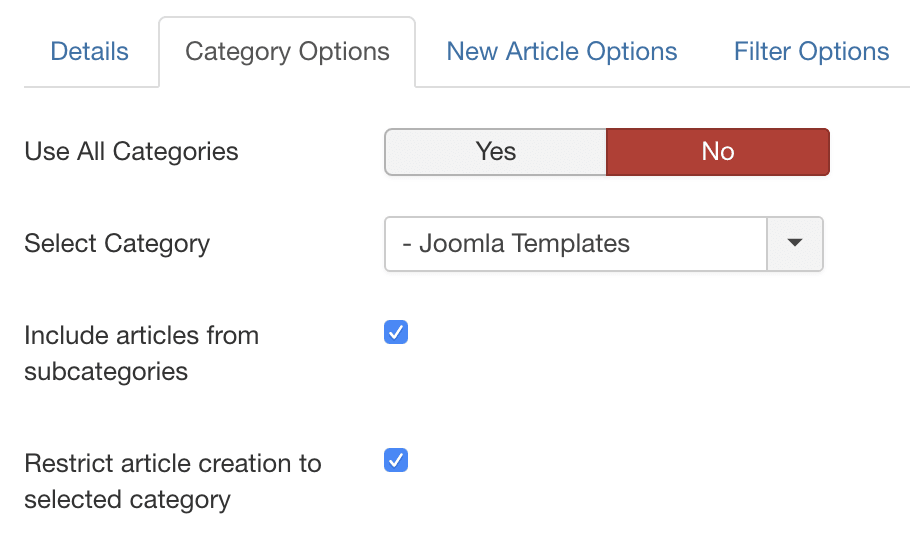
Options for Shack Article Manager
Shack Article Manager is highly configurable. For example, you can allow users to add content in any category, or you can restrict them to a single category:
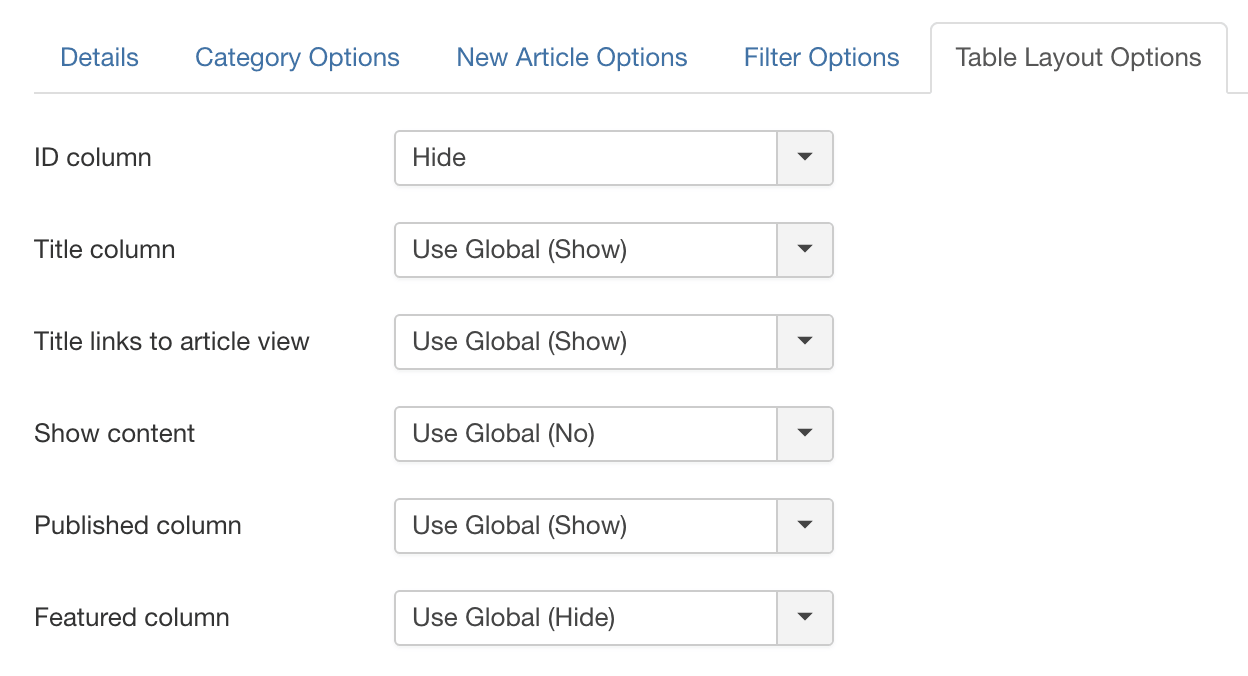
You can fully customize the frontend display of Shack Article Manager. Each element of the display can be shown or hidden, depending on your needs:
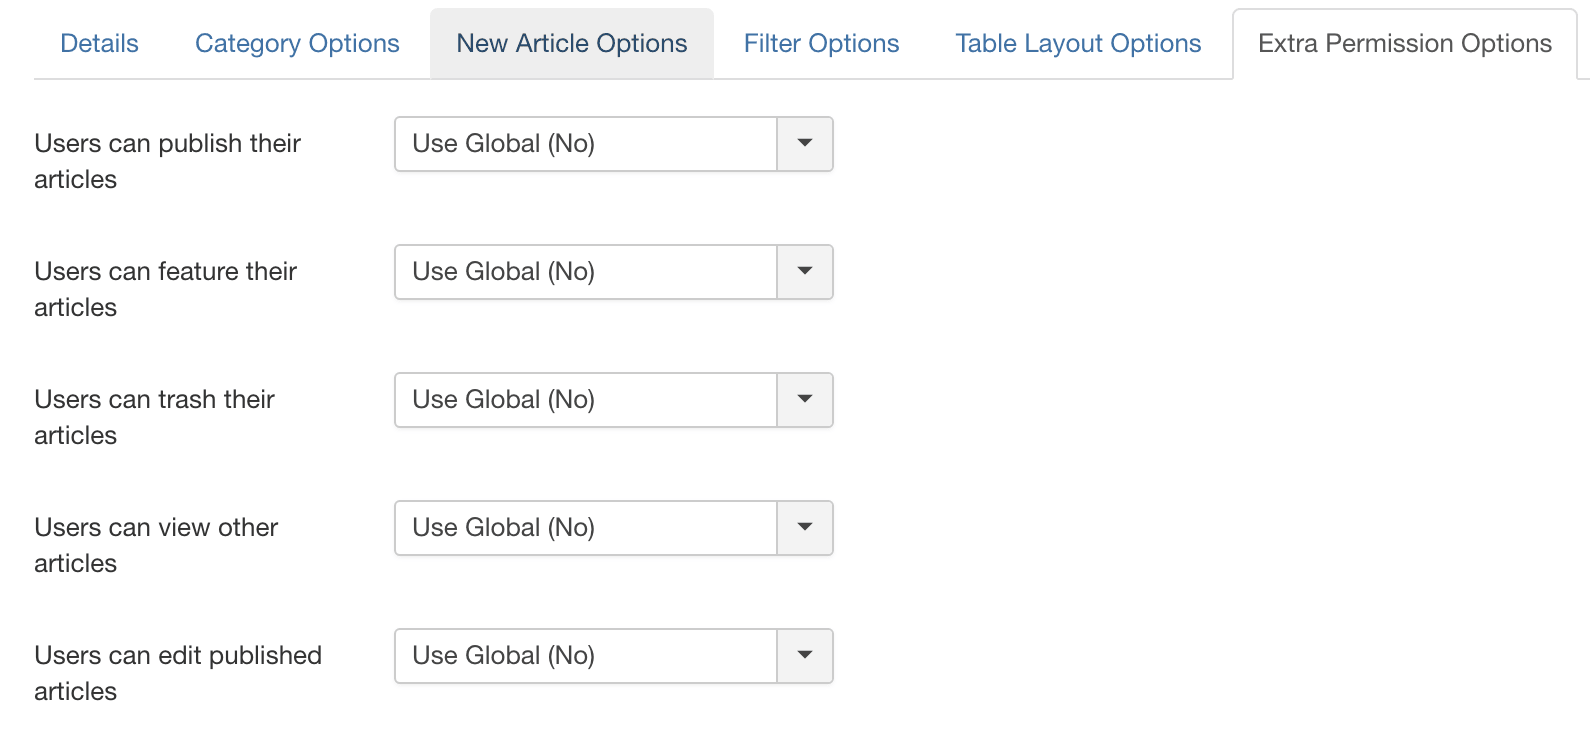
Shack Article Manager also has permissions that are easy to apply. You can decide if users can publish, feature, trash, view, or edit their published articles.
Video guide to Shack Article Manager
Video guide to allowing user to add content
Creating a Joomla Development Site
- Written by Steve Burge Steve Burge
- Published: 02 September 2010 02 September 2010
This tutorial will show you how to create a development site in Joomla. You can make changes to your test site and then, when you've tested and are happy with them, automatically push out those changes to your live site. This is professional development behavior, because it reduces the potential for mistakes and allows you eliminate most errors before they become public.
To create a development site we're going to use an extension called Working Copy.
Install Two Joomla Sites
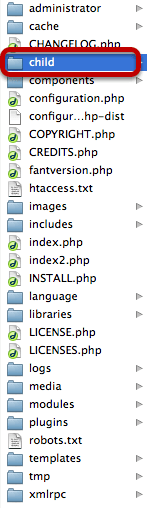
In order to synchronize a Joomla live site and a Joomla development site, you first need to make sure you have both of them. So, I've installed a live site and then a development site inside it, in a folder called /child/. You can use other arrangements, but this is a simple way to get started.
Note: Please make sure that you keep your development site private from visitors and from search engines. That means at least password-protecting the folder.
Getting Working Copy Set Up
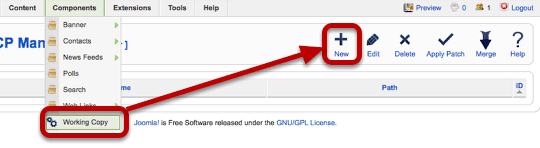
We need to install Working Copy on both of our Joomla websites. When we've done that, login in to one of them and go to Components >> Working Copy >> New.
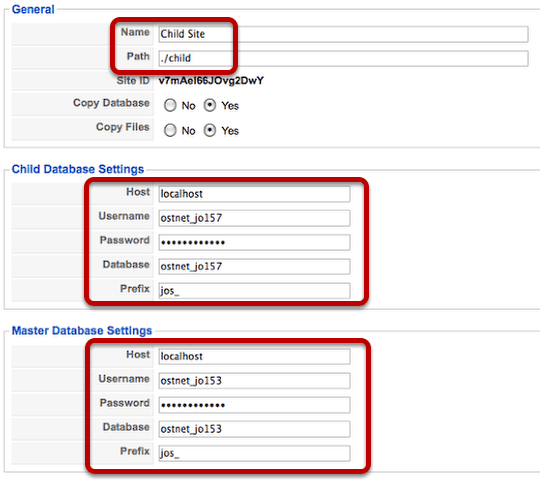
There are three pieces of information you need to enter in this area:
1) Choose a name for this entry and enter the path to the child website.
2) Enter the database information for the child site. If you don't know it, you can find this in the site's configuration.php
3) Enter the database information for the main live site.
That's all you need to do here. There other, more advanced settings, but that's enough to test Working Copy and get it working.
However, don't forget to enter this exact same data into both your live site and your child site.
Make a Change To Your Child Site

Now let's make a change on our child site - it doesn't need to be large. In fact, to test Working Copy, I recommend making only a minor alteration. In this case I modified the name of one article. I then went to the front of the site to check that the change was complete.
Seeing the Changes in Working Copy
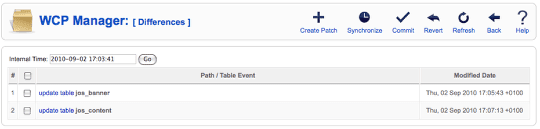
Now in your child site, go to Components >> Working Copy >> Differences and you'll see a list of the things that have changed. In this case it will an update to the jos_content table (when I edited my article) and an update to the jos_banner table (when I visited the site and saw the advertising banners).
Applying Changes to the Live Site
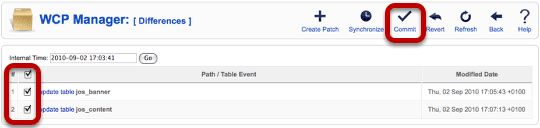
Select the changes you'd like to see made on your live site and click "Commit". You should see a blue "Commit completed" message.
Check Your Changes
Go to your live site and check to see whether the change has been made.
Changing Files

OK, OK, you might say. That was fairly simple. We were able to move some database tables over. Well, let's have a look at how can we also move over file updates.
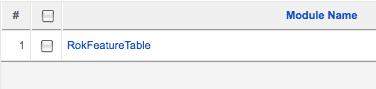
For, this example I've uploaded a module from Rockettheme to my child site, but any extension will do. You can see that 2-15 are file changes and 16-17 are module updates.
Check the Changes
Now, go over to your live site and look for the new extension. It should have been successfully transferred.
Commit the Changes
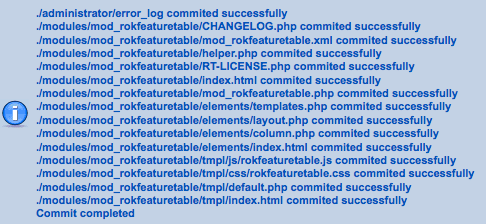
Now select those changes, click "Commit" and you should get a message saying that you've successfully moved the test changes to your live site.
Webinar by the Creator of Working Copy
Happy Birthday Joomla and Joomlashack
- Written by JohnFlanagan JohnFlanagan
- Published: 26 August 2010 26 August 2010
Like Joomla, we've gone through some big changes since then, especially the past year or so--a new team, new Premium Joomla Templates, launching Joomlashack University, releasing new Joomla Extensions and now our own Wordpress Themes & Drupal Themes, too!
Big changes, indeed--but one thing that will never change at the 'Shack is our commitment to bringing you the very BEST Joomla (and other CMS) products at the very BEST value anywhere.
We want to thank you all for making Joomlashack so successful these past 5 years. Here's to another 5!
Wordpress for Joomla! Training now available in Joomlashack University
- Written by JohnFlanagan JohnFlanagan
- Published: 24 August 2010 24 August 2010
 We recently released a very informative, in-depth training lesson in our Joomlashack University on how to set up and use the Wordpress for Joomla! extension by corePHP. Wordpress for Joomla! is a powerful new Joomla extension that allows you to use Wordpress blogging software inside your Joomla website. With Wordpress for Joomla, you can enjoy the best blogging platform integrated with the best content management system available. You can even use Wordpress plugins and Joomla modules all at the same time, on the same blog. It's amazing.
In this new Quickshot preview of Wordpress for Joomla, JSU instructor Forest Linden gives you a very brief overview of just a few of the many cool features that Wordpress for Joomla! has to offer.
Read more: Wordpress for Joomla! Training now available in Joomlashack University
4 New Joomla Templates Released: Avalon, Orion, Evenflow & Veer
- Written by JohnFlanagan JohnFlanagan
- Published: 17 August 2010 17 August 2010
It pleases us to announce our partnership with Simplethemes. Casey Lee, owner of Simplethemes was one of the founders of Joomlashack, and so it is with great pride that we have signed an agreement with Casey to become the exclusive retailer of his wonderful and professional Joomla Templates.
We are proud to release these 4 new premium Joomla templates and you can look forward to a new template from Casey every month from now on.
We have 3 more template launches coming up during the next 4 weeks. Please also look into the new Joomla lessons added recently in our University; and our first Joomla extension, Lifestream, which was released last week.
Read more: 4 New Joomla Templates Released: Avalon, Orion, Evenflow & Veer
Lifestream 1.1 Released: New support for Flickr, Youtube and Tumblr
- Written by Amanda Tabush Amanda Tabush
- Published: 04 August 2010 04 August 2010
Lifestream 1.1 has been officially released (a week ahead of schedule no less)!
Lifestream 1.1 for Joomla integrates your social network feeds and displays them ALL on 1 website!
Version 1.1 adds Flickr, Youtube and Tumblr support to Lifestream for a total of 6 social network integrations so far (Facebook, X / Twitter and RSS Feeds were included in the initial release of Lifestream two weeks ago)
New customers can get their copy of Lifestream for just $24 here.
Registered customers of Lifestream can now download version 1.1 for free in our downloads shop here.
Don't forget..LinkedIn and Last.fm plugins will be released in early October. Customers of all previous versions of Lifestream will be able to download these new plugins (plus any future plugins) for free for 6 months after their purchase.
Read more: Lifestream 1.1 Released: New support for Flickr, Youtube and Tumblr
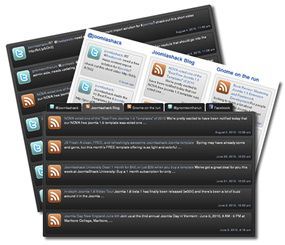
Lifestream Extension for Joomla Released!
- Written by Amanda Tabush Amanda Tabush
- Published: 04 August 2010 04 August 2010
Today, we're excited to announce the release of our very first Joomlashack extension called Lifestream!
Lifestream for Joomla integrates your social network feeds and displays them ALL in one place!
It's a powerful new component & module that dynamically updates your website with all your social network activities and RSS feeds. You can set it to display as separate streams or as one integrated social stream that includes all of your social network updates. You can display your 'life streams' in side-by-side windows, tab view or in one window.
Imagine the power and convenience of sharing your Flickr pics, YouTube videos, Facebook status updates, blog posts, RSS feeds, X / Twitter tweets and more...all from one website. Cool huh?
Lifestream for Joomla now makes that possible!