The Joomlashack Blog
Testing a Server for PCI Compliance
- Written by Steve Burge Steve Burge
- Published: 14 February 2010 14 February 2010
Today's security topic is inspired by a recent exercise I went through - testing a server for PCI compliance. For those who are not aware PCI is a security standard for accepting credit cards.
According the website for PCI they state their mission as follows:
"The PCI Security Standards Council’s mission is to enhance payment account data security by driving education and awareness of the PCI Security Standards. The organization was founded by American Express, Discover Financial Services, JCB International, MasterCard Worldwide, and Visa, Inc."
Importing RSS Feeds Into Joomla Articles
- Written by Steve Burge Steve Burge
- Published: 08 February 2010 08 February 2010
This tutorial will show you how to take an RSS feed and import it into your Joomla site. Each item on the RSS feed will become a separate Joomla article. We use this technique for a couple purposes:
- Distributing our content to other Joomla sites. For example, we use this technique to showing these tutorials on other sites in our network.
- Importing blogs and news on a particular topic from other sites. This way people can read them all in one place.
We're going to use a component called 4RSS from 4RSS.com.
Installing and Configuring 4RSS
- Go to the 4RSS page on the Joomla Extensions Directory and download the file.
- You'll see a file on your desktop with a name very similar to com_4ss_1.3.06.zip
- Go to the administrator area of your Joomla site, then Extensions >> Install / Uninstall.
- Click "Browse" to locate the package file and then click "Upload File and Install".
- Go to Components >> 4RSS
- Click "New" in the top-right corner and you'll see a screen like the one below:
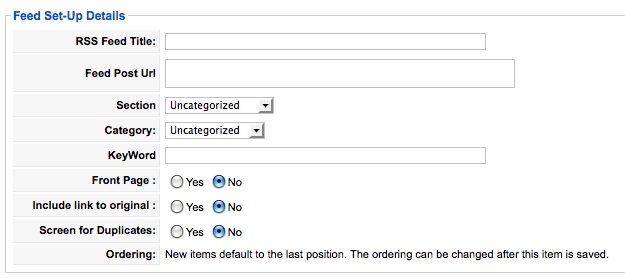
These are the settings you'll need to enter:
- RSS Feed Title: This is just for your own use. It will never show on the front-end.
- Feed Post URL: The address of the RSS feed you want to import.
- Section / Category: Where the new articles will be created.
- KeyWord: If you'd only like to import articles that mention a particular keyword, insert it here.
- Frontpage: Do you want to publish these to the frontpage of your site?
- Include link to original: Highly recommended to click "Yes" in nearly all circumstance. This will insert a link back to the article's original location with the text "read full article". You don't want search engines to get confused as to which page is the original.
- Screen for Duplicates: Should 4RSS check to see whether any feeds have already been imported? Again, "Yes" is highly recommended.
Importing the RSS Feeds
Now that you're set up, there are two ways to import feeds:
- Manually: In Components >> 4RSS, select the feeds you want to import and then click "Post" in the top-right corner.
- Automatically: In Components >> 4RSS you can click the "4RSS CRON" tab. This is a little trickier and will depend on your server for the correct setup. Each hosting company will have a different place to setup cron jobs so you will need to check with them. The developer's support forum may be able to help. One common entry that may work is:
Php -q/home/......./public_html/administrator/com_4rss/cronjob_4rss/cronjob.php > /dev/null 2>&1
5 Useful JCE Features That People Miss
- Written by Steve Burge Steve Burge
- Published: 04 February 2010 04 February 2010
It's no secret that Joomla's default editor TinyMCE lacks quite a few features. We often recommend that people upgrade to Joomla Content Editor (JCE). You can click here to find full instructions on how to install JCE, including a video.
What we're going to cover in this tutorial are 5 really great features of JCE that people often don't realise are there:
1) Cut and Paste Images Into Different Folders
One common complaint about Joomla's default Media Manager is that you can't move images around. Once you've uploaded an image to one location, you'll need to delete it and re-upload it if you want it in a different folder. JCE allows you to do that:
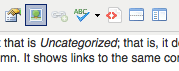
- Click on the "Image" button in the JCE editor:
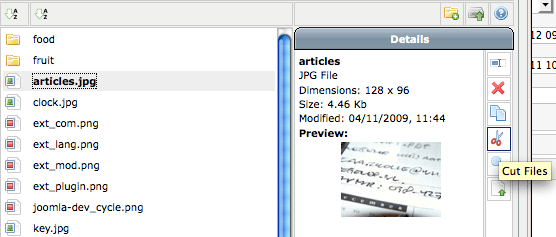
- You'll see a pop-up screen with the title "Image Manager". Select an image and look on the right-hand side for the pair of scissors. Click this button:
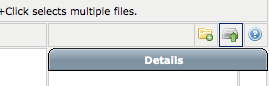
- You can now browse to another folder and click the "Paste" button, also on the right-hand side:

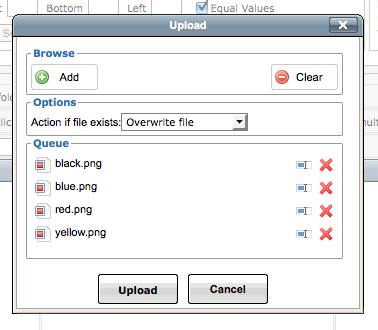
2) Upload Images in Bulk
A second complaint about the Media Manager is that images have to be uploaded one-by-one. JCE offers the ability to upload in bulk.
- As in Part 1, click on the image button in the JCE Editor.
- Click on the "upload" button on the middle-right of the screen:
- Keep clicking "Add" to select more images from your desktop.
- When you're ready, click "Upload" and all your images will be uploaded.
3) Link Directly to Any File in Your Media Manager
With the basic Joomla editor you're faced with difficult time linking to any documents that you've uploaded. A lot of people find this a problem because they need to allow their visitors to download PDF, Word and other files. With the basic editor you actually need to know the exact location of the file if you want link to it:

With JCE, this process is much easier:
- Select some text in your article. This is likely to be something such as "Click here to download the PDF". The click the link button in JCE:

- You'll see a pop-up screen with the title "Advanced Link". In the top-right hand corner, you'll see a small button that will allow you to browse all the files inside the /images/stories/ folder:

- Select the file you want to link to and then click "Insert". JCE will automatically generate a link to that file for you.
4) Different Editing Options for Different Users
The JCE Editor is a very powerful tool with a lot of options. In fact, it can sometimes have too many options. You can easily imagine some non-technical users getting a little intimidated for 4 rows of buttons like this:
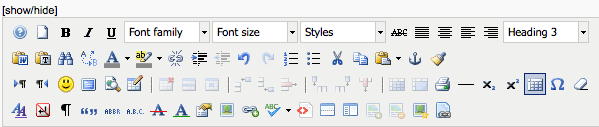
JCE allows you to add or remove these features, depending on what your users need.
- Go to Components >> JCE Administrator >> Groups.
- Here you can create different groups and assign varied features to different users. We'll use the existing "Default" group as an example.
- Click on "Default" and then the "Layout" tab at the top.
- The top box called "Available Plugins / Buttons" is the list of disabled features. The bottom box called "Current Editor Layout" is the list of active features. You can drag and drop individual features or even entire rows of features between these two boxes:
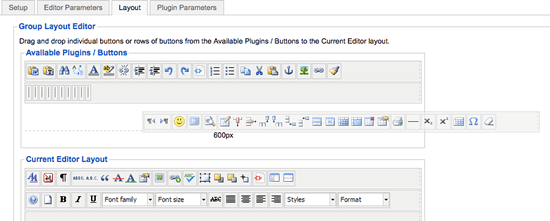
- We use this to make article submission much easier for our guests. For example, on Joomlashack.com we give writers these options:

- If you have a user who is really clumsy, you might decide to restrict their options even more :)

5) Restricting Users to their Own Upload Folders
An important security feature that many people need is the ability to restrict users to their own upload folder. They don't want John to be able to browse around the site and see all the documents that Jane has uploaded. They don't want one client being able to find files destined for another client. JCE can do that too.
- Go to Components >> JCE Administrator >> Groups.
- Again, click on the existing "Default" group as an example.
- Click the "Editor Parameters" tab and scroll to the bottom where you'll see "File Directory Path".
- In this field you'll be able to choose the settings for people's folders. Some instructions are available in the yellow pop-up box:
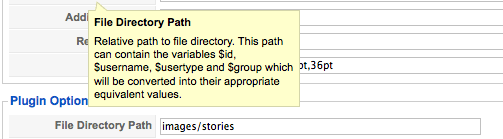
- The setting I often use is images/stories/$username This will automatically create a folder for each person based on their username and they'll only be able to upload to that folder.
- Finally, this setting only works inside JCE so you 'll need to unpublish the normal Joomla image button. Go to Extensions >> Plugin Manager and disable the plugin called "Editor Button - Image".
Automatically Update All Your Social Networks From Joomla
- Written by Steve Burge Steve Burge
- Published: 13 January 2010 13 January 2010
Would you like to be able to update your Joomla site and automatically send that update to X / Twitter, Facebook, Linkedin, MySpace, Ning and dozens of other sites?
This tutorial will show you how.
Our first part will be to create an RSS feed to export all our new posts. From there we'll use X / Twitterfeed.com and Ping.fm to distribute the posts to all our social networks.
Creating an RSS Feed
First we'll use Ninja RSS Syndicator to create our RSS feed. (it has the unusual name because it's developed by a company based in Japan).
- Step 1: Go to Joomla.org and download Ninja RSS.
- Step 2: Download Ninja RSS onto your desktop, and you'll see a file called ninjarss_unzipme.zip. Extract that package and you should see a new folder with a component and module inside.
- Step 3: Go to Administrator >> Extensions >> Install / Uninstall and upload com_ninjarss.zip.
- Step 4: Go to Components >> Ninja RSS Syndicator >> Feeds and click "New".
- Step 5: If you want to produce a feed of your whole site, simply enter a title and click save. Otherwise, scroll down and fill in the information requested. Most importantly, you can choose to hide certain sections, categories or articles:

- Step 6: Save the feed, and you should see a screen like this:

- Step 7: Copy the entry in "Feed URL" and save it into a text editor. This will be the feed that is sent to X / Twitter and Facebook.
Sending your Feed to X / Twitter and Facebook
- Step 8: We're going to use a service called X / Twitterfeed to send our news automatically to both X / Twitter and Facebook. The first step is to visit X / Twitterfeed.com and register.
- Step 9: Login to X / Twitterfeed and click "Create New Feed".
- Step 10: You'll see a box like the one below. Enter the title, and then paste the RSS feed from Step 6:

- Step 11: Click "test rss feed" to make sure everything is OK. If it is, click "Continue to Step 2".
- Step 12: This next part allows you to send your feed to X / Twitter and Facebook amongst other options:

- Step 13: X / Twitter and Facebook will allow you to authenticate your accounts and link them to X / Twitterfeed directly from this page. You can also add "UTM" tags which are designed for Google Analytics. They will show in your analytics results, so you can see how much traffic has been sent from X / Twitter or Facebook. (Click here for instructions on using Google Analytics with Joomla).

- Step 14: The final step is a really powerful feature here that many people overlook ... Ping.fm. If you create an account and authenticate it here with X / Twitterfeed, you can then pass on your updates to Linkedin.com, MySpace.com, Ning.com and dozens of others. There is a full list available here.
Understand Joomla User Levels and Permissions
- Written by Steve Burge Steve Burge
- Published: 10 January 2010 10 January 2010
Our teachers like to explain in Joomla beginner classes is that we're not Joomla cheerleaders. We love Joomla, but it has strengths and weaknesses like all software. Perhaps the biggest current weakness is user levels.
Joomla has 8 user levels but they are both basic and also often difficult to understand. Here is an explanatory chart of the levels that some of our students have found useful. (Original source: https://brian.teeman.net/joomla/65-joomla-15-acl-explained)
Place Modules Inside Joomla Articles
- Written by Steve Burge Steve Burge
- Published: 10 January 2010 10 January 2010
Now that you're a little more familiar with Joomla, let's see an exception to that rule ... we can place modules inside regular text articles.
- Step 1: In the administrator area of your Joomla site, go to Extensions >> Plugin Manager
- Step 2: Find the plugin called "Content - Load Module" and make sure that it's enabled. On Joomla 1.0 its name is "Load Module Positions"
- Step 3: Go to Extensions >> Module Manager and find the module you'd like to place inside an article.
- Step 4: Open the module and click on the "position" dropdown.
- Step 5: Choose a position that doesn't appear on your template. Remember that you can check this by adding /?tp=1 to your site.
- Step 6: Save that module in its new position. In this example we've saved it in "User1"
- Step 7: Go to Content >> Article Manager and open the article you're using.
- Step 8: Place this code into the article: { loadposition user1 } ... remove the spaces between the brackets and the text. If you're using Joomla 1.0, then the code is {mosloadposition user1} .
- Step 9: Save the article and check your handiwork on the front of your Joomla site.
Video Showing How to Place Modules Inside Joomla Articles
Joomla Training Cheat Sheet
- Written by Steve Burge Steve Burge
- Published: 10 January 2010 10 January 2010
 For the first time we're not sending a tutorial this week, but a download link: https://joomlatraining.com/cheatsheet.pdf
How to Use Joomla's Module Suffixes
- Written by Steve Burge Steve Burge
- Published: 10 January 2010 10 January 2010
Joomla templates allow you to redesign your site easily.
 They also allow you style your modules. Your login box can have one color, your "Latest News" can have another color and your "Most Popular News" can have third.
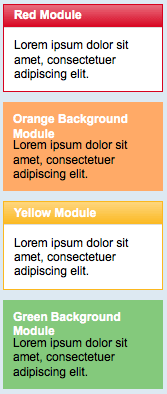
- Red header, white background.
- Orange header, orange background.
- Yellow header, white background.
- Green header, green background.
Here's how you do it
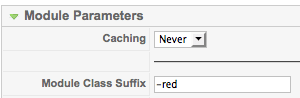
- Go to the administrator area of your site and Extensions >> Module Manager.
- In the parameters of your module, on the right-hand side, you'll see a box saying "Module Class Suffix".
- You'll have to read the documentation for your template to know what to enter - each template is different. If you're using Bolt you could enter any of these:
This example would give us a red header and white background:
- -red (Red header, white background)
- -orangebg (Orange header, orange background)
- -yellow (Yellow header, white background)
- -greenbg (Green header, green background)
How to Speed Up Your Joomla Site
- Written by Steve Burge Steve Burge
- Published: 10 January 2010 10 January 2010
Having a fast site is really important:
"For Google an increase in page load time from 0.4 second to 0.9 seconds decreased traffic and ad revenues by 20%. For Amazon every 100 ms increase in load times decreased sales with 1%." source
These are two easy ways to make sure your Joomla site loads more quickly:
Turn on Compression
You can choose to send out your webpages in a compressed format. When you get a Joomla component it is often contained in a zip file. This enables the file to be much smaller without damaging the content in any way. You can do the same thing with webpages. In Joomla you just need to click "Yes" in the following place:
Site => Global Configuration => Server => GZIP Page Compression => Yes
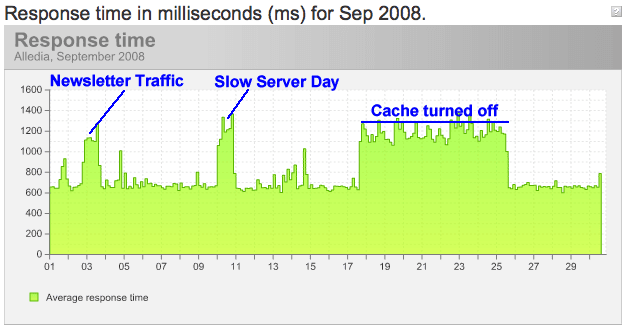
There's also a great test to find out how much your site will benefit. According to WhatsMyIP.org, JoomlaTraining.com shrinks from 13k down to just 4k when GZip is enabled
Turn on Cache
Caching is another way to speed up your site. It stores files so that Joomla doesn't have to load the same elements every time. Why load the logo again on every page? Its best just to store it and reuse. It can turn on caching here:
Site => Global Configuration => System => Cache => Yes
The speed gains with caching can be remarkable. Last year there were problems with the cache systen we use here on one of our sites. We turned it off while we tried to bugshoot the issue. We also use Pingdom.com to track whether our sites are offline and also how fast they're responding. When we logged in later, there was a stellar argument for why caching your Joomla site is so important: the site loaded twice as quickly with the cache turned on.
How To Resize Images in Joomla
- Written by Steve Burge Steve Burge
- Published: 10 January 2010 10 January 2010
This tutorial is a response to a question we've been asked often in classes:
"How can I resize images as I upload them?"
We're going to recommend Image Resize. It works so naturally with the Joomla workflow that most people don't even notice it. Here's how to use it:
- Step 1: Visit Joomlaforge.net and download the file called plg_imageresize_v.5.zip
- Step 2: In the administration area of your Joomla site, go to Extensions >> Install / Uninstall and upload the file.
- Step 3: Go to Extensions >> Plugin Manager. Find "Image Resize" and enable it.
- Step 4: Go to Content >> Article Manager and edit an article.
- Step 5: Click on the image link at the bottom of the article and upload an image. Insert it into the article.
- Step 6: Select the image and drag the corners until the image is the size you want it to be.
- Step 7: When you view the article on the frontend, Image Resize does all the work for you and creates a new version of your image!