The Joomlashack Blog
Content Versioning in Joomla
- Written by Steve Burge Steve Burge
- Published: 10 January 2010 10 January 2010
- "What happens if someone makes a mistake in an article? How can we roll back to a previous version?"
- "We have a legal requirement to track the articles that appear on our website - how do we do that?"
The answer is "versioning" and there's quite a few solutions out there. Over the last few weeks I've tried all the available versioning extensions available for Joomla and one stood head and shoulders above the others. Its free, its easy and its called "Content Revision". Here's how to set it up:
- Step 1: Visit Galore.co.za and go to "Galore Content Revision".
- Step 2: For Joomla 1.0, download that version. For Joomla 1.5 you'll need to download the component and also the plugin.
- Step 3: In the administration area of your Joomla site, go to Extensions >> Install / Uninstall and upload the files. If you're using Joomla 1.5, go to Extensions >> Plugin Manager and make sure the plugin is published.
- Step 4: Go to Content >> Article Manager and edit an article.
- Step 5: Go to Components >> Content Revision >> List New Changes. The change you just made should appear in the list.
- Step 6: To see the changes, click on the number in the "CR ID" column. You'll be able to see the "Before" and "After" Versions.
- Step 7: If you want to roll back to the previous version, make sure you are on the "Before Save" tab and click the green, circular arrows in the top-right corner.
Approving Joomla Users When They Register
- Written by Steve Burge Steve Burge
- Published: 10 January 2010 10 January 2010
This tutorial is similar to last week's in two ways:
- It's the answer to a question asked by a user in our support forum.
- It deals with managing people signing up on your Joomla site.
It has one important difference however ... it's much shorter! This week's tutorial explains how to approve Joomla users when they register. You might have a school website and only want to approve parents or students. You might have a club website and only want to have members join your site. This tutorial will show you how. We're
Add Google Analytics to a Joomla Website
- Written by Steve Burge Steve Burge
- Published: 10 January 2010 10 January 2010
In our beginner classes we recommend Google Analytics as a free and accurate way to count people visiting your site.
With Shack Analytics, you have an option to add Google Analytics to all pages of your Joomla site. Install Shack Analytics from your Joomlashack account, then follow this guide.
Step #1. Get the Google Analytics ID
- Sign in to your Google Analytics account. Please, visit this tutorial on how to create a Google Analytics account, if you still don't have one.
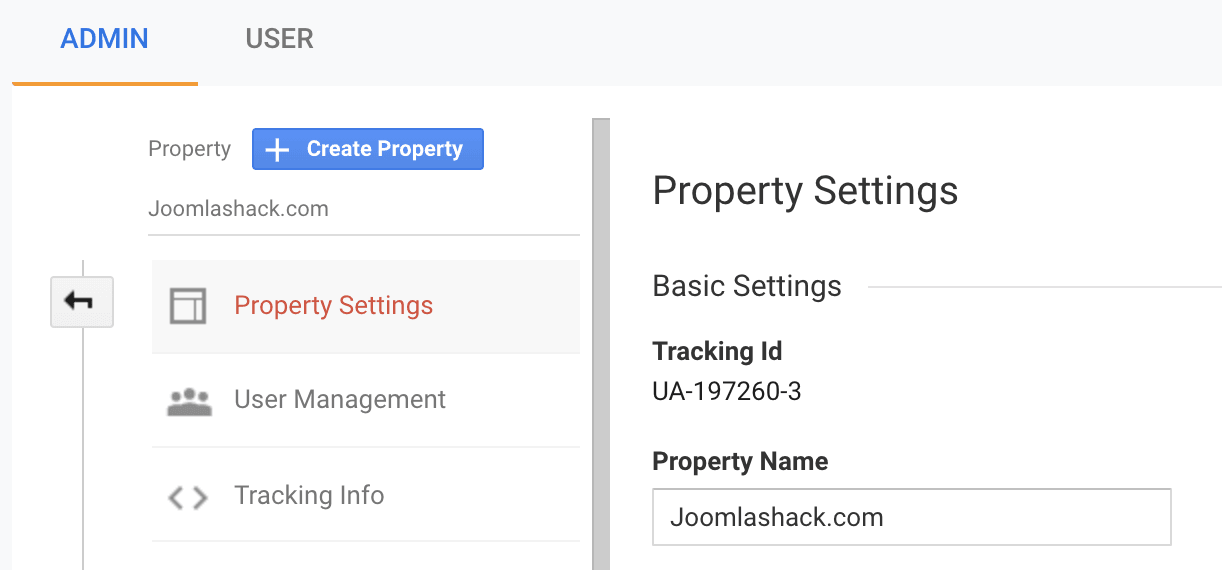
- In your Google Analytics dashboard, click Admin.
- You will see the new columns. In the Property column, click Property Settings.
- Copy the Tracking Id. This is what we will use to connect your site to Google Analytics.
Step #2. Add your Tracking ID to your site.
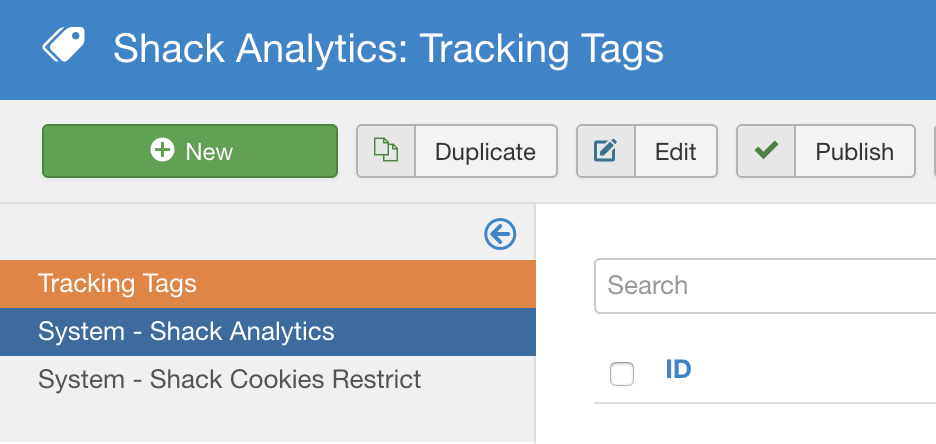
- In your Joomla administrator area, go to Components > Shack Analytics Pro.
- You will be taken to the Shack Analytics: Tracking Tags administrative page.
- Click System - Shack Analytics.
- Enter the ID number of your Google Analuytics account into the Universal property ID box.
- Make sure that this plugin is enabled.
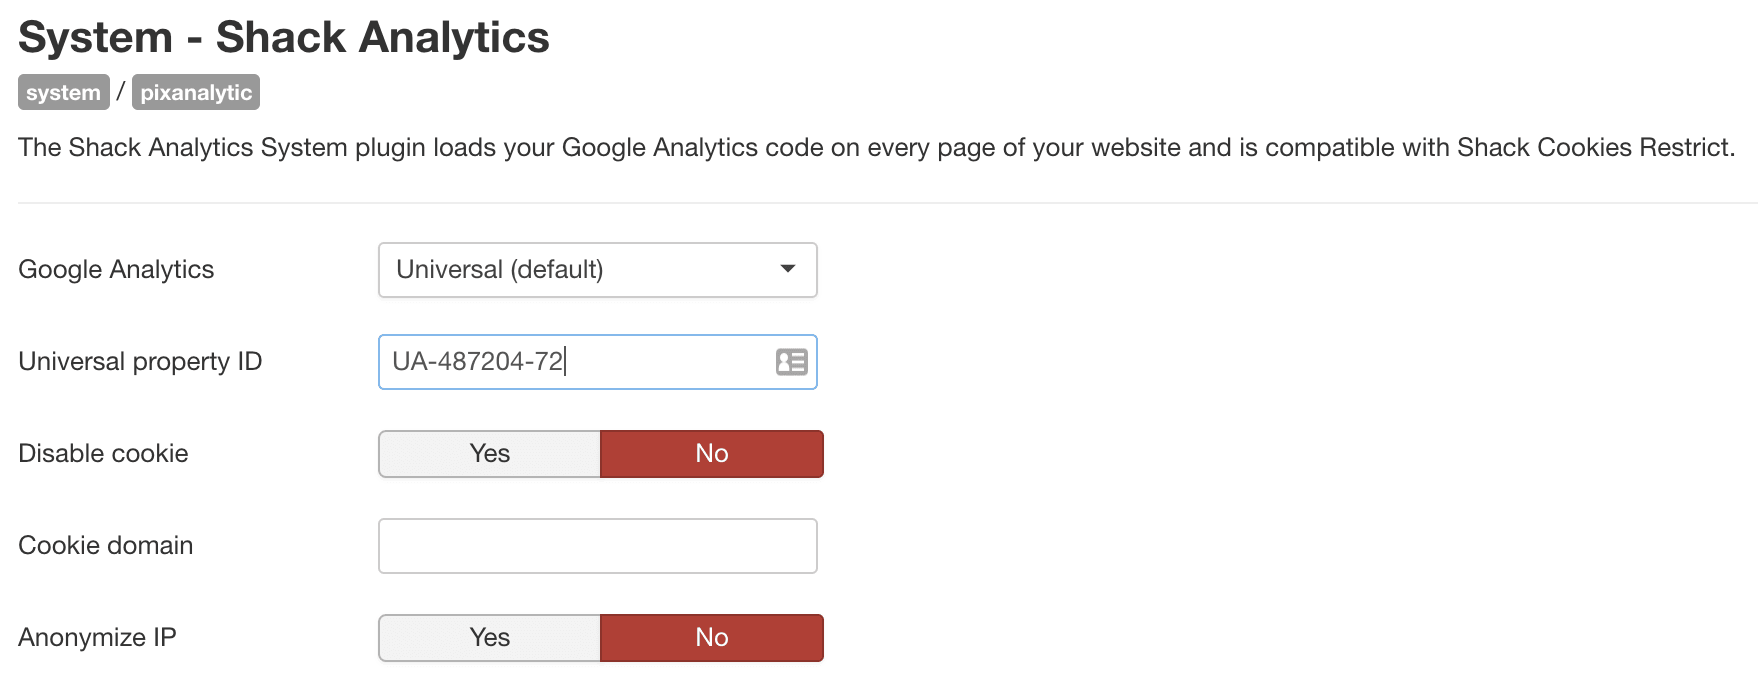
There are some key settings on this page. Here is what they mean:
- Google Analytics: Choose the Google Analytics version to use; Universal or Classic.
- Disable cookie: Let the plugin use visitor IP addresses to calculate a unique client ID instead of using a cookie. Accuracy is decreased a little but data is collected even if cookies aren't accepted.
- Cookie domain: Override the default cookie domain. The default is the domain of the current web page (minus any sub-domain). Leave it empty to preserve default behavior of Google Analytics.
- Anonymize IP: Anonymize visitor IP addresses by telling Google Analytics to not store the full IP address.
Step #3. Check your result
- Check the source code of your website pages. You will see your Google Analytics tracking code added:
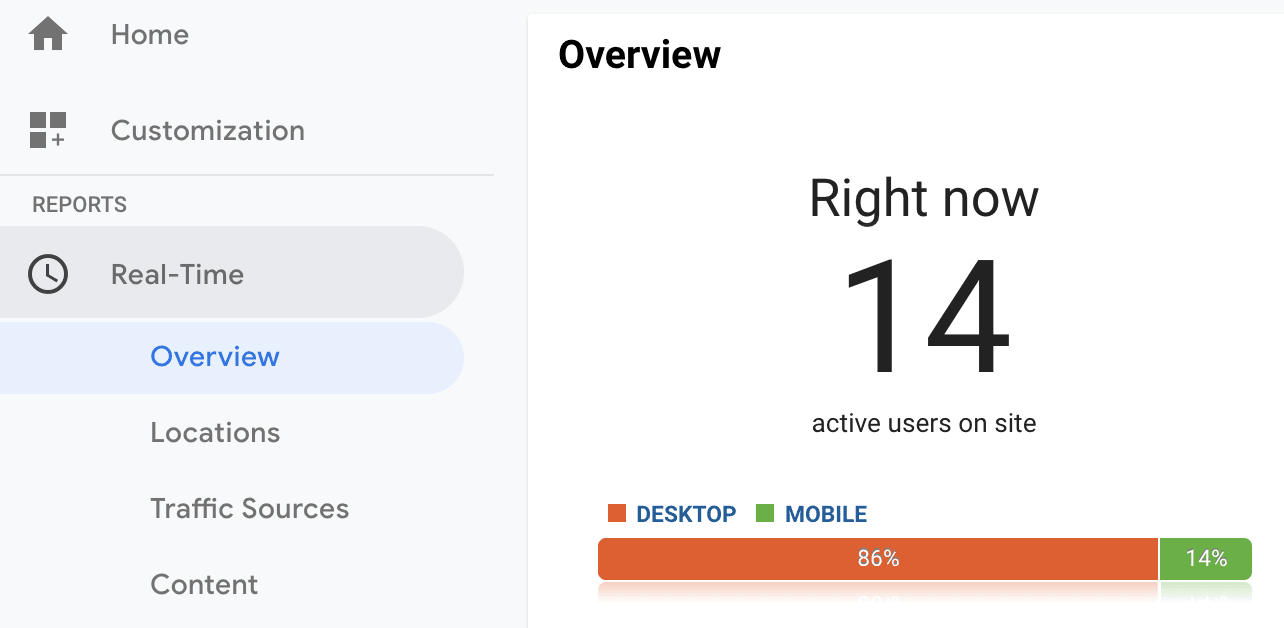
You can also go to your Google Analytics account to make sure that the Google is accepting the code. The best to way to check is by clicking "Real-Time" and seeing if Google is picking up people currently on your site.
Add an Image Rotator to Your Joomla Site
- Written by Steve Burge Steve Burge
- Published: 10 January 2010 10 January 2010
This walk you through will help you with adding an image rotator to your Joomla powered site.
We're going to recommend the "Flash Image Rotator" by Joomlashack. It's a free module that allows you to rotate up to 15 images with some pretty nice features.
Here's how you use it:
- Step 1: Visit Joomlashack.com and download the free Flash Image Rotator. *You must be registered and logged in to see the download link (register here)
- Step 2: In the administration area of your Joomla site, go to Extensions >> Install / Uninstall and upload the file.
- Step 3: Upload the images you wish to use to your joomla_root/modules/mod_flashrotator/js_flashrotator/img directory via your favorite FTP client, or by using NinjaXplorer (we have a tutorial on doing that here)
- Step 4: Go to Extensions >> Module Manager. Find "Flash Rotator" and enable it, publish it to your preferred module position, and set the parameters.
- Step 5: Go to your frontend and view your newly installed image rotator!
SORRY: Joomlashack no longer have this product available.
Add a List of Related Articles to Your Joomla Site
- Written by Steve Burge Steve Burge
- Published: 10 January 2010 10 January 2010
 This tutorial will show you how to create a list of related articles for your Joomla website.
You can see an example on the right-hand side of this site in the "Related Articles" module. Joomla is analysing the keywords in the current article and automatically listing other articles that have the most matching keywords. Related articles lists are:
- ... good for Search Engine Optimization because the search engines can find accurate and descriptive links to other pages on your site.
- ... good for your users because they can find other articles similar to the one they're already reading ... which is good for you because they may stay on your site longer
In order to create our list, we're going to need three extensions: a component, a module and a plugin. Let's get them up and running on our Joomla site:
- Step 1: Click here to download the latest version of the "FJ Related" component.
- Step 2: Click here to download the latest version of the "FJ Related Articles Plus" module.
- Step 3: Click here to download the latest version of the "Add Keywords" plugin.
- Step 4: Go to the administrator area of your site, Extensions >> Install / Uninstall and upload all three.
- Step 5: Go to Extensions >> Plugin Manager and enable the "System - Add Keywords" plugin.
- Step 6: Go to Extensions >> Module Manager and enable the "Related Articles" module.
Once you've followed those six steps, your related articles list should start working.
A note of caution: the "Add Keywords" plugin will automatically generate keywords for all your articles. You don't have to do anything. However, to reduce the amount of work your site has to do, it may not create the keywords automatically. Have patience and the links will show reasonably quickly.
10 Must Have Joomla Extensions
- Written by Steve Burge Steve Burge
- Published: 10 January 2010 10 January 2010
- Joomla Content Editor (JCE). Far better than the normal content editor.
- Mass Content. Allows you to create large numbers of articles very quickly.
- Lazy Backup. Emails you a daily back up of your entire database.
- Joomlapack. Makes it simple to back up and also move a Joomla site.
- XMap. Makes creating sitemaps very, very easy.
- Jumi. Allows you to paste any kind of code into Joomla. Normally the editor makes a mess of Javascript, PHP and other code.
- eXtplorer. You can edit all your files directly from inside Joomla.
- K2. If you want something more sophisticated than Section / Category / Article, you need K2. The next version promises to be even better.
- Metamod. Much more flexibility for modules. You can set start and finish dates, show different modules for different countries and much more.
- Sobi2. Capable of handling almost any kind of directory. Need a listing of staff members? a business yellow pages? Sobi2 can handle it.
An Introduction to Joomla Security
- Written by Tom Canavan Tom Canavan
- Published: 05 November 2009 05 November 2009
As a security guy, I get asked frequently about Joomla, and if it's secure. I start to answer, and am always interrupted with something along the lines of:
"..I know it's not, I just want to know how insecure it is.."
As if security is measured on a 1 to 10 scale..Security is not a scale, but a total philosophy, a set of tools and actions. Yes, it can be measured, but taking Joomla and singling it out is foolish. Looking at Joomla as part of your total site security makeup IS the right answer. You must measure security holistically. Any part of your security that is weak,weakens the entire infrastructure.
So how do you answer it? To begin with, Joomla is only as secure as the platform it is on, the extensions installed on it and the proper safeguards that are put in place. In fact, many times if a Joomla site is hacked, it could be any number of things. But here's the part that is hard for some to swallow...It's not typically Joomla's fault. it's many times the administrators fault for failing in some basic areas. Now to be fair to the admin, security is an entire practice itself, and in this article I will lay out some basic concepts both Joomla and non-joomla to help you understand how to secure your site.
How to use the GeSHi plugin in Joomla
- Written by Steve Burge Steve Burge
- Published: 22 July 2008 22 July 2008
Joomla! comes with a plugin/mambot called GeSHi that comes in quite handy if you have a site in which you share code snippets with your readers. I recently tried to use GeSHi on a Joomla! 1.5 site, and I found that it works differently in Joomla! 1.5 than it does in Joomla! 1.0. Read on to see how to use it in both.
What is GeSHi?
GeSHi stands for "Generic Syntax Highlighter", and it is used to highlight code snippets in different web languages like PHP, HTML, and CSS. It also converts tags in those languages so that they will not render like regular tags.
For example, if you want to share some HTML code, you have to use something like GeSHi, or the browser will treat your HTML code like regular HTML code.
The following code is done without GeSHi:
<p><strong>Without GeSHi</strong></p>
The following code is done with GeSHi:
<div class="code">
<pre xml:"php">
<p><strong>With GeSHi</strong></p>
</pre>
</div>
Not that in the code with GeSHi, you can see the HTML tags, and in the code without GeSHi, you cannot see the HTML tags. The words "Without GeSHi" are rendered like regular HTML
How to use GeSHi in Joomla! 1.0
To use GeSHi in Joomla! 1.0, you use the following HTML code:
<div class="code">
<pre xml:"php">
<pre lang="html">
<!-- your HTML code here -->
</pre>
</pre>
</div>
You can change 'lang="html"' to other languages like 'lang="php"' so that GeSHi highlights it according to the language you are using.
How to use GeSHi in Joomla! 1.5
GeSHi has a very slight difference in Joomla! 1.5. Here is an example:
<div class="code">
<pre xml:"php">
<pre xml:html>
<!-- your HTML code here -->
</pre>
</pre>
</div>
Note that instead of 'lang="html"', you use 'xml:html'. That is the only difference. I'm not sure why they did it that way, but they did so if yo plan on using GeSHi for Joomla! 1.5, you need to be aware of this.
Questions/Comments
As always, questions and comments are welcome.