The Joomlashack Blog
How to Manage Directory Files from Joomla Admin
- Written by Steve Burge Steve Burge
- Published: 10 January 2010 10 January 2010
This week we'll walk you how to manage the files on your server through your Joomla Admin, using a Joomla component.
We're going to use a component called NinjaExplorer
Here's how you do it:
- Download NinjaExplorer
- In the administration area of your Joomla site, go to Extensions >> Install / Uninstall and upload the file.
- In the administration area of your Joomla site, go to Components >> NinjaXplorer and you will have access to your server directories and files.
This tool can be used to upload files, delete files and edit files (amongst other things) just as you would do with an FTP client.
Be sure you don't delete anything you don't know the purpose of - and this is a good time to remind you to back up your site regularly! (see our newsletter on moving your site from local to live server and use the technique mentioned to back up your site).
How to Make Sure a Joomla Page is Private
- Written by Steve Burge Steve Burge
- Published: 10 January 2010 10 January 2010
Often you have pages on your website that you want to keep private - either for your staff or for you registered members.
This week we'll walk you through how to keep search engine bots from indexing certain articles.
Method #1
- In your Joomla Admin panel, go to Content >> Article Manager and open the article you wish to keep private.
- On the right-hand side under "Parameters (Article)" you will see a field labled "Access Level".
- If you set this to "Registered" then only people at the "Registered" user level and above will be able to see the article.
- If you set this to "Special" then only people at the "Author" user level and above will be able to see the article.

Method #2
 In your Joomla Admin panel, go to Content >> Article Manager and open the article you wish to keep private.
- On the right-hand side under "Metadata Information" you will see a field labled "Robots".
- You can write "noindex" into this box and search engines should recognize that this page should not be indexed
To verify that this has worked, visit the secret page on the front of your site and click "View Source" in your browser. If everything has worked correctly you should be able to see a line in the code looking like this:
< meta name="robots" content="nofollow" / >
(we've added spaces around the < and > signs so you can see the code)
How to Install Joomla Locally on a Mac
- Written by Steve Burge Steve Burge
- Published: 10 January 2010 10 January 2010
Following on the newsletter from last week where we talked about developing locally and moving your site to a live server, this week we're going to walk you through installing Joomla locally, on a Mac.
We're going to use MAMP for this tutorial.
Here's how you do it:
- Download and install MAMP to your Applications directory.
- Download the latest Joomla 1.5 zip file.
- Start MAMP by double clicking on the MAMP icon in your Applications/MAMP directory.
- Once the servers have started, a browser window should open to the MAMP start page. If not, click on the 'Open start page' in the MAMP window.
- Set up your database for Joomla by clicking on the phpMyAdmin link in the start page and inserting the name you wish to use for your database in the 'Create new database' field. **For all databases created in MAMP the default username / password is: root / root, and the Host Name that you will use when installing Joomla is: localhost.
- Copy/move the downloaded version of Joomla 1.5 to your Applications/MAMP/htdocs directory and unzip the file. Leave a copy of this zip file in the htdocs directory for easy creation of multiple Joomla sites ... just unzip the file each time you wish to have a new Joomla installation!
- Rename the unzipped folder to mysite (or whatever you wish).
- In your broswer navigate to https://localhost:8888/mysite (or whatever name you gave your directory).
- Run through the Joomla installation process and voila! (need help installing Joomla? See: https://help.joomla.org/content/category/48/268/302/)
You should now have a shiny new installation of Joomla on your Mac where you can develop your website securely in your local environment.
Video Showing How to Install Joomla Locally on a Mac
How to Get a Really Good Preview of Joomla Articles
- Written by Steve Burge Steve Burge
- Published: 10 January 2010 10 January 2010
Most of our ideas for tutorials come from people's requests and this is no exception. Someone asked me the other day ... "How can I really see what an article is going to look like when I publish it?".
Normally, if you're writing an article and click Joomla's "Preview" button you get a plain white page with no template, no modules and no styling. The real-life page will look very different. So, here's how to get a really good preview of Joomla articles:
We're going to use a plugin called (appropriately) Better Preview. Here's how you do it:
- Download the Better Preview plugin from NoNumber.nl.
- In the administration area of your Joomla site, go to Extensions >> Install / Uninstall and upload the file to install. The plugin will publish automatically.
- Go to write a new article and a button saying "Preview" will appear in the top-right of your screen.
- Click that link to see the article with the correct template, modules and styles.
One extra benefit is that you'll also be able to see the URL of page. Joomla's normal preview appears in a pop-up so you don't know where it will be located.
How to Create New Joomla Module Positions
- Written by Steve Burge Steve Burge
- Published: 10 January 2010 10 January 2010
This is a very simple trick that many people seem to miss ... you can create your own module positions from inside of Joomla. Here's how to do it:
- Go to Extensions >> Module Manager and open up any module. You'll see page looking like this:

- Place your cursor in the "Position" box and hit backspace. You'll be able to delete the position name:

- Type in the name of the position that you'd like to create:

How to Create a Joomla Site Quickly
- Written by Steve Burge Steve Burge
- Published: 10 January 2010 10 January 2010
In our classes we've talk about the SCAM workflow that makes building Joomla 1.5 websites much easier:
- S: Go to Section Manager and create sections
- C: Go to Category Manager and create categories
- A: Go to Article Manager and create articles
- M: Go to Menus and create menu links
That 4-step process is the key to building a site. A lot of people's confusion with Joomla comes from not knowing about that workflow. They try to create articles first and then realise they have no way to organize them. Or they create sections, categories and articles then wonder why they aren't visible on the site (they haven't made a menu link so that people can see them).
But what if this workflow could be done much more quickly? That's what we're going to explain in this tutorial using a component called MassContent.
- Step 1: Go to Baticore.com and download Mass Content via this link.
- Step 2: Go to Extensions >> Install / Uninstall and install the file (called com_masscontent)
- Step 3: Go to Components >> Mass Content >> Create Mass Sections
- Step 4: Enter the titles for all your sections, check the box saying "Copy Title to Alias" and then click Save.

- Step 5: Go to "Create Mass Categories" and repeat the process. Make sure you put the categories in the correct section, using the dropdown on the right-hand side.

- Step 6: Go to "Create Mass Content".
- Step 7: Click on "Parameters" in the top-right and choose your setting. How many articles do you want to create? Do you want to use the WYSIWYG editor?
- Step 8: Write your articles. You can either just write the title and fill in the rest later or you can actually create the full articles directly from this screen.
Video on How to Use Mass Content
How to Create a Joomla RSS Feed
- Written by Steve Burge Steve Burge
- Published: 10 January 2010 10 January 2010
- Step 1: Go to the RSS Feeds section on Joomla.org.
- Step 2: Download the Ninja RSS Syndicator.
- Step 3: Install Ninja RSS via the Joomla installer.
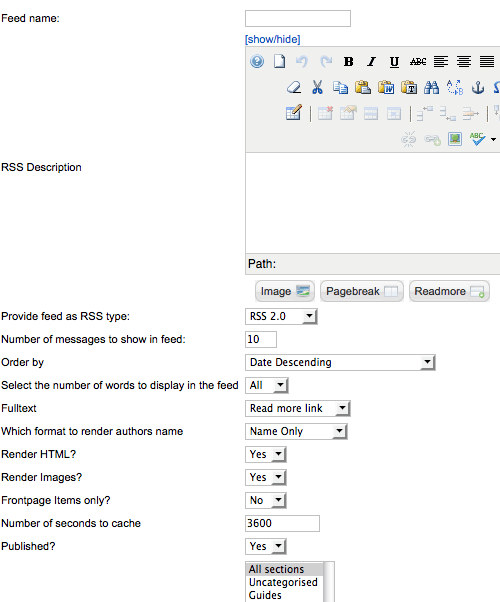
- Step 4: Go to Components >> Ninja RSS and click "New"
- Step 5: Fill in the information requested. Most of this fields are self-explanatory. You can happily just give your feed a name and click save.
Collecting Data on Your RSS Feed
- Step 6: After you've saved your feed, copy the URL or save it into a text editor.
- Step 7: Go to https://feedburner.google.com and login.
- Step 8: Enter the URL for your RSS feed into this box:

- Step 8: Give your feed a name and URL. Make sure to write down the name of your new feed URL.
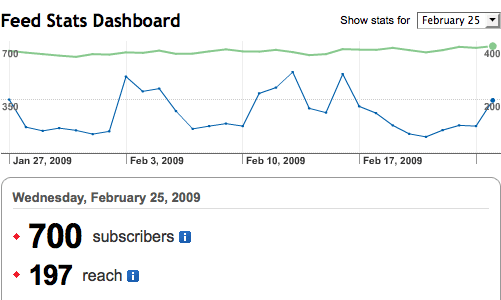
- Step 9: Over the next few weeks, you can login back into Feedburner and see detailed information about how many people are subscribing to your feed:
Allowing Search Engines and Visitors to Find Your RSS Feed
- Step 10: Add this to the head of your template:
<link rel="alternate" type="application/rss+xml" title="RSS 2.0" href="https://feedaddress.com" /> - Step 11: Go to https://siteexplorer.search.yahoo.com/submit and submit your RSS feed.
How to Create a Blog Using Joomla
- Written by Steve Burge Steve Burge
- Published: 10 January 2010 10 January 2010
People often ask "what's the best blog extension for Joomla?". Our answer: "how about Joomla itself?".
We use Joomla for our blog on here at Joomlashack and get 10s of 1000s of visitors every month. Here's how to set up a blog using Joomla:
- Step 1: Go to Content >> Section Manager and make a section called "Blog".
- Step 2: Go to Content >> Category Manager and make categories for your blog. Make sure to assign them to the "Blog" category.
- Step 3: Go to Content >> Article Manager and write the first few articles for your blog. When you're writing each article, be sure to click the "Read More" button at the bottom of the page to insert the red line. This will create an intro text for the article. Everything before the red line will be the intro. To get to the rest of the article, people will need to click "Read More".

- Step 4: Go to Menus >> Main Menu >> New >> Articles >> Section Blog Layout and choose the "Blog" section that you created in Step 1.
- Step 5: Go to the front of your site and click on the new link. If you don't like what you see, you can go back to the menu link from Step 4 and change the "Parameters" on the right-hand side. Common things to change are the number of articles on each page and the number of columns.
Video on building a blog with Joomla
How to Change the Logo on Joomla Templates
- Written by Steve Burge Steve Burge
- Published: 10 January 2010 10 January 2010
- Step 1: Go and download the Firefox browser, if you haven't done so yet: https://www.mozilla.com/en-US/firefox/personal.html. Firefox is much better than Internet Explorer or Safari for working on websites.
- Step 2: We're going to install an extra toolbar for Firefox. It is called the "Web Developer" toolbar. It was already installed on the Firefox we used in the Joomla beginners classes: https://addons.mozilla.org/en-US/firefox/addon/60
- Step 3: Click "Add to Firefox" and follow the instructions, including restarting Firefox.
- Step 4: The next time you open Firefox, you will see a list of links that starts with "Disable", "Cookies", "CSS" and ends in "Options"
- Step 5: Browse to the website where you want to change the logo. We're going to use https://joomla.org for this example.
- Step 6: In the toolbar, click on "Images" which is the 5th link from the left. Then click "View Image Information" from the dropdown.
- Step 7: You will now see a list of all the images on the site.
- Step 8: Scroll down until you see the logo. You will see two pieces of information about it: Location ( https://cdn.joomla.org/images/logo.png ) and Size ( Width = 235 pixels, Height = 40 pixels ).
- Step 9: You need to make a new logo that is the same width and height as the old.
- Step 10: Use your favorite file manager to upload the new logo to the location you found in Step 8. It is better to rename rather than delete the old logo. You could call it logo-backup.png for example.
How to Change the Image Folder in Joomla
- Written by Steve Burge Steve Burge
- Published: 10 January 2010 10 January 2010
In our beginner classes we explain a Joomla quirk ... all images should go in the /images/stories folder to make them easier to use. However, some people are taking over sites where that hasn't been done. Here's how to change the place where images are put:
- Step 1: Login to the administrator area of your Joomla website.
- Step 2: Go to Site >> Global Configuration.
- Step 3: Global Configuration is divided into 3 sections: Site, System, and Server. Click on "System".
- Step 4: Scroll down to "Media Settings".
- Step 5: In the field "Path to Image Folder", change where you'd like images to be placed. It is most likely that'll you want to change this from /images/stories to just /images/
- Step 6: Click Save.
