The Joomlashack Blog
How to Change the Favicon on Your Joomla Site
- Written by Steve Burge Steve Burge
- Published: 10 January 2010 10 January 2010
The favicon is the small image that people use to identify your site. It appears in their bookmarks, in their browser bar and in any tabs that they have open:

By default, Joomla uses the official Joomla logo. Here's how to change the image to something that reflects your website:
- Step 1: Find the image that you'd like to use. The best favicons are normally square and don't have a great of detail.
- Step 2: Either resize the image yourself to 16 pixels high and 16 pixels wide, or you can use a website such as https://www.favicon.cc to resize it for you.
- Step 3: Make sure that the image is called favicon.ico
- Step 4: You will need to upload the image via FTP or your favorite file manager. The location you need to upload to will look like this /templates/your-template-name/. That's all. You don't need to place it in your template's images directory or even Joomla's image directory. Just place it in your template's main folder.
A Note of Caution:
Many browsers use "caching" which means they show a version of the page from several minutes ago. That means that your browser may not show your new favicon immediately. You may need to delete your browser cache (instructions are here) and restart your browser to see the change.
How to Change Joomla's Read More Text
- Written by Steve Burge Steve Burge
- Published: 10 January 2010 10 January 2010
One of the most famous blogging experts is Brain Clark on Copyblogger. He recently wrote a post about the “Click Here problem”.
He quotes research that shows how often people click on different kinds of link:
- “Click to continue”: 8.53%
- “Continue to article”: 3.3%
- “Read more”: 1.8%

The main problem is that "Read More" doesn't tell people what to do or what they'll be reading about. Well, you can probably guess which of these options Joomla uses by default.
Fortunately, it is possible to make Joomla's Read More more descriptive and useful.
Here's how you do it:
- Go to the administrator area of your site and Content >> Article Manager.
- In the parameters of your article, under 'Parameters(Advanced)', enter the text you would like the article to use for the Read More link. If you leave this field blank, Joomla will use the default "Read More".
- This is how it will look on the front end of your site:

If you don't want to do this yourself for every article, both sh404SEF and SEF Advance are components that will optimize your URLs and also insert the article title into the read more link. Finally, if you're not using either of those, click here to find a code hack available to insert the title automatically (notice what we did?  ).
).
How to Block Spam Registrations in Joomla
- Written by Steve Burge Steve Burge
- Published: 10 January 2010 10 January 2010
If you run a website that allows registration, you're probably familiar with the parade of fake addresses that people use: mickymouse [at] hotmail.com, email [at] email.com and so on. You've also seen spam addresses often ending in .ru, .biz, info or similar.
This week we're going to show you how to check registration emails to make sure they are using legitimate. This can cut down on the number of spam comments, forum posts and other submissions you have to deal with.
We're going to use a plugin called Registration Validator. Here's how you do it:
- Register for an account at CEDit.biz and confirm your account.
- Log in and Download the Registration Validator plugin.
- In the administration area of your Joomla site, go to Extensions >> Install / Uninstall and upload the file.
- In the administration area of your Joomla site, go to Extensions >> Plugin Manager >> System - Registration Validator and enable the plugin.
- Inside the plugin you can change the settings.
Once the plugin is enabled your registration form will have add another layer of protection to your site from spammers.
How to Add Social Bookmarking / Networking to Joomla Articles
- Written by Steve Burge Steve Burge
- Published: 10 January 2010 10 January 2010
Social bookmarking and networking sites are very popular these days, and a must for those who wish to share their content with the broadest audience possible. Allowing your visitors to share your content with those in their 'network' is a great way to market your site.
This week we'll walk you through how to set up a tool to allow quick sharing of your articles in the most popular social bookmarking/networking sites.
We're going to use a plugin called Share This
Here's how you do it:
- Download the Share This plugin.
- In the administration area of your Joomla site, go to Extensions >> Install / Uninstall and upload the file to install.
- In the administration area of your Joomla site, go to Extensions >> Plugins and open the Share This plugin.
- On the right there are parameters allowing you to choose which services you would like to have displayed. Over 35 of the most common sites are included. You can also change the color and location to match your site.
- Enable the plugin, save the changes and start sharing your content with others.
One reason we recommend Share This over the alternatives is that its very discreet. Other bookmarking plugins take up a lot of space but Share This has only a small link that pops-up to reveal more options. There's a demo available here.
How to Add Joomla Administrator Authentication
- Written by Steve Burge Steve Burge
- Published: 10 January 2010 10 January 2010
This week we'll walk you through how to set up a little bit of extra security that will hide your Joomla Admin area from prying hackers and bots, requiring authentication to log in.
We're going to use a plugin called jSecureAuthentication.
Here's how you do it:
- Download the jSecureAuthentication plugin from Joomla Service Provider.
- In the administration area of your Joomla site, go to Extensions >> Install / Uninstall and upload the file to install.
- In the administration area of your Joomla site, go to Extensions >> Plugins and open the System - jSecure Authentication
- Enable the plugin, and on the right in the parameters insert your Key in the field - this will be your 'secret' key to use for authentication when accessing the Joomla admin area.
- Save the changes and log out of the admin. To get to your new admin area you will go to https://example.com/administrator/?secretkey (don't forget the ? before the secret key)
Using this plugin you can also set a custom redirect so that if someone were to try and access the default admin area at /administrator you can customize the message.
*We'll take this opportunity to remind you that while this is another step to help secure your Joomla site, it is no replacement for keeping your Joomla core files AND your extension files up to date. Make sure you're running the most recent versions in order to have the most secure site.
How to Add a PayPal Donation Button
- Written by Steve Burge Steve Burge
- Published: 10 January 2010 10 January 2010
When this tutorial was originally published, we recommend a certain Paypal Donate extension from the JED. However, since then, that extension has been removed from the JED.
Thankfully we have created a Paypal Donate extension which has even more features. The download and tutorial can be found here: OSDonate!
How to Add a Download Manager to Your Site
- Written by Steve Burge Steve Burge
- Published: 10 January 2010 10 January 2010
This week we'll walk you through how to set up a file download manager on your site.
We're going to use a component called RokDownloads
Here's how you do it:
- Download the RokDownloads component from Rocket Theme.
- In the administration area of your Joomla site, go to Extensions >> Install / Uninstall and upload the file to install.
- In the administration area of your Joomla site, go to Components >> RokDownloads >> Configuration and set your preferences for the root download folder and other settings, and click Save.
- Click on the 'Manager' link and set up your folders and upload the items you wish to offer as downloads on your site.
- Create a link to your downloads as either a 'File Layout' offering a direct link to a file, or a 'Folder Layout' presenting a particular folder of files. Don't forget to have a look at the many options available in the Advanced Parameters for the link.
How to Add a Commenting System
- Written by Steve Burge Steve Burge
- Published: 10 January 2010 10 January 2010
This week we're going to walk you through adding a commenting system to your site, the easy way!
We're going to be using the 'Disqus Plugin for Joomla' by JoomlaWorks. It's a free plugin that allows visitors to comment on your articles in designed categories and/or menu items using the popular Disqus Comment System.
Here's how set it up:
- Step 1: Visit Disqus.com and sign up for a free account.
- Step 2: Visit JoomlaWorks.gr and download the Disqus for Joomla plugin.
- Step 3: In the administration area of your Joomla site, go to Extensions >> Install / Uninstall and upload the file.
- Step 4: In the administration area of your Joomla site, go to Extensions >> Plugin Manager >> Disqus Comment System for Joomla! (by JoomlaWorks), and add your Disqus subdomain name to the Plugin Paramters (this will be the name you added to the 'short name' field when you set up your Disqus account), assign the categories/menu items you would like to allow comments in, and enable the plugin.
- Step 5: Start adding comments to your site!
There are quite a few really nice features you can further enable, such as shared login for Facebook and X / Twitter, and the ability for visitors to post their comment to their X / Twitter feed, thus taking your commenting system to a 'social networking' level! These features and more can be enabled within the Disqus settings and managed in your account at disqus.com
Enable Joomla's Search Engine Friendly URLs
- Written by Steve Burge Steve Burge
- Published: 10 January 2010 10 January 2010
This week we'll walk you through how to enable Search Engine Friendly (SEF) URLs in Joomla.
This mystical feat requires no extensions!
Here's how you do it:
- Go to the Administration area of your Joomla site and Global Configuration (or in the menus, site >> Global Configuration).
- In the 'Site' settings, on the right you will see 'SEO Settings', click on the 'Yes' radio button to enable Search Engine Friendly URLs
That's it! You have just enabled SEF URLs for your site. However, if you would like to clean up the URLs even more, read on...
To shorten up the URLs ever more, follow the next steps:
- Select 'Yes' for the option to use Apache mod_rewrite *ONLY if you are on a server that uses Apache (which will most likely be the case, but if you're unsure check with your hosting company).
- Go to your joomla_root directory and locate the file named htaccess.txt and rename the file to .htaccess (notice the proceeding dot . ) This can be done either via FTP or your hosting control panel.
You should now have nice clean URLs that are human readable.
If you find that upon trying to visit links in your site's menus you are getting 404 errors, you can simply go back to your configuration area and set the 'Use Apache mod_rewrite' option to 'No', and rename your .htaccess back to htaccess.txt Your issue should clear up after.
Additionally, should you wish to add a suffix after your URL (.html for example), you may select the third option in the SEO Settings 'Add suffix to URLs'.
As always, if you need any help with this feel free to post in our forum for support if you are a member.
Easily Upgrade Your Joomla Site Version
- Written by Steve Burge Steve Burge
- Published: 10 January 2010 10 January 2010
- Sorry ... there's no magic button to move from 1.0 to 1.5 or from 1.5. to 1.6.
- If you've made any changes to the core Joomla files, you will need to upgrade manually.
- Backup first! (use steps 1 to 5 here)
Here's how you upgrade:
Check Your Joomla Version
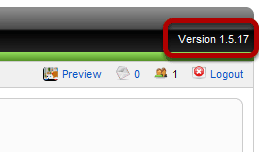
You can nearly always find out what version of Joomla you're running by looking to the top-right hand corner of your Joomla screen.
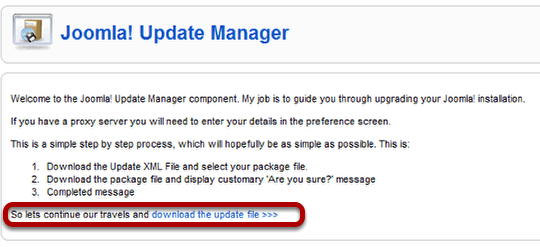
Download Update Manager for Joomla
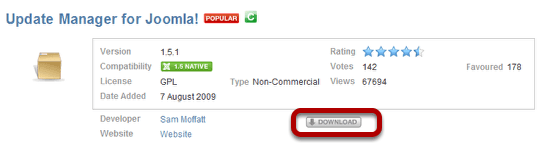
We're going to download and install the "Update Manager for Joomla!" Click here for the listing on the Joomla Extensions Directory and click "Download".

You'll be taken to the main download page. Click on the name of the file and it will be downloaded to your desktop.
Upload the Update Manager for Joomla
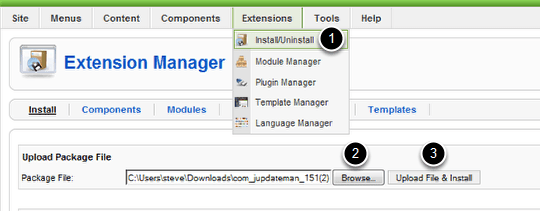
In your Joomla administrator area, go to Extensions >> Install/Uninstall then click "Browse", select the file you downloaded and then "Upload File & Install"
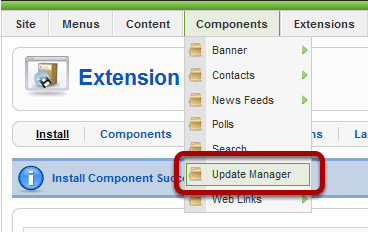
Go the Update Manager Screen
Choose Your Update Option

The first line will tell us what version we're running and that we need to update. The best option is nearly always "Patch Package" as that makes the minimum number of required changes.
Proceed With the Install
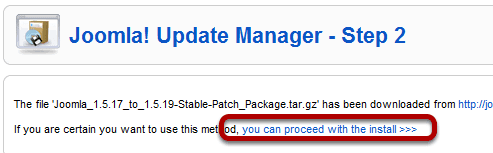
Hopefully the Update Manager will tell you that you can proced with the install. Otherwise you'll need to fix the errors it mentions.
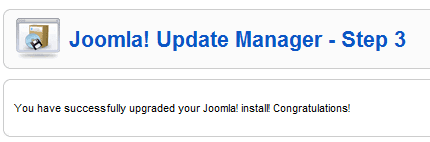
You're Done!
A Quick Confirmation Check
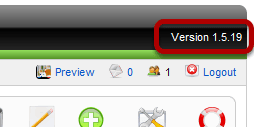
Visit another page on your site and check that the version number has changed. If it has - congratulations! Your upgrade is complete.
As always, if you need any help with this feel free to post in our forum for support if you are a member.