The Joomlashack Blog
How to Apply a Module Class Suffix in Joomla! 1.5
- Written by Barrie North Barrie North
- Published: 05 June 2009 05 June 2009
This tutorial will explain how to apply a module class suffix in Joomla!. This tutorial depends on the available styles for individual templates. Some settings may be different. See the templates corresponding docmentation for more information.
Go to your Joomla! administration console
Go the administration of your website at ww.yourjoomlasite.com/administrator/
Login to your Joomla! administration
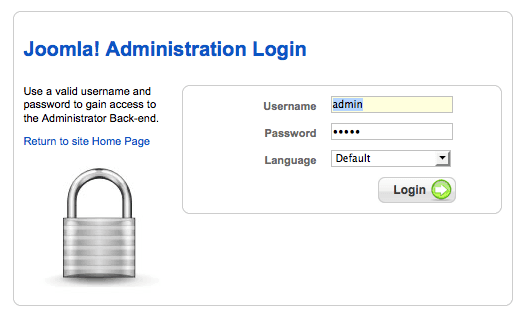
Enter the username and password you created when installing Joomla!
Go to the Module Manager
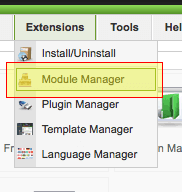
Navigate to Extensions > Module Manager
Go to the module you want to edit
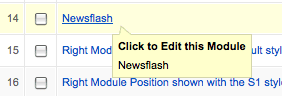
Select the module you want to apply the Module style..
Apply the Module Class Suffix into the parameters to the right
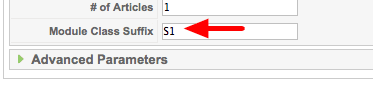
Apply the Module Class Suffix. (S1 example shown)
Save the Module Setting
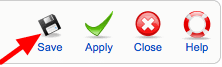
Click Save
Understanding the Module Manager
- Written by Amanda Tabush Amanda Tabush
- Published: 05 June 2009 05 June 2009
Modules are the blocks of content in your site and are distinctively separate from your main content area. For example, a module may appear to the left,right,above, or below your main article content. The Module Manager allows you to customize each module to your preference.
To access the Module Manager in Joomla! 1.0: Navigate to Modules - > Site Modules
To access the Module Manager in Joomla! 1.5: Navigate to Extensions - > Module Manager
Each module in Joomla! has some persistent features. Below are the fields you will see in every module. Modules have more individual parameters but these are the most important ones to understand first.
Note: Some of the terminology is different across Joomla! 1.0 & Joomla! 1.5 but they both have the same functionality.
- Title
- Show Title
- Enabled (1.5) / Published (1.0)
- Position
- Module Class Suffix
- Pages/Items (1.0) / Menu Assignment (1.5)
- Ordering
Title:
The title of the module is displayed above the module on the frontend. It is also called a "Module Heading". After a module is saved, the module's title is also shown in the Joomla! backend administration.
Show Title:
This setting allows you to specify whether or not the module's title should be visible on the frontend.
Enabled (1.5) / Published (1.0):
Allows you to enable (or publish) the select module. To enable a module only on specific pages see below *Pages/Items (1.0) / Menu Assignment (1.5)
Position:
A module position may be labeled as left, right, bottom, top, etc.
Module positions are defined by the template. If a module is published in a position that is not supported by the template, it will not show up. It is important to be aware of your template's supported module positions. In Joomla! 1.5, only the module positions of the default template are available in the module manager.
Module Class Suffix:
A module class suffix allows you to specify a preset style which is defined by the template. You'll need to consult your individual template documentation to see what module styles/suffixes are available.
(See also: How to apply a Module Class Suffix)
Pages/Items (1.0) / Menu Assignment (1.5):
When a module is enabled/published it can be assigned to all pages or pages specified in the Pages/Items (1.0) / Menu Assignment (1.5) dialog. Modules can only assigned to pages that have menu items.
Ordering:
You can set the order of a module to appear in the ordering dialog as well as the module manager main page by clicking the up/down arrows.
Joomla template CSS and images only displayed on home page
- Written by Amanda Tabush Amanda Tabush
- Published: 05 June 2009 05 June 2009
Sometimes your template will lose all its styles and images when navigating away from the Frontpage.
This is caused by an incorrect path to the stylesheet due to SEF errors. If you've enabled SEF, make sure your htaccess.txt file is renamed to .htaccess. You may need to temporarily disable SEF. For more information on the correct way to set up SEF in Joomla! 1.5, see the official doc item at joomla.org: SEF URLs in Joomla! 1.5
SEF quick checklist:
- Make sure htaccess.txt is renamed to .htaccess if SEF is enabled
- Make sure your server/host supports all requirements
Creating sublevel menu items
- Written by Amanda Tabush Amanda Tabush
- Published: 05 June 2009 05 June 2009
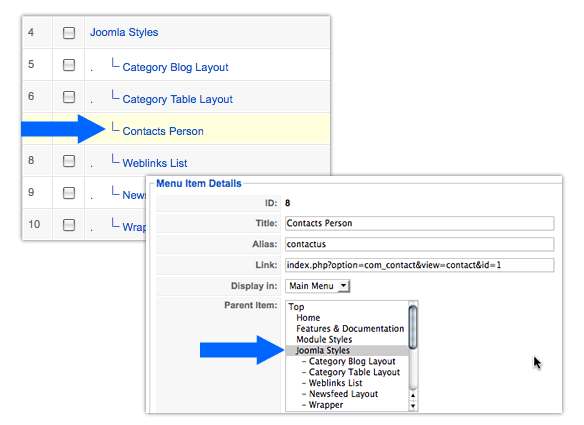
Creating sublevel menu items in both Joomla! 1.0 and Joomla! 1.5 is achieved by same general process. Think of Joomla's menu items as "parents" and "children". In order to create a sublevel item, you will need to assign a "parent" to that item. This is done inside the Menu Manager. Navigate to the menu manager and select the menu to be modified.
Example:
Joomla! 1.0: Menu > mainmenuJoomla! 1.5: Menus > Main Menu
Select the menu item you would like to assign as a sublevel (or child) item.
You will see a dialog below titled "Parent Item"
Choose the item to assign as the parent and save.
How to Update Joomla 1.5 Versions
- Written by Amanda Tabush Amanda Tabush
- Published: 04 June 2009 04 June 2009
As an open source project, Joomla frequently updates its code with new releases. Often these have important security patches in then, so its really important to keep up to date.
If you consider yourself a skilled Joomla! user and have a little confidence in your technical skills then you may be able to save yourself some time if you're updating your Joomla! installations by FTP. This article will help you greatly speed up the process.
The first thing you'll need to do is send your web host support agent a request to enable SSH access (if available). Some web hosts require you to give an explanations as to why you would want to enable SSH, because it is a command line based way of managing your server and can really screw things up if you enter a command not knowing exactly what it does.
Here is a simple email you can use as a template to request SSH access for your server:
Hi, I would like to request SSH access be enabled for my user account on (yourdomain.com).
I need this in order to perform various security updates and upgrades to the Joomla! CMS on my server.
Thanks,
(your name)
Once SSH is enabled, you can login to your server using a client such as PuTTY (PC). If you're a Mac user you can simply use OSX's native Terminal utility (located under /Applications/Utilities).
After launching PuTTy/Terminal, the first thing you want to type is:
ssh This email address is being protected from spambots. You need JavaScript enabled to view it.
(Hit enter to submit each command)
You should be asked for your password. For security reasons, you may not see it appear on the screen as you type it.
If all goes well, you should be logged in now. Servers are set up differently depending on your hosting environment, so once logged in you'll need to find your location.
Type ls to show your current location. In most cases you'll need to type cd ../ to get to the main directory listing. (the cd command means "Change Directory").
To find out exactly where your Joomla! installation is located, you can login to your Joomla! administration, navigate to Help > System Info (J!1.5). Look under "Open basedir" and note its location (excluding :/tmp)
Let's say your Joomla! installation is located in /home/username/public_html/. Type cd ../home/username/public_html/ to go inside the public_html directory.
IMPORTANT:
It is highly recommended that you back up your installation before moving forward. To do this, just type:
tar -cvf site_backup.tar public_html/*
This will create a file named site_backup.tar of your entire public_html directory and its contents.
Now, let's say you're running Joomla! 1.5.3 and you want to update to Joomla! 1.5.7
You can access the Joomla! update listing at https://joomlacode.org/gf/project/joomla/frs/. Copy the link location to Joomla_1.5.3_to_1.5.7-Stable-Patch_Package.tar.gz and type:
wget https://joomlacode.org/gf/download/frsrelease/8375/31007/Joomla_1.5.3_to_1.5.7-Stable-Patch_Package.tar.gz
wget is a command to download a package file from another server to your server.
Now type:
gzip -d Joomla_1.5.3_to_1.5.7-Stable-Patch_Package.tar.gz
The tar.gz file now has a .tar extension so type:
tar -xvf Joomla_1.5.3_to_1.5.7-Stable-Patch_Package.tar
The package is extracted and Joomla! is updated. If all goes well and Joomla! appears to be stable, you can delete the site_backup.tar file form your server.
XHTML Validation
- Written by TJ Baker TJ Baker
- Published: 24 March 2009 24 March 2009
Validating a Website's HTML
One of the first things that should be done after a site is constructed, and repeated at various steps as things are changed/updated, is the validation of the site's HTML. In the case of a Joomla powered site, HTML errors can come from 4 places:
- Templates
- Components
- Modules
- Articles
Why Validate?
It's simple really; HTML errors can present unwanted issues with your site, and is the leading cause of issues with template display that we see. These issues present themselves even more so when a 'pure CSS' template is in use, as CSS is unforgiving of left out closing brackets (>) and other often overlooked HTML errors that are introduced by extensions or other invalid code inserted in articles. While extension code is not the ONLY vehicle by which invalid code can make its way into a site, it has become one of the leading cause of issues that we have seen.
How to Validate?
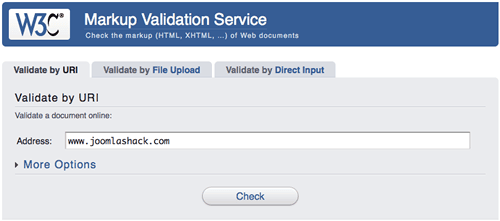
The World Wide Web Consortium (W3C) has provided a handy tool to run your site's HTML output against the standards for validation which may be accessed at https://validator.w3.org
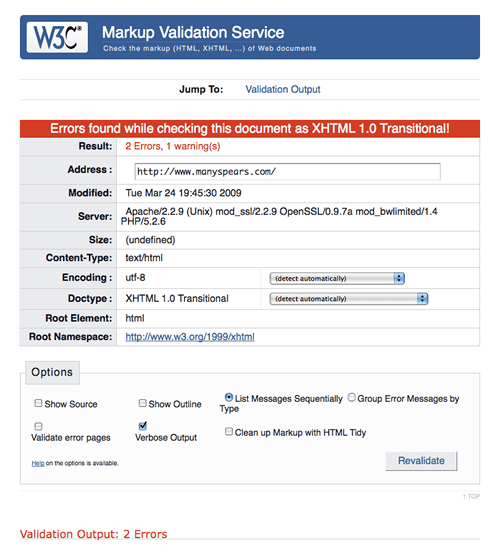
Testing your site's validation is as simple as putting your site's URL in the Address field and clicking 'Check':
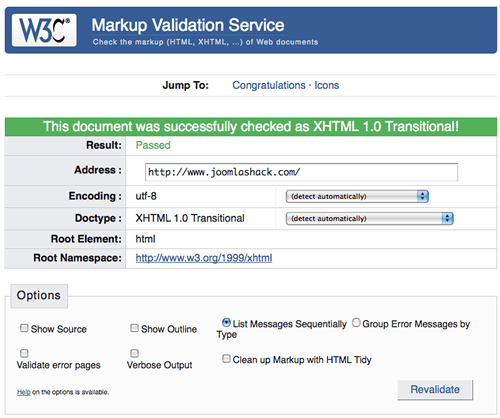
After the service runs you'll be presented with a 'results' page. If the site is free of HTML errors you will see a message of congratulations and some nice buttons you can proudly display on your site if you wish:
If there are errors, you will be presented with a results page that outlines the errors:
What to do With This Information
Seek and Destroy! Or better put, find and fix the errors.
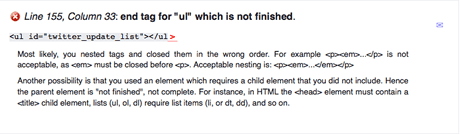
The 'Validation Output' that is presented will show all of the errors that are found, although using the info with a Joomla powered site may not be as simple as if we were validating a static HTML site. This is because in Joomla there really are no 'pages' except for the one that is presented to the viewer at the time of viewing. The Joomla 'page' is a collection of output items from the database, presented and laid out within the confines of the template. The Validation Services runs the presented 'page' against the standards and outlines the errors on the presented 'page', but in our instance the items on our 'page' could come from any number of sources. For instance, if you have a website that has a calendar component, a commenting component and a component to manage your advertisements you not only have the default Joomla output in the form of articles on a 'page', you also have the output that is coming from three other sources -- any of which could present an error or multiple errors. The validation service does not point out which is the offending source of output, only the errors and on which line they appear.
Seeking out the reported errors can be a very time consuming process, however, there are some steps that you can do to help with your process.
The first thing I do when checking for the source of a site's errors is to 'rule out' possible sources. As I know in the case of a site with a Joomlashack template that the template is not the cause, I check that one off. I would next go to the code I inserted in articles and rule them out by unpublishing ALL articles and checking the validation. If the errors are gone, publish one article at a time until the offending code is found. If errors still persist after articles are ruled out, I next go to components as a possible source. One quick way to check components is to use a bit of code at the end of your site's URL that will remove the template and show the output of the site presented only as the output from the components in use. To do this, add the following at the end of your URL: /?tmpl=component So for example, if we wished to check the Joomlashack site's HTML with only the output of components in use we would put this in the Validation Service: https://www.joomlashack.com/?tmpl=component If that fails validation we know the offending code is coming from a component. If it's a simple site and does not have too many components in use or is a site still under development, I would recommend uninstalling ALL user installed component, reinstalling one at a time while checking the validation after each component is reinstalled. Doing this should help you pinpoint the offending code.
In the case of already developed sites or sites with large amounts of components installed the process above might not be possible, in which case it may be necessary to hire a professional to help you seek out the offending code. You may also wish to seek assistance in the Joomlashack Community Forum
Creating a Parent / Child Relationship in a Menu
- Written by TJ Baker TJ Baker
- Published: 24 July 2008 24 July 2008
In order to use a Suckerfish Dropdown menu, or Dropline menu, it is first necessary to set up your menu to have 'Parent / Child' relationships. The 'Child' item is the one that you will see 'drop down', or as a 'sub menu' item.
This tutorial covers how to make it happen.
(this example uses Joomla 1.5 - although the backend looks a bit different in 1.0, the concepts are the same)
Step 1: Access the Menu Manager

Select the menu you wish to set up parent / child relationships in. In this example, we are going to use the Main Menu
No parent / child relationships
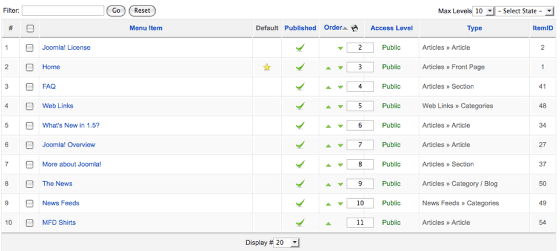
This image shows a menu with no parent / child relationships.
Access the Menu Parameters
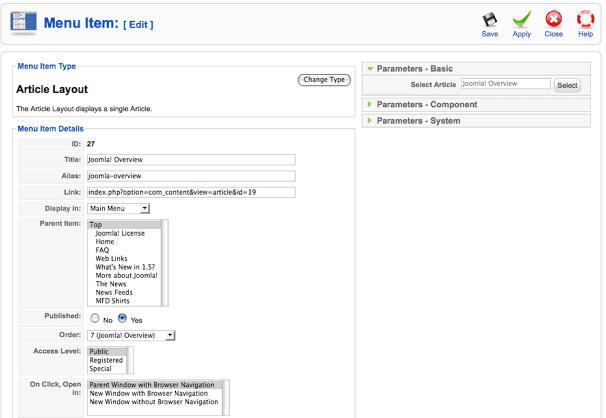
Once you've accessed the menu, click on the menu item you wish to make a 'child' item in your menu. You will see the 'Parent Item' parameter on the left side of the screen. This is where you will assign a parent item, thus making the menu item we are editing the 'child' item.
In this case, we are going to set the parent item to be 'What's New in 1.5?" - see below
Select the 'Parent Item'
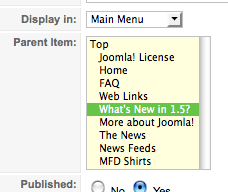
Select the item you wish to be the Parent Item. In this exaample we are setting the 'What's New in Joomla 1.5?" link to be the parent of the 'Joomla! Overview' link.
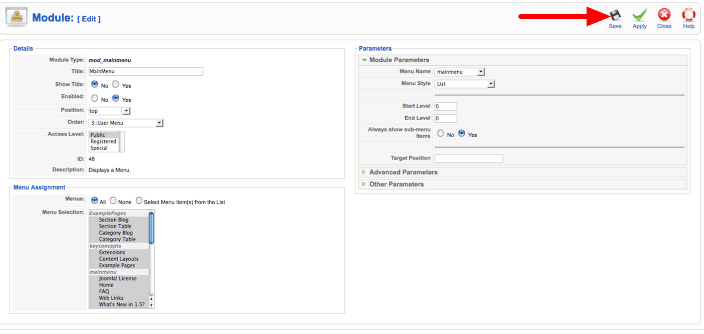
Save the Changes
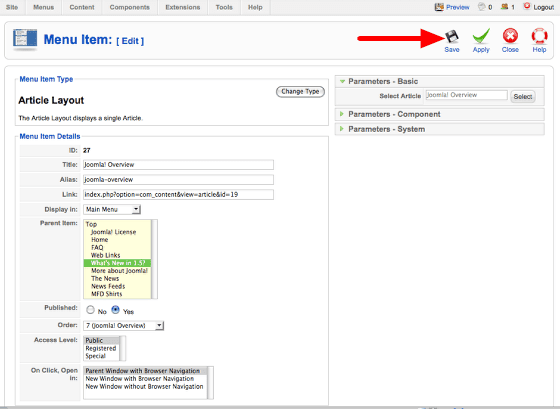
Click on Save to apply the changes.
Parent / Child relationship is set!
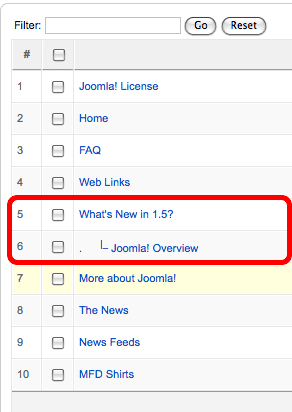
You'll see after saving that the parent / child relationship has been set. Child items are shown indented with a connection to the parent item. You can do this for as many links as you need, as many levels deep as you need. Although, the template must accomodate the levels. Joomlashack's templates will accomodate up to 3 child items.
Step 2: Set up the Menu Module
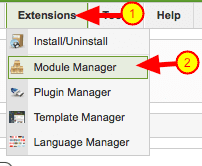
Access the menu module by going to the Extensions -> Module Manager, and select the menu module you wish to use. In our example, we are using the already existing 'Main Menu' module. So we click on the module name to open it.
Setting it up.
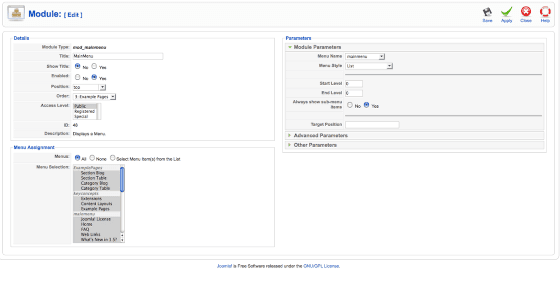
Upon opening our menu module, you will see some parameters that must be set properly for the menu to operate as a suckerfish or dropline menu.
Set the 'Details'
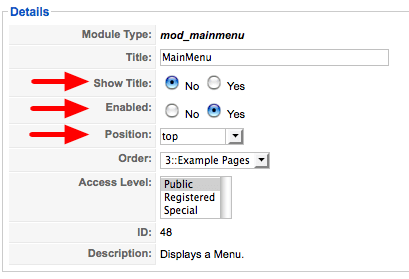
In the Details area of the module settings (top left), set the parameters as seen above, and listed here:
Show Title = No
Enabled = Yes
Position = Whatever position you are setting up the suckerfish / dropline menu to be displayed in. Check your template documentaiton, found in the template demo, for the location to use suckerfish / dropline menus in.
Set the 'Parameters'
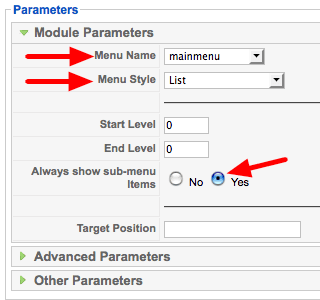
In the Parameters area of the module settings (top right), set the parameters as seen above, and listed here:
Menu Name = mainmenu (choose the name of the menu you wish to use to populate the suckerfish / dropline menu with -- in our case, we've set up the 'mainmenu' to have the parent / child relationships and will be using that menu)
Menu Style = List
Always show sub-menu items = Yes
You do not need to change any of the other parameters, unless otherwise noted in the docuementation for the template.
Preview your site to see your work!

If all settings have been done properly, you should now have a fully functional Suckerfish or Dropline menu set up, with the Joomla! Overview being the child item of the What's new in 1.5? parent.
Repeat the First Step to set up more items for the menu.
As stated above, this tutorial uses Joomla 1.5, however, the concepts are the same for Joomla 1.0 - it's just a bit different in where and how you do things.
If you have any questions or need further assistance, please visit the Community Forum and post to an appropriate thread.
How to Remove 'Welcome to the Frontpage'
- Written by TJ Baker TJ Baker
- Published: 08 February 2008 08 February 2008
One question we get quite a bit in the Community Forum is "how do I remove or change the 'Welcome to the Frontpage' message in Joomla 1.5".
Creating a Full Width Wrapper
- Written by Amanda Tabush Amanda Tabush
- Published: 29 June 2007 29 June 2007
The goal here is to get a full-width page with no left or right modules showing.
First, you will need to create a menu item linking to the page to be displayed. This can be anything you want such as a gallery, wrapper, forum etc.
Next, go to the Module Manager (Modules > Site Modules).
The filter drop down is your best friend within the Module Manager. To the right you will see a "select position" drop down list.
Select the LEFT position.
A list of all modules available in the LEFT position are now displayed. Obviously the only ones of importance are the ones that are published. Starting at the top, click on a (published) module title link.
When the page loads you will see several parameters. Look to the ones at the right of the page labeled "Pages/Items". These are the menu items (or pages) which the module is to be present in its respected position, in this case LEFT. Use your control or cmd (mac) or cntrl (pc) key to select or deselect multiple items. You can also use the shift key to select multiple items in a row. The menu item you created to be full width should NOT be selected because you don't want this or any other module in the left column.
Make your way down the list in your Module Manager through all the LEFT positioned modules with the above method and do the same for the RIGHT position.
How do I buy a Joomla template?
- Written by Barrie North Barrie North
- Published: 22 June 2007 22 June 2007
Getting a world class template from Joomlashack is now easier than ever. We have implemented a new system to give you total control over your purchases, invoices and downloads.