The Joomlashack Blog
How to Create Tabs Using Joomla and Bootstrap
- Written by Fiona Coulter Fiona Coulter
- Published: 06 October 2016 06 October 2016
A good way to do this is using a tab set, that is, a clickable set of information panes.
This article shows how to do this using Joomla Bootstrap. The Bootstrap framework is a jQuery plugin which is distributed as part of the Joomla core.
The image below has an example of tabs in action:
6 Possible New Features in Joomla 3.7
- Written by Steve Burge Steve Burge
- Published: 28 September 2016 28 September 2016
Joomla developers are working hard on Joomla 3.7, and they are proposing a lot of exciting changes.
In this post, I'm going to give you a preview of 6 new features that may be added to Joomla 3.7.
We're not even at the Alpha phase of development for 3.7 yet, so nothing is set in stone. I'm sure the developers would love more feedback and testing on these great ideas. I've added a Github link next to each proposed improvement, so you know how to get involved.
What to Know About Updating to Joomla 3.6.2
- Written by Steve Burge Steve Burge
- Published: 04 August 2016 04 August 2016
Joomla 3.6.2 has just been released (soon after version 3.6.1) and we recommend that you update.
These releases squashed some bugs and also fixes some low and medium-level security issues.
One security issue was especially tricky to fix and was related to how Joomla updates. As a result, the Joomla team have recommended a slightly different approach when updating your sites to Joomla 3.6.2.
10 Improvements and New Features in Joomla 3.6
- Written by Steve Burge Steve Burge
- Published: 11 July 2016 11 July 2016
 Joomla 3.6 is now available and you can update your sites.
When Joomla 3.6 was originally announced, it was meant to be a transitional release.
The Joomla team originally planned for this update to be called 3.5.2, with only a few minor fixes.
However, several new features were added. So, following Joomla’s versioning policy, the correct version number became Joomla 3.6.
This isn't a blockbuster release, unlike Joomla 3.7 which may have several major new features. However, there are some nice changes. Here's an overview of 10 useful improvements that you'll find in Joomla 3.6.
How to Set Up the Flash Image Rotator
- Written by BettyHelrich BettyHelrich
- Published: 24 May 2010 24 May 2010
The Flash Image Rotator is one of the most popular tools around. It enables you to set a number of images to rotate, at a speed you specify, through a module position on your site. It is a fantastic way to display multiple images without having to use up a lot of space on your page.
The Image Rotator is an extension that gets published in module positions. Once you have installed it, all you need to do is upload the images you want displayed, customise your Rotator, and publish it in a module position. This guide will teach you how to customise and publish your Rotator, after you have uploaded the images you wish to display into a folder in your Media Manager.
Setting up the Image Rotator
1. Login to the backend of your Joomla site.
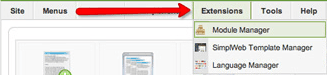
2. Go to the Module Manager under the 'Extensions' tab, as shown below.
3. You will have the Image Rotator available if you have already installed the Rotator. Find the Image Rotator, select it, and click 'Edit' in the top right corner, as in the screenshot below.

4. You will now see the familiar editing screen for modules. The editing screen for the Image Rotator is slightly different though, and it is extremely important to get all of the settings right. Important fields to note are: enabling the module, the module position, the menu assignment, and most things in the module parameters. The Image Rotator screen is pictured below, with the important fields highlighted by arrows.
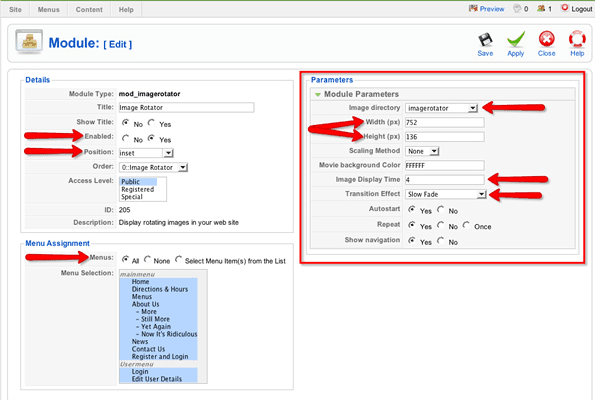
5. Set your Rotator module to be enabled, and place select the module position where you would like it to be displayed. We also recommend setting your title to be hidden.
6. Select the menu items under which you would like your Rotator to be displayed.
7. Now switch your focus to the Module Parameters box. First you will see a field for the image directory. This field determines the directory within your Media Manager from which the images will be displayed. The Image Rotator will cycle through all of the photos in the selected directory, so make sure you set this directory to be the one in which you will store your Image Rotator images.
8. Next you will see a field for height and a field for width. These fields determine the dimensions of the Image Rotator, and so they determine what dimensions the images you display should be. Putting a 900x400 pixel image into a rotator set to display at 700x200 pixels will break the rotator display. Make sure you resize your images to match the dimensions you specify in this field.
Another thing to be careful of is breaking the module position into which you place your rotator. If you set the rotator to display at 1000x800 pixels, you will break most modules because the dimensions will be greater than the dimensions of the module positions themselves. The rotator dimensions are the trickiest thing to get right, and it will likely take some trial and error to set these fields up properly.
9. The Image Display Time field determines for how long an image displays before rotating to the next image in the directory, and the Transition Effect determines the style used when it rotates. Set these fields to your preference.
10. Finally, you will see options for how your rotator triggers, whether it repeats its cycle, and whether shows navigation. We recommend leaving these to their default settings. When you are finished with the Module Parameters, click 'Save'
11. Your Image Rotator will now be up and running, but until you upload images to the directory from which it is pulling them, it will not display anything. The final step is to upload all of the images that you want your rotator to cycle through. Put them all into the directory you selected in the Module Parameters, and your Image Rotator will now be rotating through all of these images!
Resetting the Password for Any User in your Joomla site
- Written by Forest Linden Forest Linden
- Published: 15 March 2010 15 March 2010
For one reason or another, you may come upon the situation where you’ve lost your ability to login to Joomla with your super admin login information.
If this happens to you, here’s how you can reset the password:
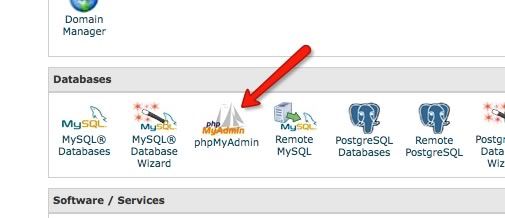
1) Login to the control panel of your web host account and open phpMyAdmin:
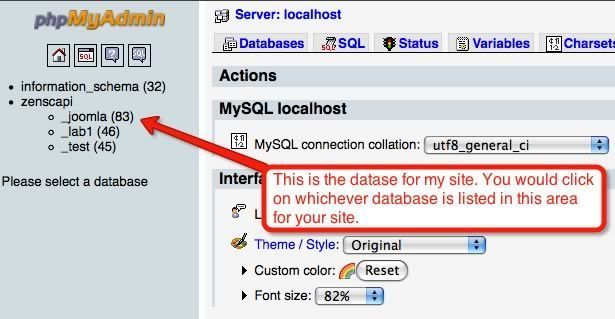
2) Open up the database for your website:
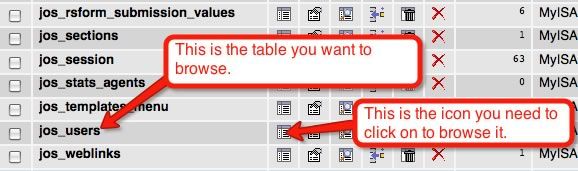
3) Find the table that ends in “_users.” It will most likely start with “jos,” but it could start with some other letters.
When you find it click on the Browse icon just to the right of the table name:
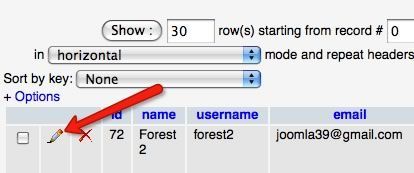
4) Find the user whose password you want to change in the list on the next page and click on the pencil icon:
5) On the next page, in the password row, select MD5 as the password type and then enter in your new desired password in the password field:
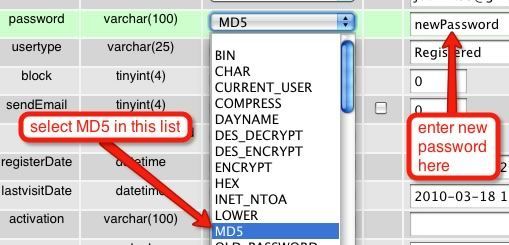
...and then click on Go at the bottom to save this change.
6) Go back to the Joomla administration login page and login with your username and the password that you entered in the last step, and you should be able to login now.
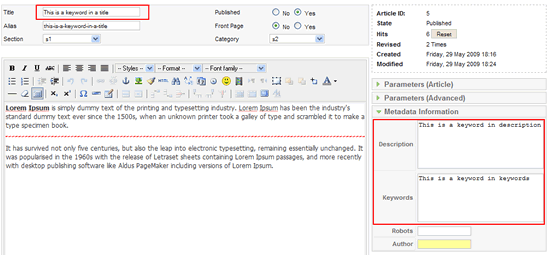
Changing Joomla's Date Format to American Format
- Written by Forest Linden Forest Linden
- Published: 18 February 2010 18 February 2010
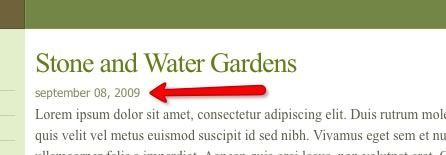
For one reason or another, American's preferred date format (e.g., February 25, 2010) is not an option within Joomla.
I know there's many people who use Joomla who are not in the U.S., but for those of you who are, if you'd like to change the date format in Joomla to the American format, this one's for you.
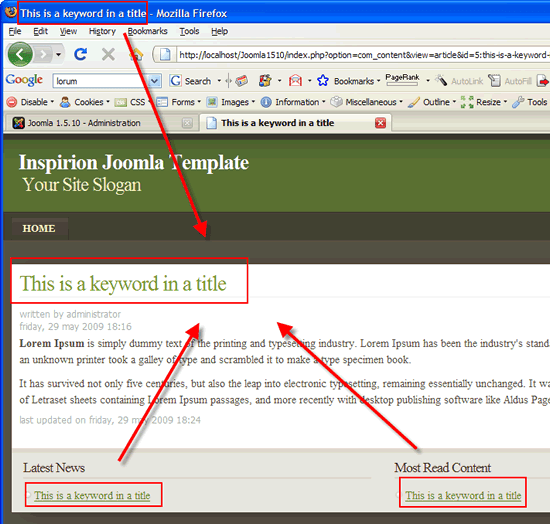
You can see the date format appear in a number of different places, but one common place you'll see it is in an article's date created information:
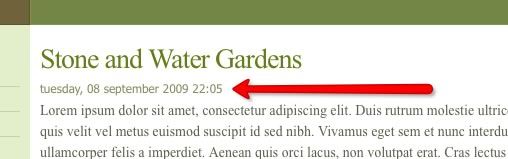
The date format you see in the above image is Joomla's default date format, which is the international date format.
I'll show you two ways you can change this date format: 1) By editing one of Joomla's core files, and 2) installing a US language pack.
Here's how to change the international date format to Month Day, Year (while also removing the time stamp) by editing one of Joomla's core files.
1) Using your ftp software, such as Filezilla, navigate to the en-GB.ini file, which is in this location: your root directory/languages/en-GB/en-GB.ini
2) Open the en-GB.ini file with your plain text editor and look for this line of code towards the top of the file:
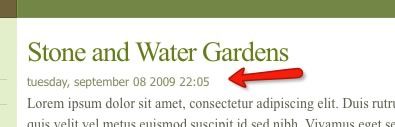
DATE_FORMAT_LC2=%A, %d %B %Y %H:%M
3) That's Linux date format code, and you'll need to change it to this:
DATE_FORMAT_LC2=%B %d, %Y
4) Once you make that change, save the en-GB.ini file and upload it back to the en-GB directory.
5) Go back to the front of your site and refresh the page. You should see this date format now:
Now, here's an important note to keep in mind: when you make this change, you're editing a core Joomla file. When you upgrade Joomla, there's a chance that there will be a new language directory, a new en-GB directory, or a new en-GB.ini file.
If that's the case, when you upgrade, your date change will be lost, since the en-GB.ini file that you edited will be overwritten by the new one in the Joomla upgrade package.
If you're fine with potentially needing to make this simple change each time you upgrade, then you're fine.
If you want to avoid that, there's another way to make this change: install the American Language pack by Dave Morgan.
Here's how:
1) Go to this page and download the language pack by clicking on the download link:
2) Install it in Joomla by going to Extensions>Install Uninstall.
Click on Browse, find the language pack file you downloaded, and double click on it when you find it.
Then click on Upload and Install on the Extension Manager page.
3) After it's been successfully installed, go to Extensions>Language Manager.
4) Check the radio button next to English(United States) and then click on the Defualt icon in the upper right of the page to make this language pack your default language pack.
5) Then, go to the front of your site and refresh the page, or navigate to a page that has a date showing and you should see a date format like this:
If you want to edit how that date format is appearing, such as taking the time stamp off, go to language/en-US and open the en-US.ini file. Change the date format for LC2 in a similar way that I described above for editing the en-GB.ini file.
For example, if you wanted to remove the time stamp, you would delete the %H:%M on the line of code for the DATE_FORMAT_LC2 within the en-US.ini file. Currently, that line of code is on line 11 of that file.
When you update Joomla, your date format changes will remain in tact as long as the core Joomla team doesn't create a new language directory named en-US as a new option.
How to put modules in Joomla articles
- Written by Forest Linden Forest Linden
- Published: 16 February 2010 16 February 2010
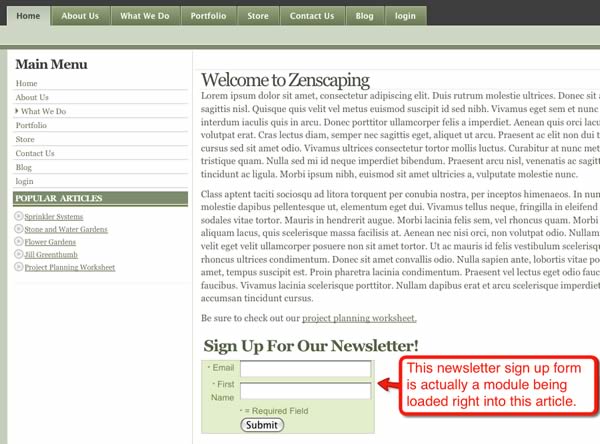
One of the handiest tools you can have in your Joomla toolbox is the ability to put the contents of a module right into the body of an article. (The article you're reading now is using this method. See the message in the box right above this sentence? That's actually content from a module being loaded right into this article.)
This can be a significant timesaver, since you can create a module one time in the Module Manager and then simply place it into any number of articles on your site.
That means you wouldn't have to set up that content individually in every article: you do the work once and then simply tell Joomla where you want that module to appear.
To show you how to do this, I'll show you an example of using this method to put a newsletter sign up form right in an article.
Here's a look at the end result:
Here's how to do this:
1) In Joomla go to Extensions>Module Manager. Then click on New to create a new module.
2) Select Custom HTML from the list of available modules. (You can put other types of modules in articles, but for this example I'll show you how to do this with a custom HTML module.)
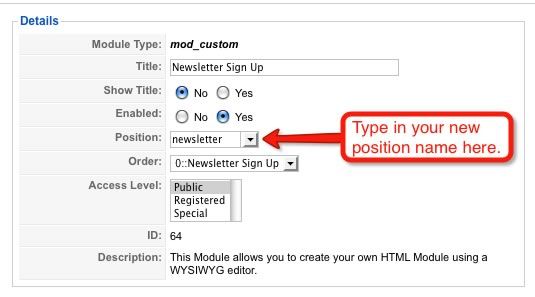
3) Name your module. In this example, I named the module "Newsletter sign up."
4) Set show title to "No."
5) For the module Position (and here's the key of this trick), put your cursor in the field next to "Position" and type in a new position name. In this example, I've called the new position "newsletter."
6) For the menu assignment, you can leave it set to All.
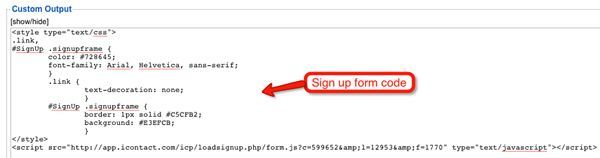
7) In the Custom Output area, enter in whatever content you want to have in this module. In this example, I've got some code entered that's creating the iContact newsletter sign up form:
8) When you're done, save the module.
9) Go into the Article Manager (Components>Article Manager) and open up an article where you'd like to put this module.
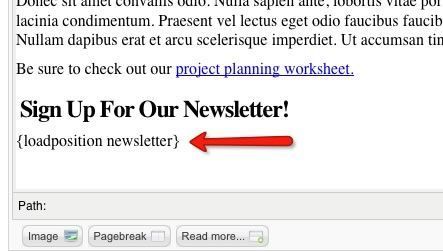
10) Wherever you want the module to be, type in this syntax (which is sometimes referred to as the "loadposition syntax") :
![]()
Replace "newmoduleposition" with the name of the new module position you created when you typed in the new position name in the custom HTML module.
For my example, this is how my article with the newsletter module in it looks when opened up in Joomla:
11) Save the article and check how it looks on the front of your site. That's it!
Now, whatever article on your site that you want to have this module appear in, all you have to do is enter in the loadposition syntax and it will appear.
How to Create a Custom Module Graphic
- Written by TJ Baker TJ Baker
- Published: 16 September 2009 16 September 2009
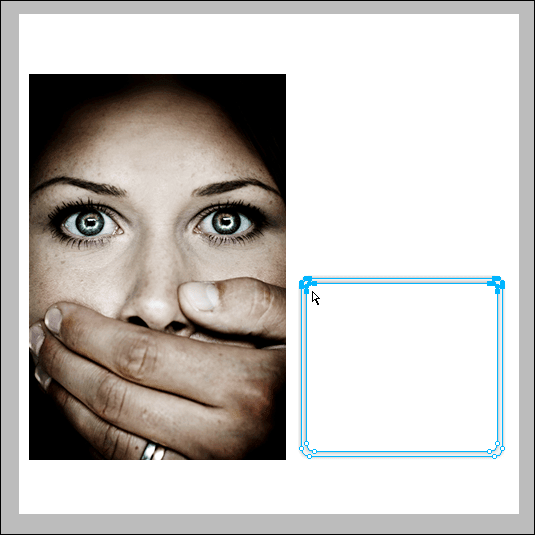
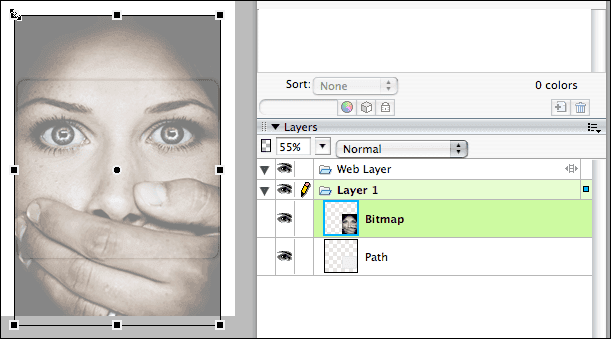
This tutorial will show you how to make custom image based modules in Fireworks using masking techniques aimed at the Luhs template design. Navigate to your downloaded package to the Graphic Source Files folder and open custom_module_graphic.png in Fireworks.
If you would like to see a video of this tutorial as well you can download the QuickTime movie here.

Small 640x480 (1.5 mb)
Large H.264 1080 (13.5 mb)
You will see a screen similar to this one.
(click for larger)

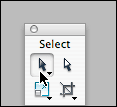
Choose the SubSelect tool.

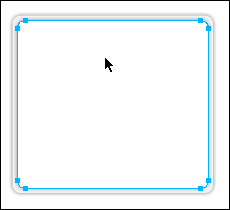
Draw a box over the shape just large enough to select the corner nodes as shown below.
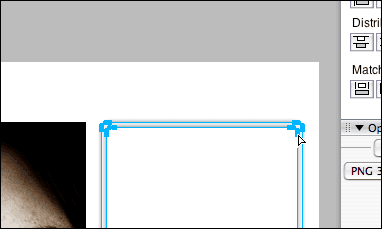
The corner nodes are sub-selected.

Hold down Shift to keep the mouse straight or use the arrow keys to resize the shape vertically.
The shape is resized.
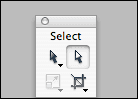
Choose the select tool.
and select the top shape.
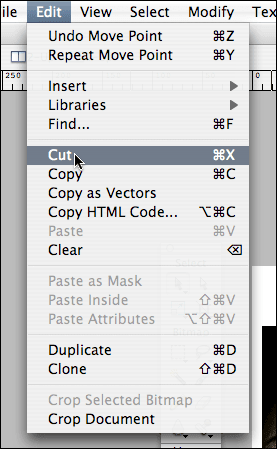
Choose Edit > Cut.
The shape is loaded onto the clipboard.
Select the image and resize it. (Cmd+T)
You can temporarily lower the opacity in the layers palette to see the underlying shape.
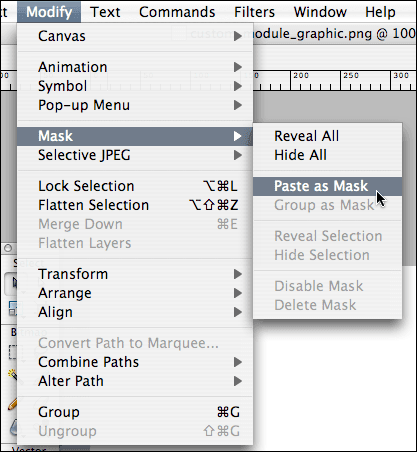
Once resized, choose Modify > Mask > Paste as Mask.
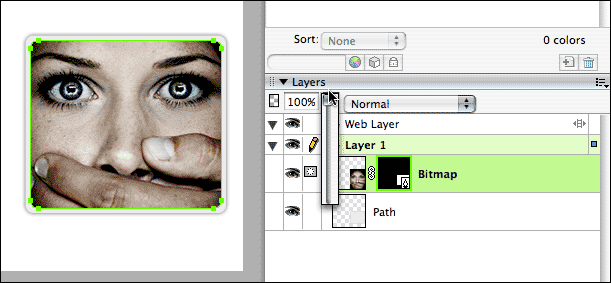
You can return the opacity back up.
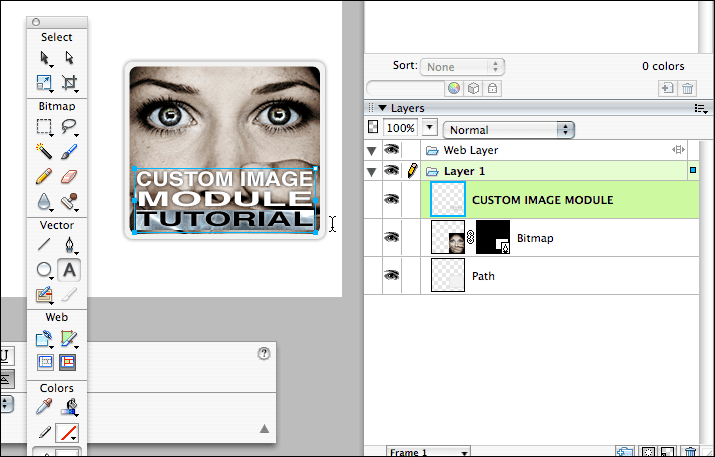
Use the text tool to add some graphic text to the image.
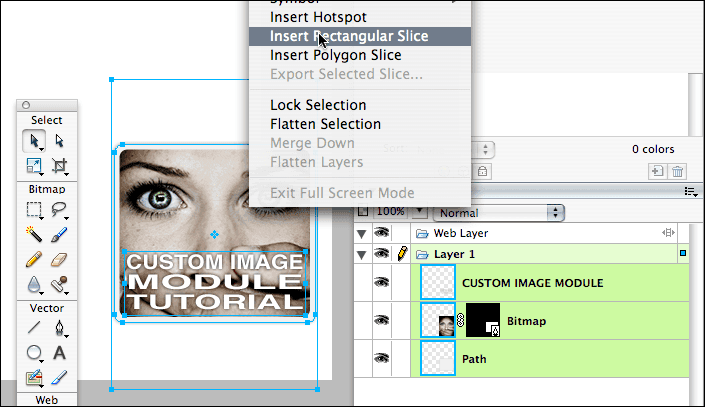
Select all by choosing (Cmd+A) , then right click the graphic and choose "Insert Rectangular Slice"
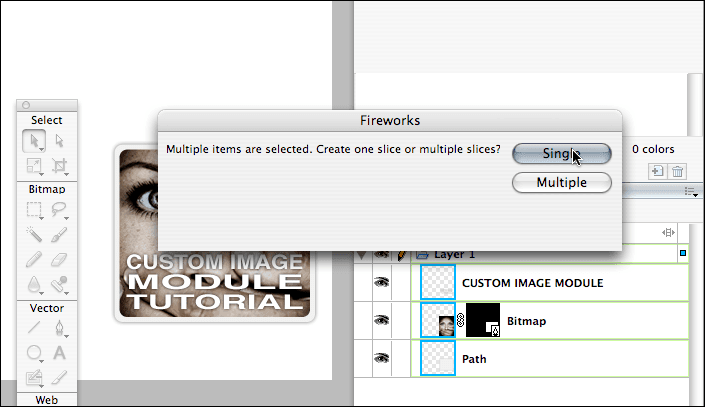
Whwn the popup appears asking you to choose Single or Multiple slices, choose "Single".
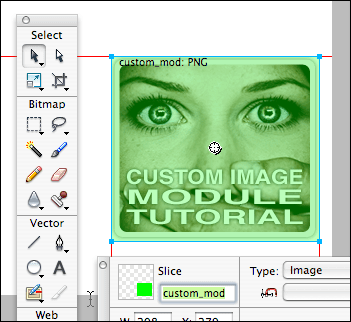
Name the slice in the properties palette to "custom_mod"
*If not shown choose Window > Properties to show the palette.
The last step is to export the image to a place on your local computer by choosing File > Export.
Choose "Images Only" and make sure the name of the file is "custom_mod.png"
To convert to a module just log in to your Joomla admin console and choose New.
Paste the code below into the editor ( in html edit mode) with these settings and save.
Show Title = No
Published = Yes
<div align="center"><img style="margin: 0px;" width="194" height="173" src="https://yourdomain.com/path/to/images/stories/custom_mod.png" alt="Alt Description" title="My Description" /></div>
Important. Modules in the Lush Template right hand position must be no larger than 194px wide!
10 Steps to Mastering Joomla
- Written by Barrie North Barrie North
- Published: 19 August 2009 19 August 2009
So you want a website, and you have heard some of the buzz about open source.
Joomla, Drupal and Wordpress have all been mentioned, but you are lost and confused.
No problem, this guide is an easy 10 step process to getting started with building a website with Joomla and some insider tricks and tips to make sure you are making best use of it.
We are going to look at the following things:
- Why do you need a website, and why use Joomla?
- What actually is Joomla?
- How do I install Joomla?
- How should I set up my site?
- Picking a Template
- Organizing Content
- Creating Navigation
- How can I add features to my site?
- How can I make Joomla better for SEO?
- How do I keep my site updated, and what lies ahead (Joomla 1.6)
You think you need a website... but why?

Unless you have clear goals, your website will not have any focus, and not contribute to your organization's goals.
- A restaurant might want to increase onsite foot traffic
- A non-profit might want to increase donations
- A consultant might want to increase sales leads
- A school might want to communicate better with parents
But unless you identify your goals, you are building your site blindfolded!
But what shall I use?
Joomla, Drupal or Wordpress?

Joking aside, Joomla is an excellent solution that lies in the middle of Wordpress's ease of use and the flexibility of Drupal.
Resources
- How to Choose Between Joomla, Drupal and Wordpress (compassdesigns.net)
- Comparing Wordpress, Joomla, and Drupal (CMS Report)
- Wordpress, Joomla or Drupal - Which CMS should you choose? (goodwebpractices.com)
Joomla is an open source content management system.
So what does that mean?
- Open Source means that anyone can contribute to the code, improve it, or distribute it. This means the platform is a living project being created and improved by a community of developers all over the world.
- A content management system uses a database to place content into designated places on the web page. Its dynamic and in real time.
Let's look at a forum as an example
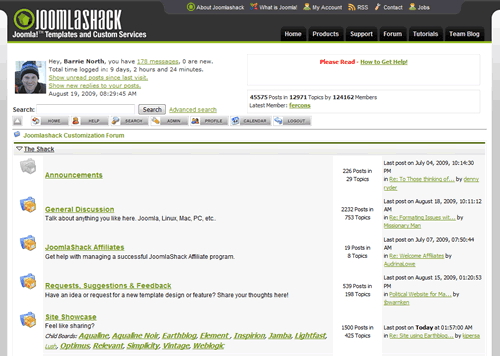
Joomla works the same way, the template creates "buckets" or "placeholders" for content, and then the CMS pours content into them as needed.
Here, the articles are being dynamically generated as well as the bottom lists of links.
Joomla is
- Easy
- Powerful
- Cheap (not free!)
Barrie North's 80/20 rule
- 80% of what you want to do will take 20% of the effort
- You don’t really know what your site visitors want
Resources
- Official Joomla Project Site
- What is Joomla? (joomla.org)
- What is Joomla? A Website Developer's Perspective (netshinesoftware.com)
- What is Joomla? (joomlashack.com)
To install Joomla, you need a web account with a MySQL database.
Or you can set up what is know as a localhost.
- Download Joomla files
- Either
- Upload file package to server then extract
- Extract then upload individual files
- Create a database
- Browse to site and run installation wizard
- Pray to all you hold holy that permissions are ok
- Delete installation folder
Resources
- How to Install Joomla 1.5 (compassdesigns.net)
- How do you install Joomla! 1.5? (Joomla.org Documentation)
- Fundamentals of Joomla! (Video Training): How Do I Install Joomla (informit.com)
One of the hardest parts to Joomla is setting up the site. To start, there are so many options it an be overwhelming.
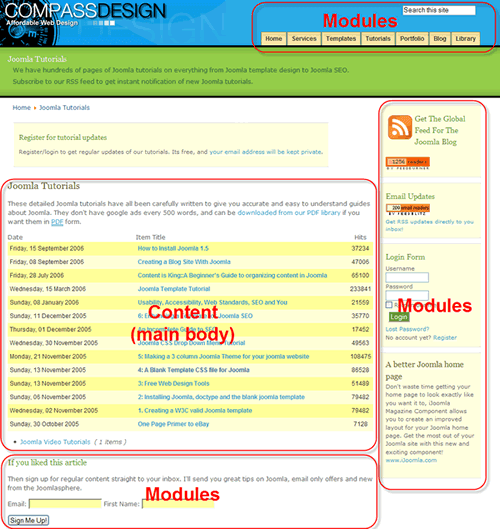
The three elements of a Joomla site are:
- Template (the look and feel)
- Content (the "beef")
- Modules (the gravy round the outside)
Joomla comes with three templates:
- Milky Way
- Beez
- Purity
To get started, just use one of these, then you can graduate to a 3rd party template of which there are thousands. You can get free ones or professional ones ranging from $25-$70
Of course www.joomlashack.com, but others of mention:
- www.joomlapraise.com
- www.rockettheme.com
- www.joomlart.com
- www.joomlajunkie.com
Commercial innovation has driven Joomla templates much quicker than some other content management systems.
The main "meat" content is made up of articles.
Content, or articles need containers, these are called Sections and Categories, and must be set up first.
- Section
- Category
- Article
- Category

Nothing can been seen on the webpage until it is linked to. Next you must set up navigation.
Joomla has thousands of 3rd party extensions, from forums and shopping carts to lacrosse league managers or women's menstrual cycle trackers.
Some are free, some are commercial. Some are GPL, some are proprietary (no, these are not the same thing!)
Lets add some extensions!
Resources
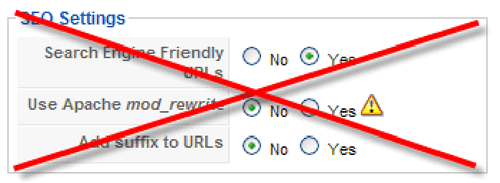
Joomla holds its own for SEO!
Joomla has something called SEF (Search Engine Friendly URL's) that turns complex url's into easy to understand ones.
Google doesn't care now anywhere, so SEO is not SEF.
- Keyword Use in Title Tag (4.9)
- Global Link Popularity of Site (4.5)
- Anchor Text of Inbound Link (4.4)
- Link Popularity within the Site's Internal Link Structure (4.1)
- Age of Site (4)
- Topical Relevance of Inbound Links to Site (3.9)
- Link Popularity of Site in Topical Community (3.9)
- Keyword Use in Body Text (3.9)
- Global Link Popularity of Linking Site (3.7)
- Topical Relationship of Linking Page (3.6)
Source:https://www.seomoz.org/article/search-ranking-factors
Concentrate on creating relevant titles for your articles
This will mean your pages have a strong foundation for SEO and will be accessible and usable.
Resources
- Joomla SEO Club (alledia.com)
- Top 10 Joomla SEO tips for Google (compassdesigns.net)
- Search Engine Optimization (Official Joomla SEO forum)
One of the challenges of open source is keeping up to date with the more frequent patches and security fixes. Someone on your team will have to know how to do these.
Joomla.org releases patches which are a bunch of files that need to be applied/ftp'ed onto your server.
Major releases come around every year or so with many new features. The current version is 1.5 and 1.6 will be released in the next 12 months.
There are some extensions and services that will keep you site updated for you.